Amiga® RKM Libraries: 3 Intuition Screens
Intuition screens are the basis of any display Intuition can make.
Screens determine the fundamental characteristics of the display such as
the resolution and palette and they set up the environment for multiple,
overlapping windows that makes it possible for each application to have
its own separate visual context.  This chapter shows how to use existing
screens and how to create new screens.

 Types of Screens            Overscan and the Display Clip
 Screen Data Structures      Intuition Screens and the Graphics Library
 Custom Screen Functions     Advanced Screen Programming
 Public Screen Functions     Other Screen Functions
 DrawInfo and the 3D Look    Function Reference
3 Intuition Screens / Types of Screens
Screens are important because they determine the basic resolution and
maximum number of colors in the display.  Once a screen is set up, these
attributes cannot be changed so any graphics work done on a given screen
is restricted to that screen's resolution and number of colors.  Hence,
the type of screen used is a basic design decision.

With Intuition screens, a video display can be created in any one of the
many Amiga display modes.  The basic parameters of the video display such
as resolution, total size, frame rate, genlock compatibility, support of
screen movement and number of colors are defined by these modes.  There
are currently four basic modes available on all Amiga models.  These basic
modes work with conventional monitors (15 kHz scan rate) and older
versions of the operating system.


            Table 3-1: Basic Amiga Display Modes


     Basic Amiga      Resolution  Maximum    Supports
    Display Modes        NTSC       PAL       Colors    HAM/EHB*
    -------------     ----------  -------    --------   -------
    Lores              320x200    320x256   32 of 4096    Yes
    Lores-Interlaced   320x400    320x512   32 of 4096    Yes
    Hires              640x200    640x256   16 of 4096    No
    Hires-Interlaced   640x400    640x512   16 of 4096    No


    * HAM and EHB modes provide for additional colors with some
      restrictions.


With Release 2 of the operating system, many other display modes are
available (these usually require a special monitor or ECS).  All these
display modes, including the specialized modes, are integrated through the
graphics library display database.  See the "Graphics Primitives" chapter
for a complete list of all Amiga display modes.

 Multiple Screens
 Public Screens and Custom Screens
 Screen Components
3 / Types of Screens / Multiple Screens
All Intuition display objects (such as windows and menus) take graphical
characteristics from the screen.  These objects are restricted to the same
resolution and maximum number of colors as the screen they operate in.
Other characteristics such as the palette, pens and fonts are inherited
from the screen (but may be changed on a case by case basis).

This is not too much of a restriction because the Amiga can maintain
multiple screens in memory at the same time.  In other words, one
application can use a high resolution screen (with 16 colors) while
another application uses a low resolution screen (with 32 colors) at the
same time.  Screens typically take up the entire viewing area so only one
is usually visible.  But screens can be moved up and down or rearranged
allowing the user (or application) to move between screens easily.
3 / Types of Screens / Public Screens and Custom Screens
An application may choose to use an existing screen or to create its own
screen.  For instance, the normal Amiga startup process opens the
Workbench screen (Workbench is the Amiga's default user interface).  Any
application is free to use the Workbench screen instead of opening a new
one.  Screens that can be shared this way are called public screens.

Public screens are a new feature of Release 2 (V36).  In older versions of
the OS, only the Workbench screen could be shared.  Now any screen may be
set up as a public screen so that other applications may use it.

The use of an existing public screen, like the Workbench screen, requires
little effort by the application and does not use up any memory.  However,
using  Workbench or another existing public screen means some flexibility
is lost; the resolution, maximum number of colors and other attributes are
already set.  If the application cannot function under these limitations,
it may open its own custom screen.

Custom screens allow for complete control of the display space so an
application can get exactly the kind of display it wants.  However, since
creating a new, custom screen uses up memory, they should only be used
when there are no suitable public screens available.

Owners of a custom screen can keep their screen private, or they may allow
other applications to share their screen by registering the screen with
the operating system as a public screen.  See the section on
"Public Screen Functions" later in this chapter for more about public
screens and Workbench.
3 / Types of Screens / Screen Components
Screens have very little visual impact, they simply provide a resolution
specific area to place other objects such as windows and menus. Screens
have no borders. Only the title bar marks the screen limits (specifying
the left and top edges, and the width of the screen), and the title bar
may be hidden, or obscured by graphics or windows.
The title bar also serves as the menu bar when the user presses the menu
button on the mouse. The menu bar area is shared by all applications
operating within the screen.
Within the title bar, there are two gadgets: a screen drag gadget and a
depth-arrangement gadget. The screen drag gadget allows the screen to be
moved up and down. The depth-arrangement gadget allows the screen to be
placed in front or behind all other screens.
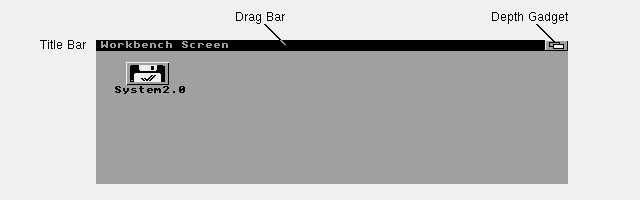
Figure 3-1: An Intuition Screen (Workbench)
Screens are always rectangular, and the areas at the sides and bottom of
the display that are not within the screen's limits are filled with the
background color. The area above all visible screens is filled with the
background color of the highest screen. These areas surrounding the
screen (normally unused) are known as the overscan area. The Amiga
display system allows the overscan area to be used for graphics under
special circumstances (see the section on "Overscan and the Display Clip"
later in this chapter).
3 Intuition Screens / Screen Data Structures
The Amiga uses color registers and bitplane organization as its internal
representation of display data.  Screens require a color table and display
raster memory for each bitplane.  This is the memory where imagery is
rendered and later translated by the hardware into the actual video
display.  This information is contained in data structures from the
Amiga's graphics library.

A ViewPort is the main data structure used by the graphics library to
represent a screen.  Pointers to each of the screen's bitplanes are stored
in the graphics library BitMap structure.  Color table information is
stored in a graphics structure called a ColorMap.  And the screen's
drawing and font information is stored in the RastPort structure.

The graphics RastPort structure is a general-purpose handle that the
graphics library uses for drawing operations.  Many Intuition drawing
functions also take a RastPort address as a parameter.  This makes sense
since the RastPort structure contains drawing variables as well as a
pointer to the BitMap telling where to draw.  See the
"Graphics Primitives" chapter for more information on these structures and
how they are used.

 The Intuition Screen Data Structure    Other Screen Data Structures
3 / Screen Data Structures / The Intuition Screen Data Structure
The structures mentioned above are unified along with other information in
Intuition's Screen data structure defined in the include file
<intuition/screens.h>.  Notice that the Screen structure contains
instances of a ViewPort, RastPort and BitMap.


struct Screen
    {
    struct Screen *NextScreen;
    struct Window *FirstWindow;
    WORD LeftEdge, TopEdge, Width, Height;
    WORD MouseY, MouseX;
    UWORD Flags;
    UBYTE *Title, *DefaultTitle;
    BYTE BarHeight, BarVBorder, BarHBorder, MenuVBorder, MenuHBorder;
    BYTE WBorTop, WBorLeft, WBorRight, WBorBottom;
    struct TextAttr *Font;
    struct ViewPort ViewPort;
    struct RastPort RastPort;
    struct BitMap BitMap;
    struct Layer_Info LayerInfo;
    struct Gadget *FirstGadget;
    UBYTE DetailPen, BlockPen;
    UWORD SaveColor0;
    struct Layer *BarLayer;
    UBYTE *ExtData, *UserData;
    };


In general, applications don't need to access the fields in the Screen
structure directly; they use Intuition functions to manipulate the screen
instead.  Likewise, applications do not set up the Screen themselves; they
use one of the OpenScreen() calls.  Here is a description of some of the
more interesting members of the Screen structure (it is not meant to be a
complete description of all the fields).

LeftEdge, TopEdge
    The LeftEdge and TopEdge variables give the position of the screen
    relative to the upper left corner of the monitor's visible display
    (as set by the user in the Overscan preferences editor).  If it is
    positioned down or to the right, the values are positive.  If the
    screen is positioned up or to the left, the values are negative.  The
    values are in screen resolution pixels.  In systems prior to V36,
    LeftEdge positioning is ignored and negative TopEdge positions are
    illegal.

    The screen position may be set when the screen is opened or later by
    calling the MoveScreen() function. Note that the screen's actual
    display position may not exactly equal the coordinates given in the
    LeftEdge and TopEdge fields of the Screen structure.  This can cause
    a window which is opened in the visible part of the screen to be
    incorrectly positioned by a few pixels in each direction.  This
    complication is due to hardware constraints that limit the fineness
    of screen positioning.  For instance, high resolution screens can
    only be positioned in low resolution pixel coordinates, yet the
    values in the LeftEdge and TopEdge use high resolution pixel
    coordinates.  So when the screen is displayed, its position is
    rounded to a position available for the monitor.

MouseX, MouseY
    Position of the mouse with respect to the upper left corner of the
    screen.

ViewPort, RastPort, BitMap, LayerInfo
    Actual instances of the graphics library data structures associated
    with this screen (not pointers to structures).  For normal use of
    custom screens, these structures may be ignored.

BarLayer
    A pointer to the Layer structure for the screen's title bar.

WBorTop, WBorLeft, WBorRight, WBorBottom
    Window border values, see the "Intuition Windows" chapter for
    information on pre-calculating the size of window borders for windows
    that open in this screen.

Font
    The default screen font, this can be used to pre-calculate the size
    of the window borders for windows that open in this screen.

UserData
    Free for application use.

Other Screen structure members provide information on the title bar layer,
and attributes of menus and windows opened in the screen.  Of particular
interest are the values that allow precalculation of window border size.
These variables will be discussed in the chapter "Intuition Windows".
3 / Screen Data Structures / Other Screen Data Structures
In addition to the Screen structure, Intuition uses some other supporting
structures defined in the include file <intuition/screens.h> and in
<utility/tagitems.h>.  (See the Amiga ROM Kernel Reference Manual:
Includes and Autodocs for a complete listing.)


      Table 3-2: Data Structures Used with Intuition Screens


  Structure Name  Description                    Defined in Include File
  --------------  -----------                    -----------------------
  Screen          Main Intuition structure that   <intuition/screens.h>
                  defines a screen (see above)

  DrawInfo        Holds the screen's pen, font    <intuition/screens.h>
                  and aspect data for Intuition

  TagItem         General purpose parameter        <utility/tagitem.h>
                  structure used to set up
                  screens in V36

  NewScreen       Parameter structure used to     <intuition/screens.h>
                  create a screen in V34

  ExtNewScreen    An extension to the NewScreen   <intuition/screens.h>
                  structure used in V37 for
                  backward compatibility with
                  older systems


As previously mentioned, there is an Intuition Screen structure (and a
corresponding graphics ViewPort) for every screen in memory.  Under
Release 2, whenever a new screen is created, Intuition also creates an
auxiliary data structure called a DrawInfo.

The DrawInfo structure is similar to a RastPort in that it holds drawing
information.  But where a RastPort is used at the lower graphics level,
the DrawInfo structure is used at the higher Intuition level.
Specifically, DrawInfo contains data needed to support the New Look of
Intuition in Release 2.  (For more information see the section below,
"DrawInfo and the 3D Look".)

Another new feature of Release 2 is tag items.  A TagItem is a general
purpose parameter structure used to pass arguments to many of the
functions in the Release 2 system software.  Each tag consists of a LONG
tag ID (ti_Tag) and a LONG tag data value (ti_Data).  With screens, tag
items are used to describe the attributes an application wants for a new,
custom screen.  Tag items replace the NewScreen structure, the set of
parameters used in older versions of the OS to set up a screen.

Applications may wish to use tag items to set up a new screen instead of
the NewScreen structure since tag items are often more convenient.  For
the sake of backwards compatibility, the ExtNewScreen structure is
available.  ExtNewScreen combines the NewScreen method used to define
screens in older versions of the OS with the tag item method used in
Release 2.  The examples listed in the next section show how these various
data structures can be used to set up a new screen.
3 Intuition Screens / Custom Screen Functions
All applications require a screen to work in.  This can be an existing,
public screen or a new, custom screen created by the application itself.
To create a new, custom screen to work with, you call OpenScreen() or one
of its variants.


                 Table 3-3: Custom Screen Functions
  _____________________________________________________________________
 |                                                                     |
 |     OpenScreenTags()  Create a new, custom screen from a tag list.  |
 |  OpenScreenTagList()  Use either one of these with Release 2 (V36)  |
 |                       or later versions of the OS.                  |
 |                                                                     |
 |         OpenScreen()  Create a new, custom screen from an           |
 |                       ExtNewScreen structure.  Use this if your     |
 |                       application must be compatible with 1.3 (V34) |
 |                       or earlier versions of the operating system.  |
 |                                                                     |
 |        CloseScreen()  Close a custom screen and free the memory     |
 |                       it used.                                      |
 |_____________________________________________________________________|


 Creating A New Custom Screen    Screen Attributes
3 / Custom Screen Functions / Creating A New Custom Screen
There are three functions you can use to open a custom screen:
OpenScreen(), OpenScreenTags() or OpenScreenTagList().  Prior to Release 2
(V36), OpenScreen() was used to create a new screen.  With V36 and later
versions of the operating system, this call is superseded by
OpenScreenTagList() and OpenScreenTags().

   struct Screen *OpenScreen( struct NewScreen *)
   struct Screen *OpenScreenTagList( struct NewScreen * , struct TagItem *)
   struct Screen *OpenScreenTags( struct NewScreen *, ULONG, ULONG, ... )

The old OpenScreen() call relied on a fixed size data structure
(NewScreen) which made little allowance for extensions and growth.  The
new calls are tag based, allowing for the addition of new features without
modification of existing structures and applications.  The
"Screen Attributes" section below contains a complete list of all the tag
options available for setting up an Intuition screen.  For a general
description of tag items, see the "Utility Library" chapter.

 A Custom Screen Example
 Creating A Custom Screen that Works With Older Systems
 Return Values from OpenScreenTagList()
 Closing the Screen
3 / / Creating A New Custom Screen / A Custom Screen Example
There are so many tag options available with screens it can be a bit
overwhelming.  Before discussing more details, it may be helpful to look
at a simple example.  The code below opens a new, custom screen using the
OpenScreenTags() call.  The example uses just two tag items (SA_Depth and
SA_Pens) which provide the minimum attributes needed to make a screen that
uses the new 3D look of Intuition available in Release 2.  (See the
section on "DrawInfo and the 3D Look" below for more information.)

     newlookscreen.c

The example above runs only under Release 2 (V36) and later versions of
the OS.  To make a custom screen that works under both Release 2 and
earlier versions of the operating system, use the original OpenScreen()
function.

The NewScreen structure used with OpenScreen() has been extended with a
tag list in V36 to form an ExtNewScreen.  This is done by setting the
NS_EXTENDED bit in the Type field of the NewScreen structure and adding a
pointer to an array of tags to the end of the structure.  The NS_EXTENDED
bit is ignored in older versions of the operating system, so the tags can
be transparently added to existing applications and the features will
appear when executed in a system running V36 or greater.  See the
OpenScreen() Autodocs and the include file <intuition/screens.h> for more
information on NS_EXTENDED and the ExtNewScreen structure.
3 / / / Creating A Custom Screen that Works With Older Systems
Here's an example of how to use the old OpenScreen() call with an
ExtNewScreen structure to make a new, custom screen under any version of
the Amiga operating system.  If the version is V36 or later, additional
Release 2 features specified via tags, in this case the new 3D look of
Intuition, will be incorporated in the window.

     screen34to37.c

As you can see from the examples above, there are many ways to create a
new, custom screen.  Further references to "OpenScreenTagList()" in this
manual are referring to any one of the three calls: OpenScreenTagList(),
OpenScreenTags(), or OpenScreen() used with tags in an ExtNewScreen as
shown above.
3 / / Creating Custom Screen / Return Values from OpenScreenTagList()
OpenScreenTagList() and its variants return a pointer to a Screen
structure on the successful creation of a new screen and NULL on failure.
With V36, the call now supports extended error codes on failure.  The
error returns provide information on the type of failure, giving the
application a greater chance of recovery.  To get the extended error code,
you need to use the SA_ErrorCode tag; the code itself will be placed into
the LONG pointed to by the TagItem.ti_Data field.  Here are the codes:

OSERR_NOMONITOR
    The monitor needed to display the requested mode is not available. An
    example of this error would be opening a Productivity mode screen on
    a system without a VGA or multisync monitor.

OSERR_NOCHIPS
    Newer custom chips are required for this screen mode.  For instance,
    the ECS Denise is required for the productivity modes.

OSERR_NOMEM
    Could not allocate enough memory.

OSERR_NOCHIPMEM
    Could not allocate enough Chip memory.

OSERR_PUBNOTUNIQUE
    Could not create public screen--name already used.  The system
    requires that public screen names be unique.

OSERR_UNKNOWNMODE
    Display mode requested was not recognized.  The system does not
    understand the value specified with the SA_DisplayID tag.
3 / / Creating A New Custom Screen / Closing the Screen
When an application has finished using a screen, the memory that the
screen occupied should be returned to the system by calling CloseScreen().
Normally, an application should close only those screens that it created.
Under V34 and earlier versions of the OS, CloseScreen() returns no values.
Under Release 2, CloseScreen() returns a boolean value, TRUE for success
and FALSE for failure.  CloseScreen() can fail if the screen is public and
another task is still using the screen.
3 / Custom Screen Functions / Screen Attributes
The sections above discuss only the basic functions and screen types that
Intuition programmers need to understand to create a custom screen.
Intuition supports an astonishing number of additional display features
and options.  In this section and the sections to follow, the finer points
of screen attributes and the functions that control them are presented.

Screen attributes are specified using the tag item scheme described in the
"Utility Library" chapter.  Therefore, the screen attributes are listed
here by tag values.  (In V34, the NewScreen structure was used to set
screen attributes so many of the tag options listed here have a
corresponding flag in NewScreen.)  In general, specifying a tag overrides
the corresponding flag or field in the NewScreen structure if you supply
one.

SA_ErrorCode
    Extended error code.  Data is a pointer to a long which will contain
    the error code on return if OpenScreenTagList() returns NULL. The
    error codes are described above.

SA_Left, SA_Top
    Initial screen position (left edge and top edge).  Data is a long,
    signed value.  Offsets are relative to the text overscan rectangle.

    If SA_Left is not specified and a NewScreen structure is not passed
    in the OpenScreenTags/TagList() call and SA_Width is not specified
    or is specified as STDSCREENWIDTH, then the left edge of the screen
    will default to the left edge of the actual display clip of the
    screen.  If the other conditions are met but some explicit SA_Width
    is specified, then the left edge defaults to zero (text overscan
    rectangle left edge).  Likewise, the top edge may, independent of the
    left edge value, default to zero or to the top edge of the actual
    display clip.  If SA_Top is not specified and a NewScreen structure
    is not passed in the OpenScreenTags/TagList() call and SA_Height is
    not specified or specified as STDSCREENHEIGHT, then the top edge of
    the screen will default to the top edge of the actual display clip of
    the screen.  If the other conditions are met but some explicit
    SA_Height is specified, then the top edge defaults to zero (text
    overscan rectangle top edge).  Prior to V36, left edge positioning is
    ignored and negative top edge positions are illegal.

    When opening a full sized overscan screen, SA_Left should be set to
    the MinX value of the display clip Rectangle used for the screen and
    SA_Top should be set to the MinY value of the display clip.  This may
    be taken from the defaults, as explained above, or explicitly set by
    the application.  See the section below "Overscan and the Display clip"
    and the OpenScreen() Autodoc for more details.

    If your screen is larger than your display clip, you may wish to set
    the SA_Left and SA_Top to values less than your display clip MinX and
    MinY in order to center a large screen on a smaller display.  For an
    example of how to open a centered overscan screen, see
    module/screen.c in the IFF Appendix of the Amiga ROM Kernel Reference
    Manual: Devices.

SA_Width, SA_Height
    Screen dimensions.  Data is a long, unsigned value.  These may be
    larger, smaller or the same as the dimensions of the display clip
    Rectangle.  The use of STDSCREENWIDTH and STDSCREENHEIGHT will make
    the screen size equal to the display clip size.

    To calculate the width of the display clip Rectangle, subtract the
    MinX value from the MaxX value plus one.  Similarly, the height of
    the display clip may be calculated by subtracting the MinY value from
    the MaxY value plus one.

SA_Depth
    Screen bitmap depth.  Data is a long, unsigned value.  The depth of
    the screen determines the number of available colors.  See the
    "Graphics Primitives" for more information on hardware limitations of
    the display.  Do not set the depth to a value greater than that
    supported by the specific display mode.  This information is
    available to the application through the graphics library display
    database.  The default is one bitplane.

SA_DisplayID
    Extended display mode key for the screen.  Data is a long, unsigned
    value.  By using Release 2 DisplayIDs and the display database,
    applications can open a screen in any display mode available on a
    user's system, including PAL and NTSC modes.  See the discussion of
    the display database in the "Graphics Primitives" chapter and the
    include file <graphics/displayinfo.h> for more information.

SA_Pens
    Pen specification for the screen.  Data is a pointer to a UWORD array
    terminated with ~0, as found in the DrawInfo structure.  Specifying
    the SA_Pens tag informs the system that the application is prepared
    to handle a screen rendered with the new 3D look of Intuition.  See
    the section below on "DrawInfo and the 3D Look". Omitting this tag
    produces a screen with a flat look, but whose color usage is more
    backwards compatible.

SA_DetailPen
    Detail pen for the screen.  Data is a long, unsigned value.  Used for
    rendering details in the screen title bar and menus.  Use SA_Pens
    beginning with V36 for more control of pen specification.  If SA_Pens
    is not specified, the screen will not get the new 3D look of
    Intuition available in Release 2.  Instead this value will be used as
    the detail pen.

SA_BlockPen
    Block pen for the screen.  Data is a long, unsigned value.  Used for
    rendering block fills in the screen title bar and menus.  Use SA_Pens
    beginning with V36 for more control of pen specification.  If SA_Pens
    is not specified, the screen will not get the new 3D look and this
    value will be used as the block pen.

SA_Title
    Default screen title.  Data is a pointer to a character string.  This
    is the title displayed when the active window has no screen title or
    when no window is active on the screen.

SA_Colors
    Specifies initial screen palette colors.  Data is a pointer to an
    array of ColorSpec structures, terminated by a ColorSpec structure
    with ColorIndex=-1. Screen colors may be changed after the screen is
    opened with the graphics library functions SetRGB4() and LoadRGB4().
    ColorSpec colors are right-justified, four bits per gun.

SA_FullPalette
    Initialize color table to entire preferences palette (32 colors
    beginning with V36), rather than the subset from V34 and earlier,
    namely pens 0-3, 17-19, with remaining palette as returned by
    GetColorMap().  Data is a boolean value (use TRUE to set the flag).
    Defaults to FALSE.

SA_Font
    Data is a pointer to a TextAttr structure (defined in
    <graphics/text.h> ) which specifies the font, size and style to use
    for the screen.  Equivalent to NewScreen.Font.

SA_SysFont
    Alternative to SA_Font.  Selects one of the preferences system fonts.
    Data is a long, unsigned value, with the following values defined:

        0  Open screen with the user's preferred fixed width font
           (the default).
        1  Open screen with the user's preferred font, which may be
           proportional.

    The Workbench screen is opened with {SA_SysFont , 1}.  Table 3-4
    summarizes how the font selected at OpenScreen() time effects
    subsequent text operations in screens and windows.


                Table 3-4: Intuition Font Selection Chart

       What you tell
       OpenScreen()            Screen font            Window.RPort font
       -------------           -----------            -----------------
    A. NewScreen.Font=myfont  myfont                  myfont
    B. NewScreen.Font=NULL    GfxBase->DefaultFont    GfxBase->DefaultFont
    C. {SA_Font, myfont}      myfont                  myfont
    D. {SA_SysFont, 0}        GfxBase->DefaultFont    GfxBase->DefaultFont
    E. {SA_SysFont, 1}        Font Prefs Screen text  GfxBase->DefaultFont

       Notes:
     * A and B are the options that existed in V34 and earlier OS versions.
     * C and D are tags in Release 2 equivalent to A and B respectively.
     * E is a new option for V36.  The Workbench screen uses this option.
     * For `myfont', any font may be used including a proportional one.
       This is true under all releases of the OS.
     * GfxBase->DefaultFont is always monospace.  (This is the "System
       Default Text" from Font Preferences.)
     * Font Prefs Screen text (the "Screen Text" choice from Font
       Preferences) can be monospace or proportional.


    The screen's font may not legally be changed after a screen is
    opened. The menu bar, window titles, menu items, and the contents of
    a string gadget all use the screen's font.  The font used for menu
    items can be overridden in the menu item's IntuiText structure.
    Under V36 and higher, the font used in a string gadget can be
    overridden through the StringExtend structure.  The font of the menu
    bar and window titles cannot be overridden.

    The Window.RPort font shown above is the initial font that Intuition
    sets in your window's RastPort.  It is legal to change that
    subsequently with SetFont().  IntuiText rendered into a window
    (either through PrintIText() or as a gadget's GadgetText) defaults to
    the window's RastPort font, but can be overridden using its ITextFont
    field.  Text rendered with the graphics library call Text() uses the
    window's RastPort font.

SA_Type
    Equivalent to the SCREENTYPE bits of the NewScreen.Type field.  Data
    is a long, unsigned value which may be set to either CUSTOMSCREEN or
    PUBLICSCREEN (WBENCHSCREEN is reserved for system use).  See the tags
    SA_BitMap, SA_Behind, SA_Quiet, SA_ShowTitle and SA_AutoScroll for
    the other attributes of the NewScreen.Type field.

SA_BitMap
    Use a custom bitmap for this screen.  Data is a pointer to a BitMap
    structure.  This tag is equivalent to NewScreen.CustomBitMap and
    implies the CUSTOMBITMAP flag of the NewScreen.Type field.  The
    application is responsible for allocating and freeing the screen's
    bitmap.

SA_Behind
    Open this screen behind all other screens in the system.  Data is a
    boolean value (TRUE to set flag).  This tag is equivalent to the
    SCREENBEHIND flag of the NewScreen.Type field.

SA_Quiet
    Disable Intuition rendering into screen.  Data is a boolean value
    (TRUE to set flag).  This tag is equivalent to the SCREENQUIET flag
    of the NewScreen.Type field.  The screen will have no visible title
    bar or gadgets, but dragging and depth arrangement still function.
    In order to completely prevent Intuition from rendering into the
    screen, menu operations must be disabled for each window in the
    screen using WFLG_RMBTRAP.

SA_ShowTitle
    Setting this flag places the screen's title bar in front of any
    backdrop windows that are opened on the screen.  Data is a boolean
    value (TRUE to set flag).  This tag is equivalent to the SHOWTITLE
    flag of the NewScreen.Type field.  The title bar of the screen is
    always displayed behind any non-backdrop windows on that screen.
    This attribute can be changed after the screen is open with the
    ShowTitle() function.

SA_AutoScroll
    Setting this flag will enable autoscroll for this screen when it is
    the active screen.  (Currently, the screen may only be made active by
    activating a window in that screen either under user or application
    control.)  Data is a boolean value (TRUE to set flag).  This tag is
    equivalent to the AUTOSCROLL flag of the NewScreen.Type field.

    Autoscroll means that screens larger than the visible display will
    automatically scroll when the user moves the mouse to the edge of the
    screen.  Without this tag, the user moves the screen either by using
    the screen drag bar, or by pressing the mouse select button anywhere
    within the screen while holding down the left Amiga key and moving
    the mouse.

SA_PubName
    Presence of this tag means that the screen is to be a public screen.
    Data is a pointer to a string.  The string is the name of the public
    screen which is used by other applications to find the screen.  This
    tag is order dependent, specify before SA_PubSig and SA_PubTask.

SA_PubSig, SA_PubTask
    Task ID (returned by FindTask()) and signal for notification that the
    last window has closed on a public screen. Data for SA_PubSig is a
    long, unsigned value. Data for SA_PubTask is a pointer to a Task
    structure. These two tags are order dependent, and must be specified
    after the tag SA_PubName.

SA_Overscan
    Set to one of the OSCAN_ specifiers to use a system standard overscan
    display clip and screen dimensions (unless otherwise specified).
    Data is a long, unsigned value.  Do not specify this tag and
    SA_DClip.  SA_Overscan is used to get one of the standard overscan
    dimensions, while SA_DClip is for custom dimensions.  If a display
    clip is not specified with either SA_Overscan or SA_DClip, the
    display clip defaults to OSCAN_TEXT.  See the section below on
    "Overscan and the Display Clip" for more information.

SA_DClip
    Custom display clip specification.  Data is a pointer to a Rectangle
    structure that defines the screen display clip region.
3 Intuition Screens / Public Screen Functions
Public screens are a new feature of Release 2 (V36).  A public screen
allows multiple applications to share a single screen thus saving memory.
If your application opens a public screen, then other applications will be
able to open their windows on your screen.  In older versions of the
operating system, only the Workbench screen could be shared so
applications had to live within its limitations or use up Chip memory
creating their own private, custom screens.

Now the system allows any screen to be set up as a public screen so there
may be many public screens in memory at once, not just Workbench.  This
permits the power user to set up different work environments that multiple
applications can share in a way that is memory efficient (each one with a
display mode appropriate to a particular job).

Workbench is a special case public screen because it is the initial
default public screen.  The default public screen is the screen
applications will get when they ask for a public screen but don't specify
a name.  Under normal conditions, Workbench is the default public screen
and is created by the system at startup time.  However, keep in mind that
the default public screen can be changed (it's not always guaranteed to be
Workbench).

    Screens for the Novice.
    -----------------------
    If you're not sure what kind of screen to use, then use the default
    public screen.  Under Release 2, you can open a window on the default
    public screen without doing any screen set-up work.  See the
    "Intuition Windows" chapter for more details.

Generally, it is much easier to use an existing, public screen than to set
up one of your own.  Here are the basic functions you use to work with an
existing public screen.


                Table 3-5: Public Screen Functions
  ______________________________________________________________________
 |                                                                      |
 |        LockPubScreen()  Find Workbench or any other public screen;   |
 |                         prevent it from closing while a window is    |
 |                         opened or its attributes copied.             |
 |                                                                      |
 |      UnlockPubScreen()  Release the lock allowing the screen to      |
 |                         later be closed.                             |
 |                                                                      |
 |  SetDefaultPubScreen()  Establishes a given public screen as the     |
 |                         default.                                     |
 |                                                                      |
 |  GetDefaultPubScreen()  Copies the name of the default screen to a   |
 |                         user supplied buffer for use by the screen   |
 |                         manager utility (the name is not needed by   |
 |                         normal applications, use LockPubScreen(NULL) |
 |                         instead).                                    |
 |                                                                      |
 |      PubScreenStatus()  Converts a screen to private or public       |
 |                         status.                                      |
 |                                                                      |
 |    SetPubScreenModes()  Controls the public screen global mode bits. |
 |______________________________________________________________________|


By using an existing public screen, an application is no longer
responsible for setting up the display, however, it also loses flexibility
and control.  It can no longer set the palette or depth, and it cannot
write directly into screen memory without cooperation from the owner of
the public screen.  (If these limitations are too confining, the
application can create a new screen instead.)

 Accessing a Public Screen by Name
 The Default Public Screen and Workbench
 Taking a New Custom Screen Public
 Searching the Public Screen List
3 / Public Screen Functions / Accessing a Public Screen by Name
The main calls for accessing an existing public screen are LockPubScreen()
and UnlockPubScreen().  To use these functions you need to know the name
of the public screen you want to access.  If you do not know the name of
the public screen or if you are not sure, you can lock the default public
screen with LockPubScreen(NULL).

    struct Screen *LockPubScreen( UBYTE * )
     VOID        UnlockPubScreen( UBYTE * , struct Screen *)

These calls enable the application to determine that a public screen
exists, and to ensure its continued existence while opening a window on
it.  This function also serves as an improvement over the old
GetScreenData() function from V34 by returning a pointer to the Screen
structure of the locked screen so that its attributes can be examined.

Be sure to unlock the public screen when done with it.  Note that once a
window is open on the screen the program does not need to hold the screen
lock, as the window acts as a lock on the screen.  The pointer to the
screen structure is valid as long as a lock on the screen is held by the
application, or the application has a window open on the screen.

Locks should not be held without reason.  Holding unnecessary locks on
screens may prevent the user from closing a public screen that has no
apparent activity.  Keep in mind that as long as you have a window open on
a public screen, the window acts as a lock preventing the screen from
closing.

Shown here is a simple example of how to find the Workbench public screen
using LockPubScreen() and UnlockPubScreen().

     pubscreenbeep.c
3 / Public Screen Functions / The Default Public Screen and Workbench
As mentioned earlier, Workbench is a special case public screen because it
is the initial default public screen.  There are other reasons Workbench
has a special status.  Normally, it's the first thing the user sees
because it is the default user interface on all Amiga computers.  Many
older applications written for V34 and earlier versions of the OS expect
to run in the Workbench screen.  Also, Workbench is currently the only
public screen supported by system Preferences and the only screen
Intuition can automatically open.

Because of its close ties with the operating system, there are some extra
functions available to manipulate the Workbench screen.  One function
which controls both Workbench and other public screens is
SetPubScreenModes().  This function controls the global public screen mode
bits, SHANGHAI and POPPUBSCREEN.  If the SHANGHAI mode bit is set, older
applications which expect to open on the Workbench screen will open
instead on the default public screen (which may or may not be the
Workbench screen).  The POPPUBSCREEN bit controls whether public screens
will be popped to the front when a window is opened.  These modes are
documented in the "Intuition Windows" chapter in the section on
"Windows and Screens".

Other functions which control the Workbench screen are listed in the table
below.


           Table 3-6: Workbench Public Screen Functions
  ______________________________________________________________________
 |                                                                      |
 |    WBenchToBack()  Move the Workbench screen behind all other        |
 |                    screens.                                          |
 |                                                                      |
 |   WBenchToFront()  Move the Workbench screen in front of all other   |
 |                    screens.                                          |
 |                                                                      |
 |   OpenWorkBench()  Open the Workbench screen.  If the screen is      |
 |                    already open, this call has no effect.  This call |
 |                    will re-awaken the Workbench application if it    |
 |                    was active when CloseWorkBench() was called.      |
 |                                                                      |
 |  CloseWorkBench()  Attempt to reclaim memory used for the Workbench  |
 |                    screen.  If successful, this call closes the      |
 |                    screen and puts the Workbench application to      |
 |                    sleep.  This call fails if any application has    |
 |                    windows open or locks on the Workbench screen.    |
 |______________________________________________________________________|


Programs can attempt to reclaim memory used by the Workbench screen by
calling CloseWorkBench().  Programs that have closed Workbench, should
call OpenWorkBench() as they exit or allow the user to re-open the screen
through a menu or gadget.

If Workbench is closed, any of the following events can re-open it:
calling OpenWorkBench(); opening a window on the Workbench (including
EasyRequests() such as the DOS "Insert Disk" requester); calling
LockPubScreen("Workbench");  calling LockPubScreen(NULL) when Workbench is
the default public screen.
3 / Public Screen Functions / Taking a New Custom Screen Public
Applications that open a new screen should consider taking the screen
public.  If the screen's characteristics are not very esoteric, making the
screen public is useful because it allows other applications to share the
working context.  This makes an application more powerful and more
attractive to the user because it allows the user to add supporting
applications and utilities from other vendors to make a customized and
integrated work environment.

To make your own custom screen into a public screen that other
applications may use, you give the screen a public name and then register
the screen with Intuition.  The screen must be declared as public in the
OpenScreenTagList() call by specifying a public name string with the
SA_PubName tag.  The application's task ID and a signal bit may also be
registered when the screen is opened with the SA_PubTask and SA_PubSig
tags.  If these tags are given, the system will signal your task when the
last window on the screen closes.

When a new public screen is opened, it starts out private so the
application can perform any desired initialization (for instance, opening
a backdrop window) before the screen is made public.  Use the
PubScreenStatus() function to make the screen public and available to
other applications (or to take the screen private again, later).  The
screen may not be taken private or closed until all windows on the screen
are closed and all locksn on the screen are released.  However, the screen
does not need to be made private before closing it.

CloseScreen() will fail if an attempt is made to close a public screen
that still has visitor windows or locks on it.  If the user selects close
screen, but the screen will not close due to visitor windows, a requester
should be displayed informing the user of the condition and instructing
them to close any windows before closing the screen.
3 / Public Screen Functions / Searching the Public Screen List
To access an existing public screen the application may take one of three
approaches.  To get a lock on the default public screen, either
LockPubScreen(NULL) or {WA_PubScreenName , NULL} may be used.

If the name of the screen is known, the application may use
LockPubScreen() to gain a lock on the screen as shown in the
example above (or use OpenWindowTagList() with the WA_PubScreenName tag as
described in the  "Intuition Windows" chapter).  Failure to lock the
screen or open the window probably indicates that the screen does not
exist.

A third approach is to search the public screen list for a screen that
meets the requirements of the application.  These requirements may be
related to the name or attributes of the screen.  Here are the functions
to use with the public screen list maintained by Intuition.


                Table 3-7: Public Screen List Functions
  _____________________________________________________________________
 |                                                                     |
 |    LockPubScreenList()  Lock the public screen list maintained by   |
 |                         Intuition so that it may be quickly copied. |
 |                                                                     |
 |  UnlockPubScreenList()  Release the lock on the public screen list. |
 |                                                                     |
 |        NextPubScreen()  Find the next screen in the public screen   |
 |                         list.                                       |
 |_____________________________________________________________________|


The main function used to access the public screen list is
LockPubScreenList().  This function, intended for use by the public screen
manager utility, locks the list to allow data from it to be quickly
copied.  The list is stored in an Exec List structure, with each node in
the list being a PubScreenNode structure.  See <intuition/screens> for
details.

Do not interpret the list while in a locked state, instead, copy any
values required to local variables and release the lock.  All required
data must be copied, including the name of the screen which is not part of
the structure.  Pointers that reference the list or structures attached to
the list are not valid after releasing the lock.  Once the lock is
released, the screen pointers in the list (psn_Screen) may be tested for
equality against other screen pointers, but referencing any part of the
screen structure from this pointer is strictly illegal.  After the lock is
released with UnlockPubScreenList(), the application may access the data
in the screen structure by obtaining a lock on the screen using
LockPubScreen() with the name of the screen.

The application should only require accessing three fields in the
PubScreenNode, these are ln_Name, psn_Screen and psn_Flags.  The name of
the public screen is maintained in the ln_Name field of the Node
(psn_Node) structure.  Access to other information on the screen may be
done by getting a lock on this name and reading the data from the Screen
structure.  The screen pointer (psn_Screen) may only be used for testing
against other screen pointers, never reference the screen structure from
this value.  Finally, the public screen flags are maintained in psn_Flags.
Currently, only PSNF_PRIVATE is defined for this field.  PSNF_PRIVATE
indicates that the screen is not currently public.

Remember that all information in the public screen list is transitory,
that is, it may change at any time.  Do not rely on the values in the
list.  The only way to ensure the existence or mode of a screen is to lock
it, either directly with LockPubScreen() or by opening a window on the
screen.  To update the copy of the list, lock it and copy the data again.
Don't forget to release the lock when finished.

As an alternative to dealing with the public screen list, NextPubScreen()
can be used.  This call takes the name of a public screen as its argument
and returns the name of the next screen in the public screen list.  This
helps an application move a window through the entire rotation of public
screens.  Repeated calls to NextPubScreen() could be used to get the names
of all public screens one at a time.  Keep in mind though that the list of
public screens is subject to sudden change; the task that owns a public
screen might close it after you obtain the name, but before you access the
screen.

Always use LockPubScreen() to access screen information after scanning the
public screen list.
3 Intuition Screens / DrawInfo and the 3D Look
In Release 2, whenever a new screen is created, Intuition also creates an
auxiliary data structure called a DrawInfo.  The DrawInfo structure
provides information Intuition uses to support the new 3D look of Release
2 and  specifies graphical information for applications that use the
screen.  The information includes such items as aspect ratio (resolution),
font, number of colors and drawing pens.


struct DrawInfo
{
    UWORD       dri_Version;    /* will be  DRI_VERSION                 */
    UWORD       dri_NumPens;    /* guaranteed to be >= numDrIPens       */
    UWORD       *dri_Pens;      /* pointer to pen array	                */

    struct TextFont     *dri_Font;  /* screen default font              */
    UWORD       dri_Depth;          /* (initial) depth of screen bitmap */

    struct {    /* from DisplayInfo database for initial display mode   */
	UWORD   X;
	UWORD   Y;
    }           dri_Resolution;

    ULONG       dri_Flags;              /* defined below                */
    ULONG       dri_Reserved[7];        /* avoid recompilation ;^)      */
};


Before an application uses fields in the DrawInfo structure, it should
check the version of the structure to ensure that all fields are
available.  If the field dri_Version is greater than or equal to the
constant DRI_VERSION that the application was compiled with, it can be
assured that all fields in DrawInfo that it knows about are being
supported by Intuition.

 The Pen Specification in DrawInfo
 The Font Specification in DrawInfo
 Cloning a Public Screen (Workbench)
3 / DrawInfo and the 3D Look / The Pen Specification in DrawInfo
The drawing pen specification in DrawInfo.dri_Pens allows applications to
use appropriate colors for graphic operations such as drawing text,
shading 3D objects and filling items selected by the user.

Intuition has two default sets of pens, one for multi-bitplane screens and
one for single bitplane screens.  In addition, there is a special
compatibility mode for screens that do not specify the SA_Pens tag.

New 3D Look
    The is the full 3D look as found by default on the Workbench screen
    in Release 2.  Objects are drawn so that light appears to come from
    the upper left of the screen with shadows cast to the lower right
    giving them a three-dimensional look.

Monochrome New Look
    It is impossible to produce the full 3D look in a single bitplane
    (two color) screen.  Intuition provides a fallback pen specification
    that is used in monochrome screens with no loss of information.

Compatible New Look
    Custom screens that do not provide the SA_Pens tag are assumed to
    have no knowledge of the pen array.  They are rendered in a special
    version of the monochrome new look, which uses the screen's DetailPen
    and BlockPen to get its colors.  This is provided for compatibility
    with V34 and older versions of the operating system.

It is very easy for an application to use the default pen specification.
Simply specify an empty pen specification (in C, {~0}), and Intuition will
fill in all of the values with defaults appropriate for the screen.  This
technique is demonstrated in the first two examples (newlookscreen.c and
screen34to37.c)listed earlier in this chapter.

For certain applications, a custom pen specification is required.  A
custom pen specification is set up when the screen is opened by using the
SA_Pens tag and a pointer to a pen array.  Currently, Intuition uses nine
pens to support the 3D look.  The application can specify all of these, or
only a few pens and Intuition will fill in the rest.  Intuition will only
fill in pens that are past the end of those specified by the application,
there is no facility for using default values for "leading" pens (those at
the beginning of the array) without using the defaults for the rest of the
pens.

Using the pen specification of an existing public screen is a bit more
involved.  First, the application must get a pointer to the screen
structure of the public screen using the LockPubScreen() call.  A copy of
the screen's DrawInfo structure may then be obtained by calling
GetScreenDrawInfo().  The DrawInfo structure contains a copy of the pen
specification for the screen that can be used in the OpenScreenTagList()
call with the SA_Pens tag.  The pen array is copied to the data structures
of the new screen (it is not kept as a pointer to the information passed),
so the application may immediately call FreeScreenDrawInfo() and
UnlockPubScreen() after the new screen is open.

     publicscreen.c

Beginning with V36, the pen specification for the Workbench screen happens
to match the Intuition default specification, however, this is not
required and may change in the future.  To create a screen that uses the
pens defined in the Workbench screen, the application must get a copy of
the pen array from the Workbench screen and use this copy with the SA_Pens
tag as described above.

Here is a list of the pens defined under V36 that support the 3D look
along with their uses.  To read the value of a particular pen, use UWORD
penvalue = myDrawInfo->dri_Pens[PENNAME], where myDrawInfo is a pointer to
a DrawInfo structure and PENNAME is taken from the list below:

DETAILPEN
    Pen compatible with V34. Used to render text in the screen's title bar.

BLOCKPEN
    Pen compatible with V34. Used to fill the screen's title bar.

TEXTPEN
    Pen for regular text on BACKGROUNDPEN.

SHINEPEN
    Pen for the bright edge on 3D objects.

SHADOWPEN
    Pen for the dark edge on 3D objects.

FILLPEN
    Pen for filling the active window borders and selected gadgets.

FILLTEXTPEN
    Pen for text rendered over FILLPEN.

BACKGROUNDPEN
    Pen for the background color.  Currently must be zero.

HIGHLIGHTTEXTPEN
    Pen for "special color" or highlighted text on BACKGROUNDPEN.
3 / DrawInfo and the 3D Look / The Font Specification in DrawInfo
Font information for a screen comes from a number of different places.

SA_Font
    The application may specify the font to be used in a screen by
    providing the SA_Font tag with a TextAttr structure.  In this case,
    the font will be used by the screen and will be the default font for
    the RastPort of any window opening in the screen.

SA_SysFont, 0
    If the application requests the user's preferred monospace font, it
    is taken from GfxBase->DefaultFont.  Any window's RastPorts are also
    initialized to use this same font.

SA_SysFont, 1
    The screen font selected by the user from the Preferences font editor
    may be used for the screen by using the SA_SysFont tag.  This font,
    the "preferred screen font", may be proportional.  For compatibility
    reasons, if this font is specified for the screen, the window's
    RastPort will be initialized to GfxBase->DefaultFont (a
    non-proportional font).

To access information on an open screen's font, the application may
reference Screen.Font or DrawInfo.dri_Font.  These fonts are identical,
the DrawInfo structure simply provides an alternate method of accessing
the information.  Note that Screen.Font is a pointer to a TextAttr
structure and that DrawInfo.dri_Font is a pointer to a TextFont structure.
The application may use whichever form is best suited to its requirements.

It is illegal to change the screen's font after the screen is opened.
This means that the font specified in the Screen and DrawInfo structures
is guaranteed to remain open as long is the screen is open.

The menu bar, window titles, menu items, and the contents of a string
gadget all use the screen's font.  The font used for menu items can be
overridden in the menu item's IntuiText structure.  Under V36 and higher,
the font used in a string gadget can be overridden through the
StringExtend structure.  The font of the menu bar and window titles cannot
be overridden.

For more information on screen fonts, see the description of the SA_Font
and SA_SysFont tags in the "Screen Attributes" section above.
3 / DrawInfo and the 3D Look / Cloning a Public Screen (Workbench)
User preferences for screen attributes are generally reflected in the
Workbench screen or in the default public screen.  In some cases it may be
useful to create a new screen with the same attributes.

Under V34, information on a screen was available through the
GetScreenData() call.  Due to extensions in V36 screen and graphics
capabilities, this call is no longer sufficient to completely describe the
display.  Applications should now use a variety of calls; the specific
call depends on the information required.

LockPubScreen() returns a pointer to the Screen structure of a specific
screen.  GetScreenDrawInfo() returns rendering information on the screen,
such as the pen array and font used.  QueryOverscan() returns the overscan
information of a specific display mode (for more information, see the
section on "Overscan and the Display Clip").

The example below shows how to use GetScreenDrawInfo() to examine the
attributes of the Workbench screen so that a new screen with the same
attributes can be created.

    struct DrawInfo *GetScreenDrawInfo( struct Screen * )

The attributes required to clone an existing screen are its width, height,
depth, pens and mode.  The pens and screen depth are available through the
DrawInfo structure.  The width and height may be obtained from the Screen
structure.  (The width and height may be larger than the overscan area if
the screen is scrollable, and autoscroll may always be enabled as it does
not effect displays smaller than or equal to the overscan area.)

The screen's display mode can be obtained using the graphics library call
GetVPModeID().  This call returns the display ID of an existing screen
which can then be used as the data for the SA_DisplayID tag in
OpenScreenTagList().  Note that the example assumes the screen should be
open to the user's text overscan preference.  If an exact copy of the
display clip of the existing screen is required, use the VideoControl()
command of the graphics library to access the ViewPortExtra structure.

The colors of the screen may be copied using the graphics library calls
GetRGB4(), SetRGB4(), SetRGB4CM() and LoadRGB4().  The example code does
not copy the colors.

The example copies the font from the cloned screen.  A reasonable
alternative would be to use the user's preference font, which may be
accessed through the SA_SysFont tag.

     clonescreen.c
3 Intuition Screens / Overscan and the Display Clip
Screens may be larger or smaller than the defined display area (overscan
rectangle or display clip).  When a screen is smaller than the display
area, the display clip acts as a "container" for the screen.  The screen
may be moved anywhere within the display clip.  When a screen is larger
than the display area, the display clip acts as a "window" into the
screen.  The screen may be moved so that different parts are visible.
Each dimension of the screen is independent and may be larger than, the
same as, or smaller than the dimensions of the display clip.

The system is very flexible in its specification of screen size.  Unless
an application fixes its screen size with hard coded values, it should be
prepared to handle the possibility that the user has changed the default
overscan presets or the default monitor (NTSC/PAL).

Use the constants STDSCREENHEIGHT and STDSCREENWIDTH with the SA_Width and
SA_Height tags to open a screen the same size as the display clip.  These
constants will work with any of the preset overscan values set with
SA_Overscan, and with custom overscan values set with SA_DClip.

 Preset Overscan Values
3 / Overscan and the Display Clip / Preset Overscan Values
Four preset overscan dimensions are provided.  Applications that support
overscan should use these preset values where possible since they will be
tailored to each individual system.  Avoid using custom values that happen
to look good on a specific system.  However, be aware that the size and
positioning of overscan screens can be different on every system depending
on how the user has set Overscan Preferences.  These preset values are
also dependent on the underlying display mode so keep in mind that both
offset and size parameters will change under different screen modes.
Overscan presets can be used, among other things, with the SA_Overscan tag
to set the size of the screen's display clip or passed as an argument to
QueryOverscan() to find their current overscan settings.

OSCAN_TEXT
    This overscan region is based on user preference settings and
    indicates a display that is completely within the visible bounds of
    the monitor. The View origin is set to the upper left corner of the
    text overscan rectangle which is the highest leftmost point known to
    be visible on the physical display.  This position is set by the user
    through the Overscan Preferences editor.  All screen positions and
    display clips are relative to this origin.

OSCAN_STANDARD
    The edges of OSCAN_STANDARD display are also based on user
    preferences and are set to be just outside the visible bounds of the
    monitor.  OSCAN_STANDARD provides the smallest possible display that
    will fill the entire screen with no border around it.  Parts of the
    display created with OSCAN_STANDARD may not be visible to the user.

OSCAN_MAX
    Create the largest display fully supported by Intuition and the
    graphics library.  This is the largest size for which all enclosed
    sizes and positions are legal.  Parts of the display created with
    OSCAN_MAX may not be visible to the user.

OSCAN_VIDEO
    Create the largest display, restricted by the hardware.  This is the
    only legal size and position that is possibly (but not necessarily)
    larger than OSCAN_MAX.  You must use the exact size and position
    specified.  OSCAN_VIDEO does not support variable left edge, top edge
    positioning.  Parts of the display created with OSCAN_VIDEO may not
    be visible to the user.

If custom clipping is required, a display clip may be explicitly specified
using the SA_DClip tag and a Rectangle structure specification.  This
custom rectangle must fit within the OSCAN_MAX rectangle, offset included.
It is not permitted to specify custom rectangles whose values are in
between OSCAN_MAX and OSCAN_VIDEO, nor is it permitted to specify
rectangles larger than OSCAN_VIDEO.  For an example of how to open a
centered overscan screen based on user preferences, see the
module/screen.c listing in the IFF Appendix of the Amiga ROM Kernel
Reference Manual: Devices.

Use the Graphics library call VideoControl() to find the true display clip
of a screen.  See the Graphics Autodocs and the chapter
"Graphics Primitives" for more information on VideoControl().  The
ViewPortExtra structure contains the display clip information.

If any dimension of a screen is not equal to the equivalent display clip
dimension, then the screen may be scrolled. If the screen's dimensions are
smaller than the display clip, then the screen may be positioned within
the display clip. If the screen is larger than the display clip, then it
may be positioned such that any part of the screen is visible.

AutoScroll may be activated by setting the tag SA_AutoScroll. Screens will
only scroll when they are the active screen. Activate a window in the
screen to make the screen active.

    About the Default Display Clip.
    -------------------------------
    The default display clip for a screen is the entire screen, that
    is, the rectangle starting from the upper left corner of the screen
    and ending at the lower right corner of the screen.  This display
    clip is only used if the application does not specify SA_Overscan or
    SA_DClip.  When using this default display clip the screen will not
    scroll as the screen exactly fits into the clipping region.

When opening a window in an overscanned screen, it is often useful to open
it relative to the visible part of the screen rather than relative to the
entire screen.  Use QueryOverscan() to find the overscan region and where
the screen is positioned relative to it.

    LONG QueryOverscan(ULONG displayID,
                       struct Rectangle *rect, WORD overscanType )

This example was taken from the chapter "Intuition Windows" in the section
"A Display Sized Window Example". The complete example is reproduced
there.


/* this technique returns the text overscan rectangle of the screen that
** we are opening on.  If you really need the actual value set into the
** display clip of the screen, use the VideoControl() command of the
** graphics library to return a copy of the ViewPortExtra structure.  See
** the Graphics library chapter and Autodocs for more details.
**
** GetVPModeID() is a graphics call...
*/

screen_modeID = GetVPModeID(&(pub_screen->ViewPort))))
if (screen_modeID != INVALID_ID)
    {
    if ( QueryOverscan(screen_modeID, &rect, OSCAN_TEXT) )
        {
        /* if this screen's origin is up or to the left of the */
        /* view origin then move the window down and to the right */
        left = max(0, -pub_screen->LeftEdge);
        top  = max(0, -pub_screen->TopEdge);

        /* get width and height from size of display clip */
        width  = rect.MaxX - rect.MinX + 1;
        height = rect.MaxY - rect.MinY + 1;

        /* adjust height for pulled-down screen (only show visible part) */
        if (pub_screen->TopEdge > 0)
            height -= pub_screen->TopEdge;

        /* ensure that window fits on screen */
        height = min(height, pub_screen->Height);
        width  = min(width,  pub_screen->Width);

        /* make sure window is at least minimum size */
        width  = max(width,  MIN_WINDOW_WIDTH);
        height = max(height, MIN_WINDOW_HEIGHT);
        }
    }
3 Intuition Screens / Intuition Screens and the Graphics Library
As previously mentioned, an Intuition screen is related to a number of
underlying graphics library structures.


         Table 3-8: Graphics Data Structures Used with Screens


    Structure Name  Description                   Defined in Include File
    --------------  -----------                   -----------------------
    View            Root structure of the            <graphics/view.h>
                    graphics display system

    ViewPort        The graphics structure that      <graphics/view.h>
                    corresponds to a screen

    BitMap          Contains size and pointers to    <graphics/gfx.h>
                    the screen's bit planes

    ColorMap        Contains size and pointer to     <graphics/view.h>
                    the screen's color table

    RastPort        Holds drawing, pen and font    <graphics/rastport.h>
                    settings and the BitMap
                    address


These data structures are unified in Intuition's Screen structure (which
also incorporates higher level Intuition constructs such as menus and
windows).  Here's a brief explanation of the graphics library structures
used with Intuition.

View
    The View is the graphics structure that corresponds to the whole
    display, including all visible screens.  The system has just one
    View; it's what you see on the monitor.  The address of the View may
    be obtained from any screen by using ViewAddress().

ViewPort
    The ViewPort is the underlying graphics structure corresponding to a
    screen.  Every screen has one ViewPort.  To get the address of the
    ViewPort from the Screen structure, use (&my_screen-> ViewPort).
    From the ViewPort an application may obtain pointers to all the
    screen's bitplanes and to its color table.

BitMap
    The BitMap structure contains pointers to all the bit planes (up to
    8) and their sizes.  For future compatibility, use
    (my_screen->RastPort.BitMap) to get the address of the BitMap from
    the screen rather than (&my_screen->BitMap).

    The BitMap.BytesPerRow field specifies the number of bytes that have
    been allocated for each raster line.  This may be larger than the
    screen width depending on display alignment restrictions.  Alignment
    restrictions may change.  Always use this variable, not a hard-coded
    value.

ColorMap
    The ColorMap contains a pointer to the color table, an array of 32
    WORDs for the hardware color registers.  Use SetRGB4(), GetRGB4(),
    SetRGB4CM() and LoadRGB4() from the graphics library to access the
    color table.  Do not read or write it directly.

RastPort
    A RastPort controls the graphics rendering to any display area (not
    just screens).  Screens have a RastPort to allow direct rendering
    into the screen.  Applications may find the RastPort address of a
    screen with (&my_screen->RastPort).  This generally is not useful
    since applications normally render into windows.

 Changing Screen Colors
 Direct Screen Access
 Screen Functions That Integrate Intuition and Graphics
 Limitations of the Graphics Subsystem
3 / Intuition Screens and Graphics Library / Changing Screen Colors
Screen colors are set at the time the screen is opened with the SA_Colors
tag.  If the colors need to be changed after the screen is opened, the
graphics library function, LoadRGB4() should be used.  To change a single
entry in the color table, use SetRGB4() and SetRGB4CM().  See the
"Graphics Primitives" chapter for more information on these functions.
3 / Intuition Screens and the Graphics Library / Direct Screen Access
Sometimes an application may want direct access to the custom screen's
bitmap to use with low-level graphics library calls.  This may be useful
if the application needs to do custom manipulation of the display but also
needs Intuition functionality.  For instance, an application may want to
use the graphics library primitives to perform double buffering then, when
detecting user input, switch to Intuition control of the screen so that
windows, gadgets and menus may be used to process the user input.  If an
application chooses to combine these techniques, it must take special care
to avoid conflicts with Intuition rendered graphics.  An example of how to
do this is listed in the next section, "Advanced Screen Programming".

Application programs that open custom screens may use the screen's display
memory in any way they choose.  However, this memory is also used by
Intuition for windows and other high level display components on the
screen.  Writing directly to the screen memory, whether through direct
access or through graphics library calls that access the screen's
RastPort, is not compatible with many Intuition constructs such as windows
and menus.

Techniques such as this require great care and understanding of the Amiga.
If possible, the application should avoid these techniques and only use
standard Intuition display and input processing.  Directly accessing the
screen's bitmap, while possible, is not recommended.  A better way to
access the screen display is through windows.  Windows provide access to
the screen through layers which perform clipping and arbitration between
multiple drawing areas.

Alternatives to writing directly to a screen, such as using a backdrop
window, greatly limit the number of cases where an application must access
screen memory.  The ShowTitle() function allows the screen's title bar
layer to be positioned in front of or behind any backdrop windows that are
opened on the screen.  Hence, a backdrop window may be created that uses
the entire visible area of the monitor. Application programs that use
existing public screens do not have the same freedom to access the
screen's display memory as they do with custom screens.  In general,
public screens must be shared through the use of windows and menus rather
than directly accessing the screen's display memory.

    Use Direct Access Only On Screens You Own.
    ------------------------------------------
    An application may not steal the bitmap of a screen that it does not
    own.  Stealing the Workbench screen's bitmap, or that of any other
    public screen, is strictly illegal.  Accessing the underlying
    graphics structures of a screen may only be done on custom screens
    opened by the application itself.

    Do Not Perform Layers Operations Directly.
    ------------------------------------------
    While layers are not part of the graphics library, it is appropriate
    to mention them here.  Certain types of layers operations are not
    allowed with Intuition.  You may not, for example, call SizeLayer()
    on a window (use SizeWindow() instead). To access layers library
    features with screens, use Intuition windows!

A custom screen may be created to allow for modification of the screen's
Copper list.  The Copper is the display synchronized co-processor that
handles the actual video display by directly affecting the hardware
registers.  See the Amiga Hardware Reference Manual or the graphics
library chapters for more information on programming the Copper.
3 / / Screen Functions That Integrate Intuition and Graphics
These functions, normally used only by the system, integrate high-level
Intuition structures with the lower-level constructs used by the graphics
library to create the display.


    Table 3-9: Screen Functions That Integrate Intuition and Graphics
  _______________________________________________________________________
 |                                                                       |
 |      MakeScreen()  Update a single screen's copper list               |
 |                                                                       |
 |  RethinkDisplay()  Merge copper lists from all screens to form a View |
 |                                                                       |
 |   RemakeDisplay()  Update all screen copper lists then merge them to  |
 |                    form a View                                        |
 |_______________________________________________________________________|


Advanced Intuition programmers may use these functions to achieve special
screen effects such as double-buffering or dual-playfield Intuition
screens.  For examples of these see the next section.

MakeScreen() updates, but does not install, a screen's Copper list.  This
function is the Intuition equivalent of the low-level MakeVPort() graphics
library function.  MakeScreen() performs the MakeVPort() call,
synchronized with Intuition's own use of the screen's ViewPort.  Call
RethinkDisplay() after MakeScreen() to allow the new Copper list for the
screen to take effect.  The MakeScreen() function takes one argument, a
pointer to the Screen that contains the Copper list to be updated.

RethinkDisplay() combines all the screen's copper lists into a single
view.  This procedure performs the Intuition global display
reconstruction, which includes massaging some of Intuition's internal
state data, rethinking all of the Intuition screen ViewPorts and their
relationship to one another, and, finally, reconstructing the entire
display by merging the new screens into the graphics View structure.
Custom screens that handle their own Copper instructions, use this call to
install the Copper list previously updated with MakeScreen().
RethinkDisplay() calls lower-level graphics primitives MrgCop() and
LoadView() to install the Copper list.  This function takes no arguments.

RemakeDisplay() remakes the entire Intuition display.  It is equivalent to
calling MakeScreen() for each screen in the system, then calling
RethinkDisplay().  This routine performs a MakeVPort() (graphics
primitive) on every Intuition screen and then calls RethinkDisplay() to
recreate the View.  It takes no arguments.

Both RemakeDisplay() and RethinkDisplay() take several milliseconds to run
and lock out all other tasks while they run.  This can seriously degrade
system performance, so do not use these routines lightly.
3 / Screens and Graphics Lib / Limitations of the Graphics Subsystem
If each of the visible screens does not have the same physical attributes,
it may not be possible to display the data in its proper screen mode.
Screen coercion is the technique that allows multiple screens with
differing physical attributes to be displayed simultaneously.  When a
coerced screen is visible, its aspect ratio and colors may appear
significantly changed.  This is normal and the screen will be displayed
correctly when it is the frontmost screen.

Hardware restrictions prevent certain types of displays.  For instance,
screens always use the full width of the display, regardless of the width
of the overscan rectangle.  This prevents any changes in display mode
within a video line.  Other modes, such as the VGA modes, require specific
revisions of the custom chips and may not be available on all machines.
See the "Graphics Primitives" chapter and the Amiga Hardware Reference
Manual for more information on Amiga display organization and limitations.
3 Intuition Screens / Advanced Screen Programming
This section discusses how to perform double-buffering of Intuition
screens, how to create a dual-playfield Intuition screen and other
advanced topics.

 Double Buffering    Dual-Playfield Screen Example
3 / Advanced Screen Programming / Double Buffering
Double buffering of an Intuition screen involves the swapping of bitmaps
of the screen, then updating the copper list to install the changes.  The
trick is that after installing the bitmaps to the screen the display is
not updated to access these new bitmaps until the program explicitly
updates the copper list.  Any rendering performed before the copper list
is updated will be rendered into the off-display bitmaps, appearing on the
screen in completed form when the copper list is updated.

First, install the alternate bitmaps into the screen.

    /* switch the bitmap so that we are drawing into the correct place */
    screen->RastPort.BitMap          = myBitMaps[toggleFrame];
    screen->ViewPort.RasInfo->BitMap = myBitMaps[toggleFrame];

Rendering may then take place into the off screen bitmaps by drawing into
screen->RastPort.

The copper list of the screen is updated by calling MakeScreen(). This
call refreshes the copper list, but does not install it into the system.
Call RethinkDisplay() to install the new copper list so that the data is
visible.

    /* update the physical display to match the newly drawn bitmap. */
    MakeScreen(screen); /* Tell intuition to do its stuff.          */
    RethinkDisplay();   /* Intuition compatible MrgCop & LoadView   */
                        /*               it also does a WaitTOF().  */

Note that it is possible for the user to force the updating of the
screen's copper list by dragging or depth-arranging the screen. This may
cause information to be displayed before it is complete.

A complete example of double buffering a screen follows.

     doublebuffer.c
3 / Advanced Screen Programming / Dual-Playfield Screen Example
This example shows how to create a dual-playfield display.  Note that this
technique is only valid for screen modes which support dual-playfield, do
not try to convert other modes.

Setting up dual playfield mode in the OpenScreen() call is not the best
method of obtaining a dual playfield viewport for a screen.  It is better
to open a standard screen, passing to Intuition (or letting Intuition
create) only one of the playfield bitmaps (the front one).  Next allocate
and set up a second bitmap, its bitplanes, and a RasInfo structure
installing these into the new screen's viewport.  Update the viewport
modes to include DUALPF and call MakeScreen() and RethinkDisplay().  This
method, shown in the example below, keeps Intuition rendering (gadgets,
menus, windows) in a single playfield.

     dualplayfield.c
3 Intuition Screens / Other Screen Functions
Other screen functions provided by Intuition control screen depth
arrangement, screen movement, the screen title bar and provide a visual
"error beep".

 Screen Depth Arrangement
 Screen Movement and Scrolling
 Miscellaneous Screen Functions
3 / Other Screen Functions / Screen Depth Arrangement
ScreenToFront() and ScreenToBack() make a screen either the frontmost or
the backmost screen.  If an application needs to render into a screen
before the screen becomes visible to the user, the screen may be opened
behind all other screens and later moved to the front when ready with
ScreenToFront().

    VOID ScreenToFront( struct Screen * )
    VOID ScreenToBack ( struct Screen * )

Depth control of screens is also available through the depth arrangement
gadget in the screen's title bar or through keyboard shortcuts.  The N key
with the Left-Amiga qualifier moves the Workbench screen to front.  The M
key with the Left-Amiga qualifier moves the frontmost screen to back.
Repeated selection of Left-Amiga-M will cycle through available screens.
These keys are processed through the keymap and will retain their value
even if the key location changes.
3 / Other Screen Functions / Screen Movement and Scrolling
The MoveScreen() function moves the screen origin by the number of pixels
specified in dx and dy.

    VOID MoveScreen( struct Screen *myscreen, WORD dx, WORD dy )

Calls to MoveScreen() are asynchronous; the screen is not necessarily
moved upon return of this function.  If the calls happen too quickly,
there may be unexpected results.  One way to pace these calls is to call
the function one time for each IDCMP_INTUITICKS event.

Screen movement is also available through the screen's drag gadget in the
title bar and through a keyboard/mouse shortcut.  Left-Amiga with the
select button of the mouse anywhere within the screen will drag the screen
(even if the title bar is totally concealed by a window).  Dragging a
screen down will reveal any screen(s) behind it.  Screens are never
revealed to the left, right or bottom of another screen.

Additionally, oversized screens may be moved with the new autoscroll
feature of Release 2.  With autoscroll, the screen is automatically
scrolled as the pointer reaches one of the edges of the display.
Autoscroll only works on the active screen.

Another screen movement feature added in Release 2 is screen menu snap.
When a screen much larger than the viewing area is scrolled such that the
upper left corner is not visible (scrolled down or to the right), menus
may could be out of the visible portion of the screen.  To prevent this,
menu snap moves the screen to a position where the menus will be visible
before rendering them.  The screen appears to snap to the home position as
the menus are selected, moving back when the operation is complete.  If
the Left-Amiga qualifier is held when the menus are selected then the
screen will remain in the home position when the menu button is released.

The Intuition preferences editor, IControl, allows the user to change a
number of Intuition features.  Some of these features include the ability
to globally disable menu snap, and to change the select qualifier for
dragging the screen.  See the User's Manual for more information on
Preferences editors.
3 / Other Screen Functions / Miscellaneous Screen Functions
Three other functions used with screens are DisplayBeep(), ShowTitle() and
GetScreenData().  DisplayBeep() flashes the screen colors to inform the
user of an error or problem.

    VOID DisplayBeep( struct Screen *myscreen )

Since not all users will have speakers attached to the system,
DisplayBeep() can be used to provide a visible bell.  DisplayBeep() can
beep any single screen or, if myscreen is set to NULL, all screens.

ShowTitle() determines whether the screen's title bar will be displayed in
front of or behind any backdrop windows on the screen.

    VOID ShowTitle( struct Screen *myscreen, BOOL infront )

By default, the screen's title bar is set to display in front of backdrop
windows.  Call this function with infront set to FALSE to put the screen
title bar behind backdrop windows.  This can also be set when the screen
is opened with the SA_ShowTitle tag.

Under 1.3 (V34) and earlier versions of the Amiga OS, applications used
the GetScreenData() to get a copy of the Workbench Screen structure in
order to examine its attributes.

    success = BOOL GetScreenData( APTR buffer, UWORD bufsize,
                                  UWORD type, struct Screen *scr)

If successful, GetScreenData() copies a given Screen structure to a buffer
supplied by the application.  A copy of the Workbench Screen data can be
obtained without knowing its location in memory using GetScreenData(buf,
sizeof(struct Screen), WBENCHSCREEN, NULL).  However, for Release 2 and
later versions of the operating system, this function may return some
false information about the Workbench screen.  This false screen
information helps prevent older applications that used the call from
malfunctioning when run in a Release 2 system that has Workbench set up
with one of the newer modes.

Applications that want to get information on the Workbench screen should
use GetScreenData() when run under 1.3 and LockPubScreen() when run under
under Release 2.  For more about LockPubScreen() and Workbench, see the
section on "Public Screen Functions" earlier in this chapter.
3 Intuition Screens / Function Reference
The following are brief descriptions of the Intuition functions that
relate to the use of Intuition screens.  See the Amiga ROM Kernel
Reference Manual: Includes and Autodocs for details on each function call.


             Table 3-10: Functions for Intuition Screens
  ______________________________________________________________________
 |                                                                      |
 |          Function                  Description                       |
 |======================================================================|
 |    OpenScreenTagList()  Open a screen.                               |
 |       OpenScreenTags()  Alternate calling sequence for               |
 |                         OpenScreenTagList().                         |
 |           OpenScreen()  Pre-V36 open screen function.                |
 |          CloseScreen()  Close an open screen.                        |
 |----------------------------------------------------------------------|
 |           MoveScreen()  Change the position of an open screen.       |
 |         ScreenToBack()  Move a screen behind all other screens.      |
 |        ScreenToFront()  Move a screen in front of all other screens. |
 |            ShowTitle()  Show the screen in front of through backdrop |
 |                         windows.                                     |
 |----------------------------------------------------------------------|
 |    GetScreenDrawInfo()  Get the DrawInfo information for an open     |
 |                         screen.                                      |
 |   FreeScreenDrawInfo()  Free the DrawInfo information for a screen.  |
 |----------------------------------------------------------------------|
 |        QueryOverscan()  Find overscan information for a specific     |
 |                         display type.                                |
 |----------------------------------------------------------------------|
 |        LockPubScreen()  Obtain a lock on a public screen.            |
 |      UnlockPubScreen()  Release a lock on a public screen.           |
 |        NextPubScreen()  Return the name of the next public screen in |
 |                         the list.                                    |
 |      PubScreenStatus()  Make a public screen private or private      |
 |                         screen public.                               |
 |----------------------------------------------------------------------|
 |    LockPubScreenList()  Lock the public screen list (for a public    |
 |                         screen utility).                             |
 |  UnlockPubScreenList()  Unlock the public screen list.               |
 |  SetDefaultPubScreen()  Change the default public screen.            |
 |    SetPubScreenModes()  Establish global public screen behavior.     |
 |  GetDefaultPubScreen()  Copies the name of the default public screen |
 |                         to a buffer.                                 |
 |----------------------------------------------------------------------|
 |        OpenWorkBench()  Open the Workbench screen, if closed.        |
 |       CloseWorkBench()  Close the Workbench screen, if possible.     |
 |         WBenchToBack()  Move the Workbench screen behind all other   |
 |                         screens.                                     |
 |        WBenchToFront()  Move the Workbench screen in front of all    |
 |                         other screens.                               |
 |        GetScreenData()  Pre-V36 way to return information on an open |
 |                         screen.                                      |
 |----------------------------------------------------------------------|
 |          ViewAddress()  Return the address of a screen's View.       |
 |      ViewPortAddress()  Use &screen->ViewPort instead.               |
 |----------------------------------------------------------------------|
 |           MakeScreen()  Low level screen handling--rebuild Copper    |
 |                         list.                                        |
 |       RethinkDisplay()  Low level screen handling--incorporate       |
 |                         Copper list changes.                         |
 |        RemakeDisplay()  MakeScreen() for all screens, then           |
 |                         RethinkDisplay().                            |
 |______________________________________________________________________|
Converted on 22 Apr 2000 with RexxDoesAmigaGuide2HTML 2.1 by Michael Ranner.