Figure 27-1: How the Video Display Picture Is Produced The diagonal lines in the figure show how the video beam returns to the start of each horizontal line. Effect of Display Overscan on the Viewing Area Color Information for the Video Lines
 Introduction                       User Copper Lists
 Display Routines and Structures    ECS and Genlocking Features
 Advanced Topics                    Function Reference
 Drawing Routines
This chapter describes the basic graphics functions available to Amiga
programmers.  It covers the graphics support structures, display routines
and drawing routines.  Many of the operations described in this section
are also performed by the Intuition software.  See the Intuition chapters
for more information.

The Amiga supports several basic types of graphics routines: display
routines, drawing routines, sprites and animation.  These routines are
very versatile and allow you to define any combination of drawing and
display areas you may wish to use.

The first section of this chapter defines the display routines.  These
routines show you how to form and manipulate a display, including the
following aspects of display use:

  * How to query the graphics system to find out what type of video
    monitor is attached and which graphics modes can be displayed on
    it.

  * How to identify the memory area that you wish to have displayed.

  * How to position the display area window to show only a certain
    portion of a larger drawing area.

  * How to split the screen into as many vertically stacked slices
    as you wish.

  * How to determine which horizontal and vertical resolution modes
    to use.

  * How to determine the current correct number of pixels across and
    lines down for a particular section of the display.

  * How to specify how many color choices per pixel are to be
    available in a specific section of the display.

The later sections of the chapter explain all of the available modes of
drawing supported by the system software, including how to do the
following:

  * Reserve memory space for use by the drawing routines.

  * Define the colors that can be drawn into a drawing area.

  * Define the colors of the drawing pens (foreground pen,
    background pen for patterns, and outline pen for area-fill
    outlines).

  * Define the pen position in the drawing area.

  * Drawing primitives; lines, rectangles, circles and ellipses.

  * Define vertex points for area-filling, and specify the area-fill
    color and pattern.

  * Define a pattern for patterned line drawing.

  * Change drawing modes.

  * Read or write individual pixels in a drawing area.

  * Copy rectangular blocks of drawing area data from one drawing
    area to another.

  * Use a template (predefined shape) to draw an object into a
    drawing area.

 Components of a Display
 Introduction To Raster Displays
 Interlaced and Non-Interlaced Modes
 Low, High and Super-High Resolution Modes
 About ECS
 Forming an Image
 Role of the Copper (Coprocessor)
In producing a display, you are concerned with two primary components:
sprites and the playfield.  Sprites are the easily movable parts of the
display.  The playfield is the static part of the display and forms a
backdrop against which the sprites can move and with which the sprites can
interact.

This chapter covers the creation of the background.  Sprites are described
in the "Graphics Sprites, Bobs and Animation" chapter.
There are three major television standards in common use around the world:
NTSC, PAL, and SECAM.  NTSC is used primarily in the United States and
Japan; PAL and SECAM are used primarily in Europe.  The Amiga currently
supports both NTSC and PAL.  The major differences between the two systems
are refresh frequency and the number of scan lines produced.  Where
necessary, the differences will be described and any special
considerations will be mentioned.

The Amiga produces its video displays on standard television or video
monitors by using raster display techniques.  The picture you see on the
video display screen is made up of a series of horizontal video lines
stacked one on top of another, as illustrated in the following figure.
Each line represents one sweep of an electronic video beam, which "paints"
the picture as it moves along.  The beam sweeps from left to right,
producing the full screen one line at a time.  After producing the full
screen, the beam returns to the top of the display screen.


Figure 27-1: How the Video Display Picture Is Produced

The diagonal lines in the figure show how the video beam returns to the
start of each horizontal line.

 Effect of Display Overscan on the Viewing Area
 Color Information for the Video Lines
To assure that the picture entirely fills the monitor (or television)
screen, the manufacturer of the video display device usually creates a
deliberate overscan.  That is, the video beam is swept across an area that
is larger than the viewable region of the monitor.

The video beam actually covers 262 vertical lines (312 for PAL).  The
user, however, sees only the portion of the picture that is within the
center region of the display, typically surrounded by a border as
illustrated in the figure below.  The center region is nominally about 200
lines high on an NTSC machine (256 lines for PAL).  Overscan also limits
the amount of video data that can appear on each display line.  The width
of the center region is nominally, about 320 pixels for both PAL and NTSC.

        ___________________
       |                   |
       |       ____________|____________
       |      |           \|/           |
       |      |·························|
       |      |- - - - - - - - - - - - -|   Overscan Region
       |      |- -*******************- -| / ---------------
       |      |- -*- - - - - - - - -*- -|/  Generally Graphics are
       |      |- -*- - - - - - - - -*- -/   not displayed in this area
       |      |   *                 *  /|
              |   *                 *   |
   Vertical   |   *                 *\  |
   Blanking   |   *                 * \ |
   Interval   |   *                 *  \|
              |   *                 *   \
       |      |   *                 *   |\
       |      |- -*- - - - - - - - -*- -| \ Viewable Region
       |      |- -*- - - - - - - - -*- -|   ---------------
       |      |- -*******************- -|   Contains approximately
       |      |- - - - - - - - - - - - -|   200 video lines (256 PAL)
       |      |·························|   and 320 pixels across.
       |      |____________|____________|
       |                   |
       |___________________|


       Figure 27-2: Display Overscan Restricts Usable Picture Area


The flexibility of the Amiga graphics subsystem allows the overscan
region, which normally forms the border of the display, to be used for
application graphics instead.  So the nominal dimensions given above can
be enlarged.

The time during which the video beam is below the bottom line of the
viewable region and above the first line is called the vertical blanking
interval.  The recommended minimum to allow for this interval is 21 lines
for NTSC (29 lines for PAL).  So, for applications that take full
advantage of the overscan area, a maximum of 241 usable lines in NTSC (283
in PAL) can be achieved.  The display resolution can also be changed by
changing the Amiga display mode as discussed in the sections below.
The hardware reads the system display memory to obtain the color
information for each line.  As the video display beam sweeps across the
screen producing the display line, it changes color, producing the images
you have defined.  On the current generation of Amiga hardware, there are
4,096 possible colors.
In producing the complete display (262 lines in NTSC, 312 in PAL), the
video display device produces the top line, then the next lower line, then
the next, until it reaches the bottom of the screen.  When it reaches the
bottom, it returns to the top to start a new scan of the screen.  Each
complete set of lines is called a display field.  It takes about 1/60th of
a second to produce a complete NTSC display field (1/50th of a second for
PAL).

The Amiga has two vertical display modes: interlaced and non-interlaced.
In non-interlaced mode, the video display produces the same picture for
each successive display field.  A non-interlaced NTSC display normally has
about 200 lines in the viewable area (up to a maximum of 241 lines with
overscan) while a PAL display will normally show 256 lines (up to a
maximum of 283 with overscan).

With interlaced mode, the amount of information in the viewable area can
be doubled.  On an NTSC display this amounts to 400 lines (482 with
overscan), while on a PAL display it amounts to 512 lines (566 with
overscan).

For interlaced mode, the video beam scans the screen at the same rate
(1/60th of a second per complete NTSC video display field); however, it
takes two display fields to form a complete video display picture and
twice as much display memory to store line data.  During the first of each
pair of display fields, the system hardware shows the odd-numbered lines
of an interlaced display (1, 3, 5, and so on).  During the second display
field, it shows the even-numbered lines (2, 4, 6 and so on).  The second
field is positioned slightly lower so that the lines in the second field
are "interlaced" with those of the first field, giving the higher vertical
resolution of this mode.

                 _______________________________________
                |                                       |
                |  Data as Displayed     Data In Memory |
                |  -----------------     -------------- |
                | Odd field - Line 1        Line 1      |
                | Even field - Line 1       Line 2      |
                | Odd field - Line 2        Line 3      |
                | Even field - Line 2       Line 4      |
                |           ·                  ·        |
                |           ·                  ·        |
                |           ·                  ·        |
                | Odd field - Line 200      Line 399    |
                | Even field - Line 200     Line 400    |
                |_______________________________________|


    Figure 27-3: Interlaced Mode -- Display Fields and Data in Memory


The following figure shows a display formed as display lines 1, 2, 3, 4,
... 400.  The 400-line interlaced display uses the same physical display
area as a 200-line non-interlaced display.

           _____________________
  line 1 _|_____________________|_
          |_____________________| \
          |      _________      |  \
          |      _________      |   \
          |                     |    \
          |      Odd Field      |     \   _____________________
          |      _________      |      \_|_____________________|_ Line 1
          |      _________      |       _|_|___________________|_ Line 2
          |_____________________|      / |                     |
          |_____________________|     /  | |                   |
          |_____________________|    /   |    Video Display    |
                                    /    | | (400 lines NTSC   |
           _____________________   /     |    512 lines PAL)   |
  line 2 _|_____________________|_/      | |                   |
          |_____________________|        |                     |
          |      _________      |        |\|/                  |
          |      _________      |        |_____________________|
          |                     |
          |      Even Field     |      Same physical space as used
          |      _________      |       by a 200-line (256) PAL),
          |      _________      |         noninterlaced display.
          |_____________________|
          |_____________________|
          |_____________________|


         Figure 27-4: Interlaced Mode Doubles Vertical Resolution


During an interlaced display, it appears that both display fields are
present on the screen at the same time and form one complete picture.
However, interlaced displays will appear to flicker if adjacent (odd and
even) scan lines have contrasting brightness.  Choosing appropriate colors
for your display will reduce this flicker considerably.  This phenomenon
can also be reduced by using a long-persistence monitor, or alleviated
completely with a hardware de-interlacer.
The Amiga also has three horizontal display modes: low-resolution (or
Lores), high-resolution (Hires) and super-high-resolution (SuperHires).

Normally, these three horizontal display modes have a width of 320 for
Lores, 640 for Hires or 1280 for SuperHires on both PAL and NTSC machines.
However, by taking full advantage of the overscan region, it is possible
to create dispays up to 362 pixels wide in Lores mode, 724 pixels wide in
Hires or 1448 pixels wide in SuperHires.  Usually, however, you should use
the standard values (320, 640 or 1280) for most applications.

In general, the number of colors available in each display mode decreases
as the resolution increases.  The Amiga has two special display modes that
can be used to increase the number of colors available.  HAM is
Hold-And-Modify mode, EHB is Extra-Half-Brite mode.

Hold-And-Modify (HAM) allows you to display the entire palette of 4,096
colors on-screen at once with certain restrictions, explained later.

Extra-Half-Brite allows for 64 colors on-screen at once; 32 colors plus 32
additional colors that are half the intensity of the first 32.  For
example, if color 1 is defined as 0xFFF (white), then color 33 is 0x777
(grey).

 Display Modes, Colors, and Requirements
The following chart lists all of the display modes that are available
under Release 2 of the Amiga operating system, as well as those available
under previous releases of the OS.


    15 kHz Amiga            Default Resolution     Maximum   Supports
    Display Modes             NTSC      PAL        Colors    HAM/EHB
    -------------             ----      ---        -------   --------
    Lores                   320x200   320x256    32 of 4096    Yes
    Lores-Interlaced        320x400   320x512    32 of 4096    Yes
    Hires                   640x200   640x256    16 of 4096    No
    Hires-Interlaced        640x400   640x512    16 of 4096    No
    SuperHires*             1280x200  1280x256   4 out of 64   No
    SuperHires-Interlaced*  1280x400  1280x512   4 out of 64   No

    *Requires both Release 2 and ECS.


    31 kHz Amiga               Default         Maximum       Supports
    Display Modes*            Resolution       Colors        HAM/EHB
    --------------            ----------       -------       --------
    VGA-ExtraLores             160x480      32 out of 4096     Yes
    VGA-ExtraLores-Interlace   160x960      32 out of 4096     Yes
    VGA-Lores                  320x480      16 out of 4096     No
    VGA-Lores-Interlace        320x960      16 out of 4096     No
    Productivity               640x480      4 out of 64        No
    Productivity-Interlace     640x960      4 out of 64        No

    *31 kHz modes require Release 2, ECS and either a bi-scan or
    multi-scan monitor.


      A2024*         Default Resolution             Maximum
   Display Modes      NTSC         PAL              Colors
   -------------      ----         ---              -------
    A2024-10Hz      1008x800    1008x1024     4 out of 4 grey levels
    A2024-15Hz      1008x800    1008x1024     4 out of 4 grey levels

    *A2024 modes require special hardware and either Release 2 or
    special software available from the monitor's manufacturer.
ECS stands for Enhanced Chip Set, the latest version of the Amiga's custom
chips that provides for improved graphics capabilities.  Some of the
special features of the Amiga's graphics sub-system such as the VGA,
Productivity and SuperHires display modes require the ECS.

 SuperHires (35 nanosecond) Pixel Resolutions
 Productivity Mode
 Selectable PAL/NTSC
 Determining Chip Versions
The enhanced version of the Denise chip can generate SuperHires pixels
that are twice as fine as Hires pixels.  It is convenient to refer to
pixels here by their speed, rather than width, for reasons that will be
explained below.  They are approximately 35nS long, while Hires are 70nS,
and Lores 140nS.  In the absence of any other features, this can bring a
new mode with nominal dimensions of 1280 x 200 (NTSC) or 1280 x 256 (PAL).
This mode requires the ECS Agnus chip as well.

When Denise is generating these new fast pixels, simple bandwidth
arithmetic indicates that at most two bitplanes can be supported.  Also
note that with two bitplanes, DMA bandwidth is saturated.  The palette for
SuperHires pixels is also restricted to 64 colors.
The enhanced version of the Denise chip can support monitor horizontal
scan frequencies of 31KHz, twice the old 15.75KHz rate.  This provides
over 400 non-interlaced horizontal lines in a frame, but requires the use
of a multiple scan rate, or multi-sync monitor.

This effect speeds up the video beam roughly by a factor of two, which has
the side effect of doubling the width of a pixel emitted at a given speed.
Thus, for a given Denise mode, pixels are twice as fat, and there are half
as many on a given line.

The increased scan rate interacts with all of the Denise modes.  So with
both SuperHires (35nS) pixels and the double scan rate the display
generated would be 640 pixels wide by more than 400 rows, non-interlaced,
with up to four colors from a palette of 64.  This combination is termed
Productivity mode, and the default international height is 480 rows. This
conforms, in a general way, to the VGA Mode 3 Standard 8514/A.

The support in Agnus is actually more flexible, and gives the ability to
conform to special-purpose modes, such as displays synchronized to motion
picture cameras.
The Enhanced Chip Set can be set to NTSC or PAL modes under software
control.  Its initial default behavior is determined by a jumper or trace
on the system motherboard.  This has no bearing on Productivity mode and
other programmable scan operations, but the new system software can
support displays in either mode.
It is possible to ascertain whether the ECS chips are in the machine at
run time by looking in the ChipRevBits0 field of the GfxBase structure.
If this field contains the flag for the chip you are interested in (as
defined in the <gfxbase.h> include file), then that chip is present.

For example, if the C statement (GfxBase->ChipRevBits0 & GFXF_HR_AGNUS)
evaluates to non-zero, then the machine contains the ECS version of the
Agnus chip and has advanced features such as the ability to handle larger
rasters.  Older Agnus chips were capable of handling rasters up to 1,024
by 1,024 pixels.  The ECS Agnus can handle rasters up to 16,384 by 16,384
pixels.

If (GfxBase->ChipRevBits0 & GFXF_HR_DENISE) is non-zero, then the ECS
version of the Denise chip is present.  Having both the ECS Agnus and ECS
Denise present allows for the special SuperHires, VGA and Productivity
display modes available in Release 2.  For more information on ECS and the
custom chips, refer to the Amiga Hardware Reference Manual.
To create an image, you write data (that is, you "draw") into a memory
area in the computer.  From this memory area, the system can retrieve the
image for display.  You tell the system exactly how the memory area is
organized, so that the display is correctly produced.  You use a block of
memory words at sequentially increasing addresses to represent a
rectangular region of data bits.  The following figure shows the contents
of three example memory words: 0 bits are shown as blank rectangles, and
1 bits as filled-in rectangles.


                   Contents of three memory words,
                     all adjacent to each other.
             Note that N is expressed as a byte-address.

                   _______________________________
                  |_|_|_|_|_|_|_|#|#|_|_|_|_|_|_|_|

                      Memory Location N (0x0180)

                   _______________________________
                  |_|_|_|_|_|#|#|#|#|#|#|_|_|_|_|_|

                     Memory Location N+2 (0x07E0)

                   _______________________________
                  |_|_|_|_|_|_|_|#|#|_|_|_|_|_|_|_|

                     Memory Location N+4 (0x0180)


                  Figure 27-5: Sample Memory Words


The system software lets you define linear memory as rectangular regions,
called bitplanes.  The figure below shows how the system would organize
three sequential words in memory into a rectangular bitplane with
dimensions of 16 x 3 pixels.

          _______________________________
         |_|_|_|_|_|_|_|#|#|_|_|_|_|_|_|_|  Memory Location N
         |_|_|_|_|_|#|#|#|#|#|#|_|_|_|_|_|  Memory Location N+2
         |_|_|_|_|_|_|_|#|#|_|_|_|_|_|_|_|  Memory Location N+4


       Figure 27-6: A Rectangular Bitplane Made from 3 Memory Words


The following figure shows how 4,000 words (8,000 bytes) of memory can be
organized to provide enough bits to define a single bitplane of a
full-screen, low-resolution video display (320 x 200).

  _______________________________         _______________________________
 |_|_|_|_|_|_|_|_|_|_|_|_|_|_|_|_| ----> |_|_|_|_|_|_|_|_|_|_|_|_|_|_|_|_|

         Memory Location N                     Memory Location N+38
  _______________________________         _______________________________
 |_|_|_|_|_|_|_|_|_|_|_|_|_|_|_|_| ----> |_|_|_|_|_|_|_|_|_|_|_|_|_|_|_|_|

       Memory Location N+40          |         Memory Location N+78
                                     |
                                     |
                                    \|/
  _______________________________         _______________________________
 |_|_|_|_|_|_|_|_|_|_|_|_|_|_|_|_| ----> |_|_|_|_|_|_|_|_|_|_|_|_|_|_|_|_|

      Memory Location N+7960                  Memory Location N+7998


      Figure 27-7: Bitplane for a Full-screen, Low-resolution Display


Each memory data word contains 16 data bits. The color of each pixel on a
video display line is directly related to the value of one or more data
bits in memory, as follows:

  * If you create a display in which each pixel is related to only
    one data bit, you can select from only two possible colors,
    because each bit can have a value of only 0 or 1.

  * If you use two bits per pixel, there is a choice of four
    different colors because there are four possible combinations of
    the values of 0 and 1 from each of the two bits.

  * If you specify three, four, or five bits per pixel, you will
    have eight, sixteen, or thirty-two possible choices of a color
    for a pixel.

  * If you use six bits per pixel, then depending on the video mode
    (EHB or HAM), you will have sixty-four or 4,096 possible choices
    for a pixel.

To create multicolored images, you must tell the system how many bits are
to be used per pixel. The number of bits per pixel is the same as the
number of bitplanes used to define the image.

As the video beam sweeps across the screen, the system retrieves one data
bit from each bitplane. Each of the data bits is taken from a different
bitplane, and one or more bitplanes are used to fully define the video
display screen. For each pixel, data-bits in the same x,y position in each
bitplane are combined by the system hardware to create a binary value.
This value determines the color that appears on the video display for that
pixel.

      _______________
     |
     | ‘          bit-plane 5
     | _\_____________
     ||  \
     || ‘ \        bit-plane 4
      | _\_\_____________
      ||  \ \
      || ‘ \ \      bit-plane 3
       | _\_\_\___________                   Bits from
       ||  \ \ \                               planes     Color
       || ‘ \ \ \    bit-plane 2             5,4,3,2,1  Registers
        | _\_\_\_\__________
        ||  \ \ \ \                                     _________
        || ‘ \ \ \ \  bit-plane 1              00000   |_________|
         | ^\ \ \ \ \                          00001   |_________|
         | | \ \ \ \ \                         00010   |_________|
         | |  \ \ \ \ \                        00011   |_________|
           |   \ \ \ \ \  ___  _ _ _ _ _       00100   |_________|
           |    \ \ \ \ \|   |          |        -     |         |
          One    \ \ \ \ | 1 |                   -     |    |    |
         Pixel    \ \ \ \|___|          |        -     |         |
                   \ \ \ \|   |                  -     |    |    |
                    \ \ \ | 1 |         |        -     |         |
                     \ \ \|___|                  -     |   \|/   |
                      \ \ \|   |        |    \   -     |_________|
                       \ \ | 0 |         - - - 11000   |#########|
                        \ \|___|        |    / 11001   |_________|
                         \ \|   |              11010   |_________|
                          \ | 0 |       |      11011   |_________|
                           \|___|              11100   |_________|
                            \|   |      |      11101   |_________|
                             | 0 |             11110   |_________|
                             |___| _ _ _|      11111   |_________|


        Figure 27-8: Bits from Each Bitplane Select Pixel Color


You will find more information showing how the data bits actually select
the color of the displayed pixel in the section below called
"ViewPort Color Selection."
The Amiga has a special-purpose coprocessor, called the Copper, that can
control nearly the entire graphics system.  The Copper can control
register updates, reposition sprites, change the color palette, and update
the blitter.  The graphics and animation routines use the Copper to set up
lists of instructions for handling displays, and advanced programmers can
create their own custom Copper lists.
    CAUTION:
    --------
    This section describes the lowest-level graphics interface to the
    system hardware.  If you use any of the routines and the data
    structures described in these sections, your program will essentially
    take over the entire display.  In general, this is not compatible
    with Intuition's multiwindow operating environment since Intuition
    calls these low-level routines for you.

The descriptions of the display routines, as well as those of the drawing
routines, occasionally use the same terminology as that in the Intuition
chapters.  These routines and data structures are the same ones that
Intuition software uses to produce its displays.

The computer produces a display from a set of instructions you define.
You organize the instructions as a set of parameters known as the View
structure (see the <graphics/view.h> include file for more information).
The following figure shows how the system interprets the contents of a
View structure.  This drawing shows a complete display composed of two
different component parts, which could (for example) be a low-resolution,
multicolored part and a high-resolution, two-colored part.


                                VIDEO DISPLAY
                          _________________________
                         |                         |
                         |  _____________________  |
                         | |                     | |
                         | |                     | |
                         | |                     | |
                         | |     ViewPort #1     | |
                         | |                     | |   Background color
                         | |                     | | / shows here
                         | |_____________________| |/
                         |    _________________    /
                         |  /|                 |  /|
                         | / |                 | / |
                         |/  |                 |   |
                         /   |   ViewPort #2   |   |
                        /|   |                 |   |
     ViewPorts must be / |   |                 |   |
       seperated by at   |   |_________________|   |
  least one blank line   |                         |
      (sometimes more).  |_________________________|

                        A complete display is composed
                          of one or more "ViewPorts"


            Figure 27-9: The Display Is Composed of ViewPorts


A complete display consists of one or more ViewPorts, whose display
sections are vertically separated from each other by at least one blank
scan line (non-interlaced). (If the system must make many changes to the
display during the transition from one ViewPort to the next, there may be
two or more blank scanlines between the ViewPorts.) The viewable area
defined by each ViewPort is rectangular. It may be only a portion of the
full ViewPort, it may be the full ViewPort, or it may be larger than the
full ViewPort, allowing it to be moved within the limits of its
DisplayClip. You are essentially defining a display consisting of a number
of stacked rectangular areas in which separate sections of graphics
rasters can be shown.

 Limitations on the Use of Viewports
 Characteristics of a Viewport
 Viewport Size Specifications
 Viewport Color Selection
 Viewport Display Modes
 Viewport Display Memory
 Forming a Basic Display
 Loading and Displaying the View
 Monitors, Modes and the Display Database
The system software for defining ViewPorts allows only vertically stacked
fields to be defined. The following figure shows acceptable and
unacceptable display configurations.

                                     \\                   ////
       _________________________      \\_________________////
      |                         |    |                         |
      |  _____________________  |    |  _____________________  |
      | |                     | |    | |                     | |
      | |                     | |    | |                     | |
      | |                     | |    | |                     | |
      | |                     | |    | |                     | |
      | |_____________________| |    | |_____________________| |
      |   ___________________   |    | |                     | |
      |  |                   |  |    | |                     | |
      |  |                   |  |    | |                     | |
      |  |                   |  |    | |                     | |
      |  |___________________|  |    | |_____________________| |
      |  _____________________  |    | |                     | |
      | |                     | |    | |                     | |
      | |                     | |    | |                     | |
      | |                     | |    | |                     | |
      | |_____________________| |    | |_____________________| |
      |                         |    |                         |
      |_________________________|    |_________________________|
                                      ////                 \\
              ACCEPTABLE             ////     INCORRECT     \\
              ----------                      ---------
                                     (Does not use at least one
                                    blank line between ViewPorts)


      \\                   ////    \\                   ////
       \\_________________////      \\_________________////
      |                         |    |                         |
      |  _____________________  |    |  _________   _________  |
      | |                     | |    | |         | |         | |
      | |                     | |    | |         | |         | |
      | |                     | |    | |         | |         | |
      | |     ___________     | |    | |         | |         | |
      | |    |           |    | |    | |         | |         | |
      | |____|           |____| |    | |         | |         | |
      |      |           |      |    | |         | |         | |
      |      |           |      |    | |         | |         | |
      |  ____|           |____  |    | |         | |         | |
      | |    |           |    | |    | |         | |         | |
      | |    |___________|    | |    | |         | |         | |
      | |                     | |    | |         | |         | |
      | |                     | |    | |         | |         | |
      | |                     | |    | |         | |         | |
      | |_____________________| |    | |_________| |_________| |
      |                         |    |                         |
      |_________________________|    |_________________________|
       ////                 \\      ////                 \\
      ////     INCORRECT     \\    ////     INCORRECT     \\
               ---------                      ---------
       (Cannot have overlapping        (Cannot create multiple
               ViewPorts)               horizontal ViewPorts)


        Figure 27-10: Correct and Incorrect Uses of ViewPorts


A ViewPort is related to the custom screen option of Intuition. In a
custom screen, you can split the screen into slices as shown in the
"correct" illustration of the above figure. Each custom screen can have
its own set of colors, use its own resolution, and show its own display
area.
To describe a ViewPort fully, you need to set the following parameters:
height, width, depth and display mode.

In addition to these parameters, you must tell the system the location in
memory from which the data for the ViewPort display should be retrieved
(by associating with it a BitMap structure) and how to position the final
ViewPort display on the screen. The ViewPort will take on the user's
default Workbench colors unless otherwise instructed with a ColorMap.  See
the section called "Preparing the ColorMap Structure" for more information.
The following figure illustrates that the variables DHeight, and DWidth
specify the size of a ViewPort.


                     DISPLAY BIT-PLANES
                  _________________________
                 |                         |
                 |  _____________________  |
                 | |                     | |
                 | |                     | |
                 | |                     | |
                 | |                     | |
                 | |                     | |
                 | |_____________________| |
                 |   __________________ _ _|_ _ _ _ _ _
                 |  |                  |   |       |
                 |  |                  |   |       |
                 |  |                  |   |
                 |  |                  |   |   DHeight = how
                 |  |                  |   |  many lines tall
                 |  |                  |   |
                 |  |                  |   |       |
                 |  |__________________|_ _|_ _ _ _|_ _
                 |                         |
                 |__|__________________|___|

                    |                  |

                    |-- DWidth = how --|
                      many pixels wide
                    |                  |

         Figure 27-11: Size Definition for a ViewPort


 ViewPort Height    ViewPort Width
The DHeight field of the ViewPort structure determines how many video
lines will be reserved to show the height of this display segment.  The
size of the actual segment depends on whether you define a non-interlaced
or an interlaced display.  An interlaced ViewPort displays twice as many
lines as does a non-interlaced ViewPort in the same physical height.

For example, a complete View consisting of two ViewPorts might be defined
as follows:

  * ViewPort 1 is 150 lines, high-resolution mode (uses the top
    three-quarters of the display).

  * ViewPort 2 is 49 lines of low-resolution mode (uses the bottom
    quarter of the display and allows the space for the required
    blank line between ViewPorts).

Initialize the height directly in DHeight.  Nominal height for a
non-interlaced display is 200 lines for NTSC, 256 for PAL.  Nominal height
for an interlaced display is 400 lines for NTSC, 512 for PAL.

To set your ViewPort to the maximum supported (displayable) height, use
the following code fragment (this requires Release 2):

    struct DimensionInfo querydims;
    struct Rectangle *oscan;
    struct ViewPort viewport;

    if (GetDisplayInfoData( NULL,(UBYTE *)&querydims,
                            sizeof(struct DimensionInfo),
                            DTAG_DIMS, modeID ))
    {
            /* Use StdOScan instead of MaxOScan to get standard   */
            /* overscan dimensions as set by the user in Overscan */
            /* Preferences                                        */
            oscan = &querydims.MaxOScan;
            viewPort->DHeight = oscan->MaxY - oscan->MinY + 1;
    }
The DWidth variable in the ViewPort structure determines how wide, in
pixels, the display segment will be.  To set your ViewPort to the maximum
supported (displayable) NTSC high-resolution width, use the following
fragment (this requires Release 2):

    struct DimensionInfo querydims;
    struct Rectangle *oscan;
    struct ViewPort viewport;

    /* Use PAL_MONITOR_ID instead of NTSC_MONITOR_ID to get PAL   */
    /* dimensions                                                 */
    if (GetDisplayInfoData( NULL,(UBYTE *)&querydims, sizeof(querydims),
        DTAG_DIMS, NTSC_MONITOR_ID|HIRES_KEY ))
    {
            /* Use StdOScan instead of MaxOScan to get standard   */
            /* overscan dimensions as set by the user in Overscan */
            /* Preferences                                        */
            oscan = &querydims.MaxOScan;
            viewPort->DWidth = oscan->MaxX - oscan->MinX + 1;
    }

You may specify a smaller value of pixels per line to produce a narrower
display segment or simply set ViewPort.DWidth to the nominal value for
this resolution.

Although the system software allows you define low-resolution displays as
wide as 362 pixels and high-resolution displays as wide as 724 pixels, you
should use caution in exceeding the normal values of 320 or 640,
respectively.  Because display overscan varies from one monitor to
another, many video displays will not be able to show all of a wider
display, and sprite display may also be affected.  However, if you use the
standard overscan values (DimensionInfo.StdOScan) provided by the Release
2 function GetDisplayInfoData() as shown above, the user's preference for
the size of the display will be satisfied.

If you are using hardware sprites or VSprites with your display, and you
specify ViewPort widths exceeding 320 or 640 pixels (for low or
high-resolution, respectively), it is likely that some hardware sprites
will not be properly rendered on the screen. These sprites may not be
rendered because playfield DMA (direct memory access) takes precedence
over sprite DMA when an extra-wide display is produced.  See the Amiga
Hardware Reference Manual for a more complete description of this
phenomenon.
The maximum number of colors that a ViewPort can display is determined by
the depth of the BitMap that the ViewPort displays. The depth is specified
when the BitMap is initialized. See the section below called
"Preparing the BitMap Structure."

Depth determines the number of bitplanes used to define the colors of the
rectangular image you are trying to build (the raster image) and the
number of different colors that can be displayed at the same time within a
ViewPort. For any single pixel, the system can display any one of 4,096
possible colors.

The following table shows depth values and the corresponding number of
possible colors for each value.


    Table 27-1: Depth Values and Number of Colors in the ViewPort


          Colors    Depth Value
          ------    -----------
              2          1
              4          2
              8          3         (Note 1)
             16          4         (Notes 1,2)
             32          5         (Notes 1,2,3)
             16          6         (Notes 1,4)
             64          6         (Notes 1,2,3,5)
          4,096          6         (Notes 1,2,3,6)

        Notes:
        1. Not available for SUPERHIRES.
        2. Single-playfield mode only - DUALPF not one of the
           ViewPort's attributes.
        3. Low-resolution mode only - neither HIRES nor
           SUPERHIRES one of the ViewPort attributes.
        4. Dual Playfield mode - DUALPF is an attribute of this
           ViewPort.  Up to eight colors (in three planes) for
           each playfield.
        5. Extra-Half-Brite mode - EXTRA_HALFBRITE is an
           attribute of this ViewPort.
        6. Hold-And-Modify mode only - HAM is an attribute of
           this ViewPort.


The color palette used by a ViewPort is specified in a ColorMap. See the
section called "Preparing the ColorMap" for more information.

Depending on whether single- or dual-playfield mode is used, the system
will use different color register groupings for interpreting the on-screen
colors. The table below details how the depth and the different ViewPort
modes affect the registers the system uses.


      Table 27-2: Color Registers Used in Single-playfield Mode


                        Color
           Depth   Registers Used
           -----   --------------
             1          0,1
             2          0-3
             3          0-7
             4          0-15
             5          0-31
             6          0-31       (if EXTRA_HALFBRITE is an
                                    attribute of this ViewPort.)

             6          0-15       (if HAM is an attribute of
                                    this ViewPort.)


The following table shows the five possible combinations when DUALPF is an
attribute of the ViewPort.


        Table 27-3: Color Register Used in Dual-playfield Mode


	   Depth       Color	   Depth       Color
           (PF-1)    Registers     (PF-2)    Registers
           ------    ---------     ------    ---------
             1          0,1          1          8,9
             2          0-3          1          8,9
             2          0-3          2          8-11
             3          0-7          2          8-11
             3          0-7          3          8-15
The system has many different display modes that you can specify for each
ViewPort.  Under 1.3, the eight constants that control the modes are
DUALPF, PFBA, HIRES, SUPERHIRES, LACE, HAM, SPRITES, and EXTRA_HALFBRITE.
Some, but not all of the modes can be combined in a ViewPort.  HIRES and
LACE combine to make a high-resolution, interlaced ViewPort, but HIRES and
SUPERHIRES conflict, and cannot be combined.

Under 1.3, you set these flags directly in the Modes field during
initialization of the ViewPort.  Under Release 2, there are many more
display modes possible than in 1.3 so a new system of flags and structures
is used to set the mode.  With Release 2, you set the display mode for a
ViewPort by using the VideoControl() function as described in the section
on "Monitors, Modes and the Display Database" later in this chapter.

The DUALPF and PFBA modes are related.  DUALPF tells the system to treat
the raster specified by this ViewPort as the first of two independent and
separately controllable playfields. It also modifies the manner in which
the pixel colors are selected for this raster (see the above table).

When PFBA is specified, it indicates that the second playfield has video
priority over the first one.  Playfield relative priorities can be
controlled when the playfield is split into two overlapping regions.
Single-playfield and dual-playfield modes are discussed below in
"Advanced Topics."

HIRES tells the system that the raster specified by this ViewPort is to be
displayed with (nominally) 640 horizontal pixels, rather than the 320
horizontal pixels of Lores mode.

SUPERHIRES tells the system that the raster specified by this ViewPort is
to be displayed with (nominally) 1280 horizontal pixels.  This can be used
with 31 kHz scan rates to provide the VGA and Productivity modes available
in Release 2.  SUPERHIRES modes require both the ECS and Release 2.   See
the section on "Determining Chip Versions" earlier in this chapter for an
explanation of how to find out if the ECS is present.

LACE tells the system that the raster specified by this ViewPort is to be
displayed in interlaced mode. If the ViewPort is non-interlaced and the
View is interlaced, the ViewPort will be displayed at its specified height
and will look only slightly different than it would look when displayed in
a non-interlaced View (this is handled by the system automatically). See
"Interlaced Mode vs. Non-interlaced Mode" below for more information.

HAM tells the system to use "hold-and-modify" mode, a special mode that
lets you display up to 4,096 colors on screen at the same time. It is
described in the "Advanced Topics" section.

SPRITES tells the system that you are using sprites in this display
(either VSprites or Simple Sprites). The system will load color registers
for the sprites. Note that since the mouse pointer is a sprite, omitting
this mode will prevent the mouse pointer from being displayed when this
ViewPort is frontmost. See the "Graphics Sprites, Bobs and Animation"
chapter for more information about sprites.

EXTRA_HALFBRITE tells the system to use the Extra-Half-Brite mode, a
special mode that allows you to display up to 64 colors on screen at the
same time.  It is described in the "Advanced Topics" section.

If you peruse the <graphics/view.h> include file you will see another
flag, EXTENDED_MODE. Never set this flag yourself; it is used by the
Release 2 system to control more advanced mode features.

Be sure to read the section on "Monitors, Modes and the Display Database"
for additional information about the ViewPort mode and how it has changed
in the Release 2 version of the operating system.

 Single-playfield Mode vs. Dual-playfield Mode
 Low-resolution Mode vs. High-resolution Mode
 Interlaced Mode vs. Non-interlaced Mode
When you specify single-playfield mode you are asking that the system treat all bitplanes as part of the definition of a single playfield image. Each of the bitplanes defined as part of this ViewPort contributes data bits that determine the color of the pixels in a single playfield.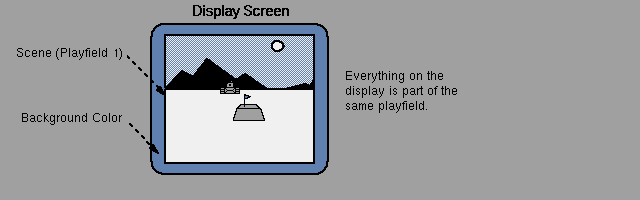
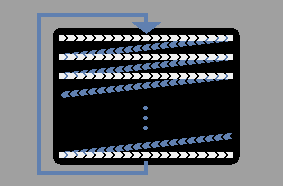
Figure 27-12: A Single-playfield Display If you use dual-playfield mode, you can define two independent, separately controllable playfield areas as shown on the next page.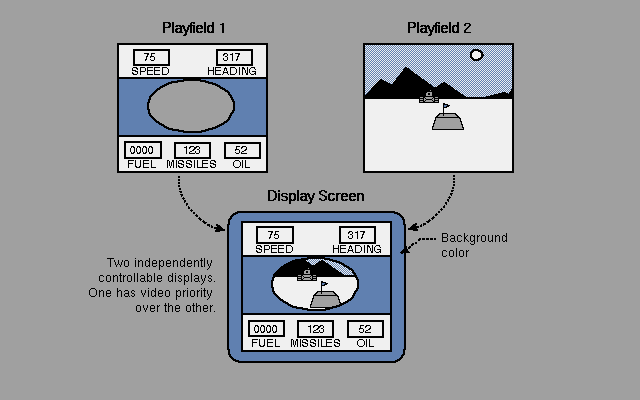
Figure 27-13: A Dual-playfield Display In the previous figure, PFBA was included in the display mode. If PFBA had not been included, the relative priorities would have been reversed; playfield 2 would have appeared to be behind playfield 1.
In LORES mode, horizontal lines of 320 pixels fill most of the ordinary
viewing area.  The system software lets you define a screen segment width
up to 362 pixels in this mode, or you can define a screen segment as
narrow as you desire (minimum of 16 pixels).  In HIRES mode, 640 pixels
fill a horizontal line. In this mode you can specify any width from 16 to
724 pixels. In SUPERHIRES mode, 1280 pixels fill a horizontal line. In
this mode you can specify any width from 16 to 1448 pixels. The fact that
many monitor manufacturers set their monitors to overscan the video
display normally limits you to showing only 16 to 320 pixels per line in
LORES, 16 to 640 pixels per line in HIRES, or 16 to 1280 pixels per line
in SUPERHIRES. Under Release 2, the user can set the monitor's viewable
screen size with the Preferences Overscan editor.


  |   |   |   |   |   |   |   |   |   |   |
  |   |   |   |   |   |   |   |   |   |   |
  |   |   |                       |   |   |
  |   |   |   320 Pixels Across   |   |   |  ViewPort.Modes = 0
  |   |   | width of 352 possible |   |   |
  |   |   |                       |   |   |
  |   |   |   |   |   |   |   |   |   |   |
  |   |   |   |   |   |   |   |   |   |   |


  | | | | | | | | | | | | | | | | | | | | |
  | | | | | | | | | | | | | | | | | | | | |
  | | | | | |                   | | | | | |
  | | | | |   640 Pixels Across   | | | | |  ViewPort.Modes = HIRES
  | | | | | width of 704 possible | | | | |
  | | | | |                       | | | | |
  | | | | | | | | | | | | | | | | | | | | |
  | | | | | | | | | | | | | | | | | | | | |


  |||||||||||||||||||||||||||||||||||||||||
  |||||||||||||||||||||||||||||||||||||||||
  |||||||||||                   |||||||||||
  ||||||||||  1280 Pixels Across  |||||||||  ViewPort.Modes = SUPERHIRES
  ||||||||| width of 1408 possible ||||||||
  ||||||||||                      |||||||||
  |||||||||||||||||||||||||||||||||||||||||
  |||||||||||||||||||||||||||||||||||||||||


    Figure 27-14: How HIRES and SUPERHIRES Affect the Width of Pixels
In interlaced mode, there are twice as many lines available as in
non-interlaced mode, providing better vertical resolution in the same
display area.


  -----------------------------------------
  -----------------------------------------
  ------------                -------------
  ----------- 200 lines define ------------  ViewPort.Modes = 0
  -----------  a full screen   ------------
  ------------                -------------
  -----------------------------------------
  -----------------------------------------


  =========================================
  =========================================
  ============                =============
  =========== 400 lines define ============  ViewPort.Modes = LACE
  ===========  a full screen   ============
  ============                =============
  =========================================
  =========================================

            Figure 27-15: How LACE Affects Vertical Resolution


If the View structure does not specify LACE, and the ViewPort specifies
LACE, only the top half of the ViewPort data will be displayed. If the
View structure specifies LACE and the ViewPort is non-interlaced, the same
ViewPort data will be repeated in both fields.  The height of the ViewPort
display is the height specified in the ViewPort structure. If both the
View and the ViewPort are interlaced, the ViewPort will be built with
double the normal vertical resolution.  That means it will need twice as
much data space in memory as a non-interlaced picture to fill the display.
The picture you create in memory can be larger than the screen image that can be displayed within your ViewPort. This big picture (called a raster and represented by the BitMap structure) can have a maximum size dependent upon the version of the Agnus chip in the Amiga. The ECS Agnus can handle rasters up to 16,384 by 16,384 pixels. Older Agnus chips are limited to rasters up to 1,024 by 1,024 pixels. The section earlier in this chapter on "Determining Chip Versions" explains how to find out which Agnus is installed. The example in the following figure introduces terms that tell the system how to find the display data and how to display it in the ViewPort. These terms are RHeight, RWidth, RyOffset, RxOffset, DHeight, DWidth, DyOffset and DxOffset.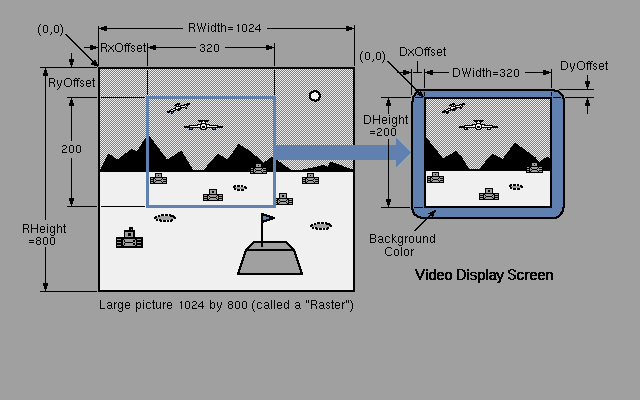
Figure 27-16: ViewPort Data Area Parameters The terms RHeight and RWidth do not appear in actual system data structures. They refer to the dimensions of the raster and are used here to relate the size of the raster to the size of the display area. RHeight is the number of rows in the raster and RWidth is the number of bytes per row times 8. The raster shown in the figure is too big to fit entirely in the display area, so you tell the system which pixel of the raster should appear in the upper left corner of the display segment specified by your ViewPort. The variables that control that placement are RyOffset and RxOffset. To compute RyOffset and RxOffset, you need RHeight, RWidth, DHeight, and DWidth. The DHeight and DWidth variables define the height and width in pixels of the portion of the display that you want to appear in the ViewPort. The example shows a full-screen, low-resolution mode (320-pixel), non-interlaced (200-line) display formed from the larger overall picture. Normal values for RyOffset and RxOffset are defined by the formulas: 0 < = RyOffset < = (RHeight - DHeight) 0 < = RxOffset < = (RWidth - DWidth) Once you have defined the size of the raster and the section of that raster that you wish to display, you need only specify where to put this ViewPort on the screen. This is controlled by the ViewPort variables DyOffset and DxOffset. These are offsets relative to the View.DxOffset and DyOffset. Possible NTSC values for DyOffset range from -23 to +217 (-46 to +434 if the ViewPort is interlaced), PAL values range from -15 to +267 (-30 to +534 for interlaced ViewPorts). Possible values for DxOffset range from -18 to +362 (-36 to +724 if the ViewPort is Hires, -72 to +1448 if SuperHires), when the View is in its default, initialized position. The parameters shown in the figure above are distributed in the following data structures: * View (information about the whole display) includes the variables that you use to position the whole display on the screen. The View structure contains a Modes field used to determine if the whole display is to be interlaced or non-interlaced. It also contains pointers to its list of ViewPorts and pointers to the Copper instructions produced by the system to create the display you have defined. * ViewPort (information about this segment of the display) includes the values DxOffset and DyOffset that are used to position this portion relative to the overall View. The ViewPort also contains the variables DHeight and DWidth, which define the size of this display segment; a Modes variable; and a pointer to the local ColorMap. Under Release 2, the VideoControl() function and its various tags are used to manipulate the ColorMap and ViewPort.Modes. Each ViewPort also contains a pointer to the next ViewPort. You create a linked list of ViewPorts to define the complete display. * RasInfo (information about the raster) contains the variables RxOffset and RyOffset. It also contains pointers to the BitMap structure and to a companion RasInfo structure if this is a dual playfield. * BitMap (information about memory usage) tells the system where to find the display and drawing area memory and shows how this memory space is organized, including the display's depth. You must allocate enough memory for the display you define. The memory you use for the display may be shared with the area control structures used for drawing. This allows you to draw into the same areas that you are currently displaying on the screen. As an alternative, you can define two BitMaps. One of them can be the active structure (that being displayed) and the other can be the inactive structure. If you draw into one BitMap while displaying another, the user cannot see the drawing taking place. This is called double-buffering of the display. See "Advanced Topics" below for an explanation of the steps required for double-buffering. Double-buffering takes twice as much memory as single-buffering because two full displays are produced. To determine the amount of required memory for each ViewPort for single-buffering, you can use the following formula. #include/* Depth, Width, and Height get set to something reasonable. */ UBYTE Depth, Width, Height; /* Calculate resulting VP size. */ bytes_per_ViewPort = Depth * RASSIZE(Width, Height); RASSIZE() is a system macro attuned to the current design of the system memory allocation for display rasters. See the <graphics/gfx.h> include file for the formula with which RASSIZE() is calculated. For example, a 32-color ViewPort (depth = 5), 320 pixels wide by 200 lines high currently uses 40,000 bytes. A 16-color ViewPort (depth = 4), 640 pixels wide by 400 lines high currently uses 128,000 bytes.
Here are the data structures that you need to define to create a basic
display:

    struct View view;               /* These get used in all versions of */
    struct ViewPort viewPort;       /* the OS */
    struct BitMap bitMap;
    struct RasInfo rasInfo;
    struct ColorMap *cm;

    struct ViewExtra *vextra;       /* Extra View data, new in Release 2 */
    struct ViewPortExtra *vpextra;  /* Extra ViewPort data, new in       */
                                    /* Release 2 */
    struct MonitorSpec *monspec;    /* Monitor data needed in Release 2  */
    struct DimensionInfo dimquery;  /* Display dimension data needed in  */
                                    /* Release 2 */

ViewExtra and ViewPortExtra are new data structures used in Release 2 to
hold extended data about their corresponding parent structure.  ViewExtra
contains information about the video monitor being used to render the
View.  ViewPortExtra contains information required for clipping of the
ViewPort.

GfxNew() is used to create these extended data structures and
GfxAssociate() is used to associate the extended data structure with an
appropriate parent structure.  Although GfxAssociate() can associate a
ViewPortExtra structure with a ViewPort, it is better to use
VideoControl() with the VTAG_VIEWPORTEXTRA_SET tag instead.  Keep in mind
that GfxNew() allocates memory for the resulting data structure which must
be returned using GfxFree() before the application exits.  The function
GfxLookUp() will find the address of an extended data structure from the
address of its parent.

 Preparing the View Structure
 Preparing the BitMap Structure
 Preparing the RasInfo Structure
 Preparing the ViewPort Structure
 Preparing the ColorMap Structure
 Creating the Display Instructions
The following code prepares the View structure for further use:

    InitView(&view);      /* Initialize the View.          */
    view.Modes |= LACE;   /* Only interlaced, 1.3 displays */
                          /* require this                  */

For Release 2 applications, a ViewExtra structure must also be created
with GfxNew() and associated with this View with GfxAssociate() as shown
in the example programs RGBBoxes.c and WBClone.c.

    /* Form the ModeID from values in  */
    modeID=DEFAULT_MONITOR_ID | HIRESLACE_KEY;

    /* Make the ViewExtra structure */
    if( vextra=GfxNew(VIEW_EXTRA_TYPE) )
        {
        /* Attach the ViewExtra to the View */
        GfxAssociate(&view , vextra);
        view.Modes |= EXTEND_VSTRUCT;

        /* Initialize the MonitorSpec field of the ViewExtra */
        if( monspec=OpenMonitor(NULL,modeID) )
            vextra->Monitor=monspec;
        else
            fail("Could not get MonitorSpec\n");
        }
     else fail("Could not get ViewExtra\n");
The BitMap structure tells the system where to find the display and
drawing memory and how this memory space is organized. The following code
section prepares a BitMap structure, including allocation of memory for
the bitmap. This is done with two functions, InitBitMap() and
AllocRaster(). InitBitMap() takes four arguments--a pointer to a BitMap
and the depth, width, and height of the desired bitmap. Once the bitmap
is initialized, memory for its bitplanes must be allocated. AllocRaster()
takes two arguments--width and height. Here is a code section to
initialize a bitmap:
/* Init BitMap for RasInfo. */
InitBitMap(&bitMap, DEPTH, WIDTH, HEIGHT);
/* Set the plane pointers to NULL so the cleanup routine will know */
/* if they were used. */
for(depth=0; depth
27 / / Forming a Basic Display / Preparing the RasInfo Structure
The RasInfo structure provides information to the system about the
location of the BitMap as well as the positioning of the display area as a
window against a larger drawing area. Use the following steps to prepare
the RasInfo structure:
/* Initialize the RasInfos. */
rasInfo.BitMap = &bitMap; /* Attach the corresponding BitMap. */
rasInfo.RxOffset = 0; /* Align upper left corners of display */
rasInfo.RyOffset = 0; /* with upper left corner of drawing area.*/
rasInfo.Next = NULL; /* for a single playfield display, there
* is only one RasInfo structure present */
The system may be made to reinterpret the RxOffset and RyOffset values in
a ViewPort's RasInfo structure by calling ScrollVPort() with the address
of the ViewPort. Changing one or both offsets and calling ScrollVPort()
has the effect of scrolling the ViewPort.
27 / / Forming a Basic Display / Preparing the ViewPort Structure
To prepare the ViewPort structure for further use, you call InitVPort()
and initialize certain fields as follows:
InitVPort(&viewPort); /* Initialize the ViewPort. */
viewPort.RasInfo = &rasInfo; /* The rasInfo must also be initialized */
viewPort.DWidth = WIDTH;
viewPort.DHeight = HEIGHT;
/* Under 1.3, you should set viewPort.Modes here to select a display
* mode. Under Release 2, use VideoControl() with VTAG_NORMAL_DISP_SET
* to select a display mode by attaching a DisplayInfo structure to
* the ViewPort. */
The InitVPort() routine presets certain default values in the ViewPort
structure. The defaults include:
* Modes variable set to zero--this means you select a low-resolution
display. (To alter this, use VideoControl() with the
VTAG_NORMAL_DISP_SET tag as explained below.)
* Next variable set to NULL--no other ViewPort is linked to this one.
If you want a display with multiple ViewPorts, you must fill in the
link yourself.
If you want to create a View with two or more ViewPorts you must declare
and initialize the ViewPorts as above. Then link them together using the
ViewPort.Next field with a NULL link for the ViewPort at the end of the
chain:
viewPortA.Next = &viewPortB; /* Tell 1st one the address of the 2nd. */
viewPortB.Next = NULL; /* There are no others after this one. */
For Release 2 applications, once a ViewPort has been prepared, a
ViewPortExtra structure must also be created with GfxNew(), initialized,
and associated with the ViewPort via the VideoControl() function. In
addition, a DisplayInfo for this mode must be attached to the ViewPort.
The fragment below shows how to do this. For complete examples, refer to
the program listings of RGBBoxes.c and WBClone.c.
struct TagItem vcTags[] = /* These tags will be passed to */
{ /* the VideoControl() function to */
{ VTAG_ATTACH_CM_SET, NULL }, /* set up the extended ViewPort */
{ VTAG_VIEWPORTEXTRA_SET, NULL }, /* structures required in Release */
{ VTAG_NORMAL_DISP_SET, NULL }, /* 2. The NULL ti_Data field of */
{ VTAG_END_CM, NULL } /* these tags must be filled in */
}; /* before making the call to */
/* VideoControl(). */
struct DimensionInfo dimquery; /* Release 2 structure for display size */
/* data */
/* Make a ViewPortExtra and get ready to attach it */
if( vpextra = GfxNew(VIEWPORT_EXTRA_TYPE) )
{
vcTags[1].ti_Data = (ULONG) vpextra;
/* Initialize the DisplayClip field of the ViewPortExtra structure */
if( GetDisplayInfoData( NULL , (UBYTE *) &dimquery ,
sizeof(struct dimquery) , DTAG_DIMS, modeID) )
{
vpextra->DisplayClip = dimquery.Nominal;
/* Make a DisplayInfo and get ready to attach it */
if( !(vcTags[2].ti_Data = (ULONG) FindDisplayInfo(modeID)) )
fail("Could not get DisplayInfo\n");
}
else fail("Could not get DimensionInfo\n");
}
else fail("Could not get ViewPortExtra\n");
/* This is for backwards compatibility with, for example, */
/* a 1.3 screen saver utility that looks at the Modes field */
viewPort.Modes = (UWORD) (modeID & 0x0000ffff);
27 / / Forming a Basic Display / Preparing the ColorMap Structure
When the View is created, Copper instructions are generated to change the
current contents of each color register just before the topmost line of a
ViewPort so that this ViewPort's color registers will be used for
interpreting its display. To set the color registers you create a
ColorMap for the ViewPort with GetColorMap() and call SetRGB4(). Here are
the steps used in 1.3 to initialize a ColorMap:
if( view.ColorMap=GetColorMap( 4L ) )
LoadRGB4((&viewPort, colortable, 4);
Under Release 2, a ColorMap is attached to the View -- usually along with
DisplayInfo and ViewExtra -- by calling the VideoControl() function.
/* RGB values for the four colors used. */
#define BLACK 0x000
#define RED 0xf00
#define GREEN 0x0f0
#define BLUE 0x00f
/* Define some colors in an array of UWORDS. */
static UWORD colortable[] = { BLACK, RED, GREEN, BLUE };
/* Fill the TagItem Data field with the address of the properly
initialized (including ViewPortExtra) structure to be passed to
VideoControl(). */
vc[0].ti_Data = (ULONG)viewPort;
/* Init ColorMap. 2 planes deep, so 4 entries
(2 raised to #planes power). */
if(cm = GetColorMap( 4L ) )
{
/* For applications that must be compatible with 1.3, replace */
/* the next 2 lines with: viewPort.ColorMap=cm; */
if( VideoControl( cm , vcTags ) )
fail("Could not attach extended structures\n");
/* Change colors to those in colortable. */
LoadRGB4(&viewPort, colortable, 4);
}
The 4 Is For Bits, Not Entries.
-------------------------------
The 4 in the name LoadRGB4() refers to the fact that each of the red,
green, and blue values in a color table entry consists of four bits.
It has nothing to do with the fact that this particular color table
contains four entries. The call GetRGB4() returns the RGB value of a
single entry of a ColorMap. SetRGB4CM() allows individual control of
the entries in the ColorMap before or after linking it into the
ViewPort.
The LoadRGB4() call above could be replaced with the following:
register USHORT entry;
/* Operate on the same four ColorMap entries as above. */
for (entry = 0; entry < 4; entry++)
{
/* Call SetRGB4CM() with the address of the ColorMap, the entry to
be changed, and the Red, Green, and Blue values to be stored
there.
*/
SetRGB4CM(viewPort.ColorMap, entry,
/* Extract the three color values from the one colortable entry. */
((colortable[entry] & 0x0f00) >> 8),
((colortable[entry] & 0x00f0) >> 4),
(colortable[entry] & 0x000f));
}
Notice above how the four bits for each color are masked out and shifted
right to get values from 0 to 15.
WARNING!
--------
It is important to use only the standard system ColorMap-related
calls to access the ColorMap entries. These calls will remain
compatible with recent and future enhancements to the ColorMap
structure.
You might need to specify more colors in the color map than you think. If
you use a dual playfield display (covered later in this chapter) with a
depth of 1 for each of the two playfields, this means a total of four
colors (two for each playfield). However, because playfield 2 uses color
registers starting from number 8 on up when in dual-playfield mode, the
color map must be initialized to contain at least 10 entries. That is, it
must contain entries for colors 0 and 1 (for playfield 1) and color
numbers 8 and 9 (for playfield 2). Space for sprite colors must be
allocated as well. For Amiga system software version 1.3 and earlier, when
in doubt, allocate a ColorMap with 32 entries, just in case.
27 / / Forming a Basic Display / Creating the Display Instructions
Now that you have initialized the system data structures, you can request
that the system prepare a set of display instructions for the Copper using
these structures as input data. During the one or more blank vertical
lines that precede each ViewPort, the Copper is busy changing the
characteristics of the display hardware to match the characteristics you
expect for this ViewPort. This may include a change in display resolution,
a change in the colors to be used, or other user-defined modifications to
system registers.
Here is the code that creates the display instructions:
/* Construct preliminary Copper instruction list. */
MakeVPort( &view, &viewPort );
In this line of code, &view is the address of the View structure and
&viewPort is the address of the first ViewPort structure. Using these
structures, the system has enough information to build the instruction
stream that defines your display.
MakeVPort() creates a special set of instructions that controls the
appearance of the display. If you are using animation, the graphics
animation routines create a special set of instructions to control the
hardware sprites and the system color registers. In addition, the advanced
user can create special instructions (called user Copper instructions) to
change system operations based on the position of the video beam on the
screen.
All of these special instructions must be merged together before the
system can use them to produce the display you have designed. This is done
by the system routine MrgCop() (which stands for "Merge Coprocessor
Instructions"). Here is a typical call:
/* Merge preliminary lists into a real Copper list in the view
structure. */
MrgCop( &view );
27 / Display Routines and Structures / Loading and Displaying the View
To display the View, you need to load it using LoadView() and turn on the
direct memory access (DMA). A typical call is shown below.
LoadView(&view);
The &view argument is the address of the View structure defined in the
example above.
There are two macros, defined in <graphics/gfxmacros.h>, that control
display DMA: ON_DISPLAY and OFF_DISPLAY. They simply turn the display DMA
control bit in the DMA control register on or off.
If you are drawing to the display area and do not want the user to see
intermediate steps in the drawing, you can turn off the display. Because
OFF_DISPLAY shuts down the display DMA and possibly speeds up other system
operations, it can be used to provide additional memory cycles to the
blitter or the 68000. The distribution of system DMA, however, allows
four-channel sound, disk read/write, and a sixteen-color, low-resolution
display (or four-color, high-resolution display) to operate at the same
time with no slowdown (7.1 megahertz effective rate) in the operation of
the 68000. Using OFF_DISPLAY in a multitasking environment may, however,
be an unfriendly thing to do to the other running processes. Use
OFF_DISPLAY with discretion.
A Custom ViewPort Example Exiting Gracefully
27 / / Loading and Displaying the View / Exiting Gracefully
The preceding sample program provides a way of exiting gracefully with the
cleanup() subroutine. This function returns to the memory manager all
dynamically-allocated memory chunks. Notice the calls to FreeRaster() and
FreeColorMap(). These calls correspond directly to the allocation calls
AllocRaster() and GetColorMap() located in the body of the program. Now
look at the calls within cleanup() to FreeVPortCopLists() and
FreeCprList(). When you call MakeVPort(), the graphics system dynamically
allocates some space to hold intermediate instructions from which a final
Copper instruction list is created. When you call MrgCop(), these
intermediate Copper lists are merged together into the final Copper list,
which is then given to the hardware for interpretation. It is this list
that provides the stable display on the screen, split into separate
ViewPorts with their own colors and resolutions and so on.
When your program completes, you must see that it returns all of the
memory resources that it used so that those memory areas are again
available to the system for reassignment to other tasks. Therefore, if
you use the routines MakeVPort() or MrgCop(), you must also arrange to use
FreeCprList() (pointing to each of those lists in the View structure) and
FreeVPortCopLists() (pointing to the ViewPort that is about to be
deallocated). If your View is interlaced, you will also have to call
FreeCprList(&view.SHFCprList) because an interlaced view has a separate
Copper list for each of the two fields displayed. Do not confuse
FreeVPortCopLists() with FreeCprList(). The former works on intermediate
Copper lists for a specific ViewPort, the latter directly on a hardware
Copper list from the View.
As a final caveat, notice that when you do free everything, the memory
manager or other programs may immediately change the contents of the freed
memory. Therefore, if the Copper is still executing an instruction stream
(as a result of a previous LoadView()) when you free that memory, the
display will malfunction. Once another View has been installed via
LoadView(), do a WaitTOF() for the new View to begin displaying, and then
you can begin freeing up your resources. WaitTOF() waits for the vertical
blanking period to begin and all vertical blank interrupts to complete
before returning to the caller. The routine WaitBOVP() (for
"WaitBottomOfViewPort") busy waits until the vertical beam reaches the
bottom of the specified ViewPort before returning to the caller. This
means no other tasks run until this function returns.
27 / Routines and Structures / Monitors, Modes and Display Database
The Release 2 graphics library supports a variety of new video monitors,
and new programmable video modes not available in older versions of the
operating system. Inquiries about the availability of these modes, their
dimensions and currently accessible options can be made through a database
indexed by the same key information used to open Intuition screens. This
design provides a good degree of compatibility with existing software,
between differently equipped hardware platforms and for both static and
dynamic data storage.
The Release 2 software may be running on A1000 computers which will not
have ECS, on A500 computers which may not have the latest ECS upgrade, and
on A2000 computers which generally have the latest ECS but may not have a
multi-sync monitor currently attached. This means that there are
compatibility issues to consider--what should happen when a required ECS
or monitor resource is not available for the desired mode.
Here are the compatibility criteria, in a simplified fashion:
Requires Release 2, and ECS Chips only
SuperHires mode (35nS pixel resolutions). This allows for very high
horizontal resolutions with the new ECS chip set and a standard NTSC
or PAL monitor. (SuperHires has twice as much horizontal resolution
as the old Hires mode.)
Requires Release 2, ECS Chips, and appropriate monitor
Productivity mode. This allows for flicker-free 640 x 480 color
displays with the addition of a multi-sync or bi-sync 31 Khz monitor.
(Productivity mode conforms, in a general way, to the VGA Mode 3
Standard 8514/A.)
Requires Release 2 (or the V35 of graphics.library under 1.3)
and appropriate monitor only
A2024 Scan Conversion. This allows for a very high resolution
grayscale display, typically 1008x800, suitable for desktop
publishing or similar applications. A special video monitor is
required (the monitor also supports the normal Amiga modes in
greyscale).
Requires Release 2 but not ECS Chips or appropriate monitor
Display database inquiries. This allows for programmers to determine
if the required resources are currently available for the requested
mode.
In addition, there are fallback modes (which do not require Release 2)
which resort to some reasonable display when a required resource is not
available.
New Monitors
New Modes
Mode Specification, Screen Interface
Mode Specification, ViewPort Interface
Coexisting Modes
ModeID Identifiers
The Display Database and the DisplayInfo Record
Accessing the DisplayInfo
Mode Availability
Accessing the MonitorSpec
Mode Properties
Nominal Values
Preference Items
Run-Time Name Binding of Mode Information
Relase 2 Custom ViewPort Example
27 / / Monitors, Modes and the Display Database / New Monitors
Currently, there are five possible monitor settings in the display
database (more may be added in future releases):
default.monitor
Since the default system monitor must be capable of displaying an
image no matter what chips are installed or what software revision is
in ROM, the graphics.library default.monitor is defined as a 15 Khz
monitor which can display NTSC in the U.S. or PAL in Europe.
ntsc.monitor
Since the ECS chip set allows for dynamic choice of standard scan
rates, NTSC applications running on European machines may choose to
be displayed on the ntsc.monitor to preserve the aspect ratio.
pal.monitor
Since the ECS chip set allows for dynamic choice of standard scan
rates, PAL applications running on American machines may choose to be
displayed on the pal.monitor to preserve the aspect ratio.
multisync.monitor
Programmably variable scan rates from 15 Khz through 31 Khz or more.
Responds to signal timings to decide what scan rate to display.
Required for Productivity (640 x 480 x 2 non-interlaced) display.
A2024.monitor
Scan converter monitor which provides 1008 x 800 x 2 (U.S.) or 1008 x
1024 x 2 (European) high-resolution, greyscale display. Does not
require ECS. Does require Release 2 (or 1.3 V35) graphics library.
27 / / Monitors, Modes and the Display Database / New Modes
In V1.3 and earlier versions of the OS, the mode for a display was
determined by a 16 bit-value specified either in the ViewPort.Modes field
(for displays set up with the graphics library) or in the
NewScreen.ViewModes field (for displays set up with Intuition). Prior to
Release 2, it was sufficient to indicate the mode of a display by setting
bits in the ViewPort.Modes field. Furthermore, programs routinely made
interpretations about a given display mode based on bit-by-bit testing of
this 16-bit value.
Table 27-4: ViewPort Modes Used in 1.3
Bit Name 1.3 ViewPort Modes
--- ---- ------------------
15 HIRES RP
14 SPRITE DC
13 VPHIDE DC R = respected by 1.3
12 reserved IP I = ignored by 1.3
11 HAM RP D = dynamic
10 DUALPF RP C = cleared on write by 1.3
9 reserved IP IFF writers
8 GENAUD IC P = preserved on write by 1.3
7 EHB RP IFF writers
6 PFBA (PF2PRI) RP
5 reserved IP
4 reserved IP
3 reserved IP
2 LACE RP
1 GENVID IC
0 reserved IP
Considering all the possible new mode combinations and the need for future
expansion, it is clear that the 16-bit mode specification used in 1.3
needs to be extended. Also, the specification of a mode needs to be
separated from its interpretation. Furthermore, since modes can be
grouped by the special monitor or physical device needed for the display,
it is also beneficial to make provisions to support additional monitors
and their modes in the future.
The approach taken in Release 2 is to introduce a new 32-bit display mode
specifier called a ModeID. The upper half of this specifier is called the
monitor part and the lower half is informally called the mode part. There
is a correspondence between the monitor part and the monitor's operating
modes (referred to as virtual monitors or MonitorSpecs after a system data
structure).
For example, the A2024 monitor, PAL and NTSC are all different virtual
monitors--the actual, physical monitor may be able to support more than
one of these virtual types. Another new concept in Release 2 is the
default monitor. The default monitor, represented by a zero value for the
ModeID monitor part, may be either PAL or NTSC depending on a jumper on
the motherboard.
Compatibility considerations--especially for IFF files and their CAMG
chunk--have dictated very careful choices for the bit values which make up
the mode part of the 32-bit ModeIDs. For example, the ModeIDs
corresponding to the older, 1.3 display modes have been constructed out of
a zero in the monitor part and the old 16-bit ViewPort.Modes bits in the
lower part (after several extraneous bits such as SPRITES and VP_HIDE are
cleared).
There are other such coincidences, but steps for compatibility with old
programs notwithstanding, there is a new rule:
Programmers shall never interpret ModeIDs on a bit-by-bit basis.
For example, if the HIRES bit is set it does not mean the display is 640
pixels wide because there can also be a doubling of the beam scan rate
under Release 2. Programs should not attempt to interpret modes directly
from the ViewPort.Modes field. The Release 2 graphics library provides a
suitable substitute for this information through its new display database
facility (explained below).
Likewise, under Release 2, the Mode of a ViewPort is no longer set
directly. Instead it is set indirectly by associating the ViewPort with
an abstract, 32-bit ModeID via the VideoControl() function.
These 32-bit ModeIDs have been carefully designed so that their lower 16
bits, when passed to graphics in the ViewPort.Modes field, provide some
degree of compatibility between different systems. Older V1.3 programs
will continue to work within the new scheme. (They will, however, not
gain the benefits of the new modes and monitors available.)
Table 27-5: Extended ViewPort Modes Used in Release 2
Bit Name Release 2 ViewPort Modes
--- ---- ------------------------
15 MDBIT9 RP
14 SPRITE DC
13 VPHIDE DC R = respected by Release
12 EXTEND RP I = ignored by Release 2
11 MDBIT8 RP D = dynamic
10 MDBIT7 RP C = cleared on write by
9 MDBIT6 RP Release 2 IFF writers
8 reserved IC P = preserved on write by
7 MDBIT5 RP Release 2 IFF writers
6 PF2PRI RP
5 MDBIT4 RP
4 MDBIT3 RP
3 MDBIT2 RP
2 MDBIT1 RP
1 reserved IC
0 MDBIT0 RP
Refer to the example program, WBClone.c, at the end of this section for
examples on opening Release 2 ViewPorts using the new ModeID specification.
27 / / / Mode Specification, Screen Interface
Opening an Intuition screen in one of the new modes requires the
specification of 32 bits of mode data. The NewScreen.ViewModes field is a
UWORD (16 bits). Therefore, the new Release 2 function OpenScreenTags()
must be used along with a SA_DisplayID tag which specifies the 32-bit
ModeID. See the "Intuition Screens" chapter for more on this.
The new display modes also introduce some complexity for applications that
want to support "mode-sensitive" processing. If a program wishes to open
a screen in the highest resolution that a user has available, there are
many more cases to handle under Release 2. Therefore, it will become
increasingly important to algorithmically layout a screen for correct,
functional and aesthetic operation. All the information needed to be
mode-flexible is available through the display database functions
(explained below).
27 / / / Mode Specification, ViewPort Interface
When working directly with graphics, the interface is based on View and
ViewPort structures, rather than on Intuition's Screen structure. As
previously mentioned, new information must be associated with the ViewPort
to specify the new Release 2 modes, and also with the View to specify what
virtual monitor the whole View will be displayed on. There is also a lot
of information to associate with a ViewPort regarding enhanced genlock
capabilities.
This association of this new data with the View is made through a display
database system which has been added to the Release 2 graphics library.
All correctly written programs that allocate a ColorMap structure for a
ViewPort use the GetColorMap() function to do it. Hence, in Release 2 the
ColorMap structure is used as the general purpose black box extension of
the ViewPort data.
To set or obtain the data in the extended structures, Release 2 provides a
new function named VideoControl() which takes a ColorMap as an argument.
This allows the setting and getting of the new extended display data.
This mechanism is used to associate a DisplayInfo handle (not a ModeID)
with a ViewPort. A DisplayInfo handle is an abstract link to the display
database area associated with a particular ModeID. This handle is passed
to the graphics database functions when getting or setting information
about the mode. Using VideoControl(), a program can enable, disable, or
obtain the state of a ViewPort's ColorMap, mode, genlock and other
features. The function uses a tag based interface and returns NULL if no
error occurred.
error = BOOL VideoControl( struct ColorMap *cm, struct TagItem *tag );
The first argument is a pointer to a ColorMap structure as returned by the
GetColorMap() function. The second argument is a pointer to an array of
video control tag items, used to indicate whether information is being
given or requested as well as to pass (or receive the information). The
tags you can use with VideoControl() include the following:
VTAG_ATTACH_CM_GET (or _SET) is used to obtain the ColorMap structure from
the indicated ViewPort or attach a given ColorMap to it.
VTAG_VIEWPORTEXTRA_GET (or _SET) is used to obtain the ViewPortExtra
structure from the indicated ColorMap structure or attach a given
ViewPortExtra to it. A ViewPortExtra structure is an extension of the
ViewPort structure and should be allocated and freed with GfxNew() and
GfxFree() and associated with the ViewPort with VideoControl().
VTAG_NORMAL_DISP_GET (or _SET) is used to obtain or set the DisplayInfo
structure for the standard or "normal" mode.
See <graphics/videocontrol.h> for a list of all the available tags. See
the section on genlocking for information on using VideoControl() to
interact with the Amiga's genlock capabilities. Note that the graphics
library will modify the tag list passed to VideoControl().
27 / / Monitors, Modes and the Display Database / Coexisting Modes
Each display mode specifies (among other things) a pixel resolution and a
monitor scan rate. Though the Amiga has the unique ability to change
pixel resolutions on the fly, it is not possible to change the speed of a
monitor beam in mid-frame. Therefore, if you set up a display of two or
more ViewPorts in different display modes requiring different scan rates,
at least one of the ViewPorts will be displayed with the wrong scan rate.
Such ViewPorts can be coerced into a different mode designed for the scan
rate currently in effect. You can do this in a couple of ways,
introducing or removing interlace to adjust the vertical dimension, and
changing to faster or slower pixels (higher or lower resolution) for the
horizontal dimension.
The disadvantage of introducing interlace is flicker. The disadvantage of
increasing resolution is the lessening of the video bus bandwidth and
possibly a reduction in the number of colors or palette resolution.
Under Intuition, the frontmost screen determines which of the conflicting
modes will take precedence. With the graphics library, the Modes field of
the View and its frontmost ViewPort or, in Release 2, the MonitorSpec of
the ViewExtra determine the scan rate. For some monitors (such as the
A2024), simultaneous display is excluded. This is a requirement only
because the A2024 modes require very special and intricate display Copper
list management.
27 / / Monitors, Modes and the Display Database / ModeID Identifiers
The following definitions appear in the include file
<graphics/displayinfo.h>. These values form the 32-bit ModeID which
consists of a _MONITOR_ID in the upper word, and a _MODE_KEY in the lower
word. Never interpret these bits directly. Instead use them with the
display database to obtain the information you need about the display mode.
/* normal identifiers */
#define MONITOR_ID_MASK 0xFFFF1000
#define DEFAULT_MONITOR_ID 0x00000000
#define NTSC_MONITOR_ID 0x00011000
#define PAL_MONITOR_ID 0x00021000
/* the following 20 composite keys are for Modes on the default */
/* Monitor NTSC & PAL "flavors" of these particular keys may be */
/* made by OR'ing the NTSC or PAL MONITOR_ID with the desired */
/* MODE_KEY... */
#define LORES_KEY 0x00000000
#define HIRES_KEY 0x00008000
#define SUPER_KEY 0x00008020
#define HAM_KEY 0x00000800
#define LORESLACE_KEY 0x00000004
#define HIRESLACE_KEY 0x00008004
#define SUPERLACE_KEY 0x00008024
#define HAMLACE_KEY 0x00000804
#define LORESDPF_KEY 0x00000400
#define HIRESDPF_KEY 0x00008400
#define SUPERDPF_KEY 0x00008420
#define LORESLACEDPF_KEY 0x00000404
#define HIRESLACEDPF_KEY 0x00008404
#define SUPERLACEDPF_KEY 0x00008424
#define LORESDPF2_KEY 0x00000440
#define HIRESDPF2_KEY 0x00008440
#define SUPERDPF2_KEY 0x00008460
#define LORESLACEDPF2_KEY 0x00000444
#define HIRESLACEDPF2_KEY 0x00008444
#define SUPERLACEDPF2_KEY 0x00008464
#define EXTRAHALFBRITE_KEY 0x00000080
#define EXTRAHALFBRITELACE_KEY 0x00000084
/* vga identifiers */
#define VGA_MONITOR_ID 0x00031000
#define VGAEXTRALORES_KEY 0x00031004
#define VGALORES_KEY 0x00039004
#define VGAPRODUCT_KEY 0x00039024
#define VGAHAM_KEY 0x00031804
#define VGAEXTRALORESLACE_KEY 0x00031005
#define VGALORESLACE_KEY 0x00039005
#define VGAPRODUCTLACE_KEY 0x00039025
#define VGAHAMLACE_KEY 0x00031805
#define VGAEXTRALORESDPF_KEY 0x00031404
#define VGALORESDPF_KEY 0x00039404
#define VGAPRODUCTDPF_KEY 0x00039424
#define VGAEXTRALORESLACEDPF_KEY 0x00031405
#define VGALORESLACEDPF_KEY 0x00039405
#define VGAPRODUCTLACEDPF_KEY 0x00039425
#define VGAEXTRALORESDPF2_KEY 0x00031444
#define VGALORESDPF2_KEY 0x00039444
#define VGAPRODUCTDPF2_KEY 0x00039464
#define VGAEXTRALORESLACEDPF2_KEY 0x00031445
#define VGALORESLACEDPF2_KEY 0x00039445
#define VGAPRODUCTLACEDPF2_KEY 0x00039465
#define VGAEXTRAHALFBRITE_KEY 0x00031084
#define VGAEXTRAHALFBRITELACE_KEY 0x00031085
/* a2024 identifiers */
#define A2024_MONITOR_ID 0x00041000
#define A2024TENHERTZ_KEY 0x00041000
#define A2024FIFTEENHERTZ_KEY 0x00049000
/* prototype identifiers */
#define PROTO_MONITOR_ID 0x00051000
27 / / / The Display Database and the DisplayInfo Record
For each ModeID, the graphics library has a body of data that enables the
set up of the display hardware and provides applications with information
about the properties of the display mode.
The display information in the database is accessed by searching it for a
record with a given ModeID. For performance reasons, a look-up function
named FindDisplayInfo() is provided which, given a ModeID, will return a
handle to the internal data record about the attributes of the display.
This handle is then used for queries to the display database and
specification of display mode to the low-level graphics routines. It is
never used as a pointer. The private data structure associated with a
given ModeID is called a DisplayInfo. From the <graphics/displayinfo.h>
include file:
/* the "public" handle to a DisplayInfo */
typedef APTR DisplayInfoHandle;
In order to obtain database information about an existing ViewPort, you
must first gain reference to its 32-bit ModeID. A graphics function
GetVPModeID() simplifies this operation:
modeID = ULONG GetVPModeID(struct ViewPort *vp )
The vp argument is pointer to a ViewPort structure. This function returns
the normal display ModeID, if one is currently associated with this
ViewPort. If no ModeID exists this function returns INVALID_ID.
Each new valid 32-bit ModeID is associated with data initialized by the
graphics library at powerup. This data is accessed by obtaining a handle
to it with the graphics function FindDisplayInfo().
handle = DisplayInfoHandle FindDisplayInfo(ULONG modeID);
Given a 32-bit ModeID key (modeID in the prototype above)
FindDisplayInfo() returns a handle to a valid DisplayInfo Record found in
the graphics database, or NULL. Using this handle, you can obtain
information about this video mode, including its default dimensions,
properties and whether it is currently available for use.
For instance, you can use a DisplayInfoHandle with the GetDisplayInfoData()
function to look up the properties of a mode (see below). Or use the
DisplayInfoHandle with VideoControl() and the VTAG_NORMAL_DISP_SET tag to
set up a custom ViewPort.
27 / / Monitors, Modes and Display Database / Accessing DisplayInfo
Basic information about a display can be obtained by calling the Release 2
graphics function GetDisplayInfoData(). You also call this function
during the set up of a ViewPort.
result = ULONG GetDisplayInfoData( DisplayInfoHandle handle, UBYTE *buf,
ULONG size, ULONG tagID, ULONG modeID )
Set the handle argument to the DisplayInfoHandle returned by a previous
call to FindDisplayInfo(). This function will also accept a 32-bit ModeID
directly as an argument. The handle argument should be set to NULL in
that case.
The buf argument points to a destination buffer you have set up to hold
the information about the properties of the display. The size argument
gives the size of the buffer which depends on the type of inquiry you make.
The tagID argument specifies the type information you want to know about
and may be set as follows:
DTAG_DISP Returns display properties and availability information
(the buffer should be set to the size of a DisplayInfo
structure).
DTAG_DIMS Returns default dimensions and overscan information (the
buffer should be set to the size of a DimensionInfo
structure).
DTAG_MNTR Returns monitor type, view position, scan rate, and
compatibility (the buffer should be set to the size of a
MonitorInfo structure).
DTAG_NAME Returns the user friendly name for this mode (the buffer
should be set to the size of a NameInfo structure).
If the call succeeds, result is positive and reports the number of bytes
actually transferred to the buffer. If the call fails (no information for
the ModeID was available), result is zero.
27 / / Monitors, Modes and the Display Database / Mode Availability
Even if the video monitor (NTSC, PAL, VGA, A2024) or ECS chips required to
support a given mode are not available, there will be a DisplayInfo for
all of the display modes. (This will not be the case for disk-based modes
such as Euro36, Euro72, etc.)
Thus, the graphics library provides the ModeNotAvailable() function to
determine whether a given mode is available, and if not, why not. Data
corruption might cause the look-up function, GetVPModeID(), to fail even
when it should not, so the careful programmer will always test the look-up
function's return value.
error = ULONG ModeNotAvailable( ULONG modeID )
The modeID argument is again a 32-bit ModeID as shown in
<graphics/displayinfo.h>. This function returns an error code, indicating
why this modeID is not available, or NULL if there is no known reason why
this mode should not be there. The ULONG return values from this function
are a proper superset of the DisplayInfo.NotAvailable field (defined in
<graphics/displayinfo.h>).
The graphics library checks for the presence of the ECS chips at power up,
but the monitor attached to the system cannot be detected and so must be
specified by the user through a separate utility named AddMonitor.
27 / / Monitors, Modes and Display Database / Accessing MonitorSpec
The OpenMonitor() function will locate and open the requested MonitorSpec.
It is called with either the name of the monitor or a ModeID.
mspc = struct MonitorSpec *OpenMonitor(STRPTR name, ULONG modeID)
If the name argument is non-NULL, the MonitorSpec is chosen by name. If
the name argument is NULL, the MonitorSpec is chosen by ModeID. If both
the name and ModeID arguments are NULL, a pointer to the MonitorSpec for
the default monitor is returned. OpenMonitor() returns either a pointer
to a MonitorSpec structure, or NULL if the requested MonitorSpec could not
be opened. The CloseMonitor() function relinquishes access to a
MonitorSpec previously acquired with OpenMonitor().
To set up a View in Release 2, a ViewExtra structure must also be created
and attached to it. The ViewExtra.Monitor field must be initialized to
the address of a valid MonitorSpec structure before the View is displayed.
Use OpenMonitor() to initialize the Monitor field.
27 / / Monitors, Modes and the Display Database / Mode Properties
Here is an example of how to query the properties of a given mode from a
DisplayInfoHandle.
#include
check_properties( handle )
DisplayInfoHandle handle;
{
struct DisplayInfo queryinfo;
/* fill in the displayinfo buffer with basic Mode display data */
if(GetDisplayInfoData(handle, (UBYTE *)&queryinfo,sizeof(queryinfo),
DTAG_DISP,NULL)))
{
/* check for Properties of this Mode */
if(queryinfo.PropertyFlags)
{
if(queryinfo.PropertyFlags & DIPF_IS_LACE)
printf("mode is interlaced");
if(queryinfo.PropertyFlags & DIPF_IS_DUALPF)
printf("mode has dual playfields");
if(queryinfo.PropertyFlags & DIPF_IS_PF2PRI)
printf("mode has playfield two priority");
if(queryinfo.PropertyFlags & DIPF_IS_HAM)
printf("mode uses hold-and-modify");
if(queryinfo.PropertyFlags & DIPF_IS_ECS)
printf("mode requires the ECS chip set");
if(queryinfo.PropertyFlags & DIPF_IS_PAL)
printf("mode is naturally displayed on pal.monitor");
if(queryinfo.PropertyFlags & DIPF_IS_SPRITES)
printf("mode has sprites");
if(queryinfo.PropertyFlags & DIPF_IS_GENLOCK)
printf("mode is compatible with genlock displays");
if(queryinfo.PropertyFlags & DIPF_IS_WB)
printf("mode will support workbench displays");
if(queryinfo.PropertyFlags & DIPF_IS_DRAGGABLE)
printf("mode may be dragged to new positions");
if(queryinfo.PropertyFlags & DIPF_IS_PANELLED)
printf("mode is broken up for scan conversion");
if(queryinfo.PropertyFlags & DIPF_IS_BEAMSYNC)
printf("mode supports beam synchronization");
}
}
}
27 / / Monitors, Modes and the Display Database / Nominal Values
Some of the display information is initialized in ROM for each mode such
as recommended nominal (or default) dimensions. Even though this
information is presumably static, it would still be a mistake to hardcode
assumptions about these nominal values into your code.
Gathering information about the nominal dimensions of various modes is
handled in a fashion similar to to the basic queries above. Here is an
example of how to query the nominal dimensions of a given mode from a
DisplayInfoHandle.
#include
check_dimensions( handle )
DisplayInfoHandle handle;
{
struct DimensionInfo query;
/* fill the buffer with Mode dimension information */
if(GetDisplayInfoData(handle, (UBYTE *)&query,sizeof(query),
DTAG_DIMS,NULL)))
{
/* display Nominal dimensions of this Mode */
printf("nominal width = %ld",
query.Nominal.MaxX - query.Nominal.MinX + 1);
printf("nominal height = %ld",
query.Nominal.MaxY - query.Nominal.MinY + 1);
}
}
27 / / Monitors, Modes and the Display Database / Preference Items
Some display information is changed in response to user Preference
specification. Until further notice, this will be reserved as a system
activity and use private interface methods.
One Preferences setting that may affect the display data is the user's
preferred overscan limits to the monitor associated with this mode. Here
is an example of how to query the overscan dimensions of a given mode from
a DisplayInfoHandle.
#include
check_overscan( handle )
DisplayInfoHandle handle;
{
struct DimensionInfo query;
/* fill the buffer with Mode dimension information */
if(GetDisplayInfoData(handle, (UBYTE *)&query,sizeof(query),
DTAG_DIMS,NULL)))
{
/* display standard overscan dimensions of this Mode */
printf("overscan width = %ld",
query.StdOScan.MaxX - query.StdOScan.MinX + 1);
printf("overscan height = %ld",
query.StdOScan.MaxY - query.StdOScan.MinY + 1);
}
}
27 / / / Run-Time Name Binding of Mode Information
It is useful to associate common names with the various display modes.
The Release 2 graphics library includes a provision for binding a name to
a display mode so that it will be available via a query. This will be
useful in the implementation of a standard screen-format requester. Note
however that no names are bound initially since the bound names will take
up RAM at all times. Instead defaults are used.
Bound names will override the defaults though, so that, until the
screen-format requester is localized to a non-English language, the modes
can be localized by binding foreign language names to them. Here is an
example of how to query the run-time name binding of a given mode from a
DisplayInfoHandle.
#include
check_name_bound( handle )
DisplayInfoHandle handle;
{
struct NameInfo query;
/* fill the buffer with Mode dimension information */
if(GetDisplayInfoData(handle, (UBYTE *)&query,sizeof(query),
DTAG_NAME,NULL)))
{
printf("%s", query.Name);
}
}
27 Graphics Primitives / Advanced Topics
This section covers advanced display topics such as dual-playfield mode,
double-buffering, EHB mode and HAM mode.
Creating a Dual-Playfield Display Extra-Half-Brite Mode
Creating a Double-Buffered Display Hold-And-Modify Mode
27 / Advanced Topics / Creating a Dual-Playfield Display
In dual-playfield mode, you have two separately controllable playfields.
You specify dual-playfield mode in 1.3 by setting the DUALPF bit in the
ViewPort.Modes field. In Release 2, you specify dual-playfield by using
any ModeID that includes DPF in its name as listed in <graphics/displayinfo.h>.
In dual-playfield mode, you always define two RasInfo data structures.
Each of these structures defines one of the playfields. There are five
different ways you can configure a dual-playfield display, because there
are five different distributions of the bitplanes which the system
hardware allows.
Table 27-6: Bitplane Assignment in Dual-playfield Mode
Number of Playfield 1 Playfield 2
Bitplanes Depth Depth
--------- ----- -----
2 1 1
3 2 1
4 2 2
5 3 2
6 3 3
Under 1.3 if PFBA is set in the ViewPort.Modes field, or, under Release 2,
if the ModeID includes DPF2 in its name, then the playfield priorities are
swapped and playfield 2 will be displayed in front of playfield 1. In
this way, you can get more bitplanes in the background playfield than you
have in the foreground playfield. The playfield priority affects only one
ViewPort at a time. If you have multiple ViewPorts with dual-playfields,
the playfield priority is set for each one individually.
Here's a summary of the steps you need to take to create a dual-playfield
display:
* Allocate one View structure and one ViewPort structure.
* Allocate two BitMap structures. Allocate two RasInfo structures
(linked together), each pointing to a separate BitMap. The two
RasInfo structures are linked together as follows:
struct RasInfo playfield1, playfield2;
playfield1.Next = &playfield2;
playfield2.Next = NULL;
* Initialize each BitMap structure to describe one playfield, using one
of the permissible bitplane distributions shown in the above table
and allocate memory for the bitplanes themselves. Note that BitMap 1
and BitMap 2 need not be the same width and height.
* Initialize the ViewPort structure. In 1.3, specify dual-playfield
mode by setting the DUALPF bit (and PFBA, if appropriate) in the
ViewPort.Modes field. Under Release 2, specify dual-playfield mode
by selecting a ModeID that includes DPF (or DPF2) in its name as
listed in <graphics/displayinfo.h>. Set the ViewPort.RasInfo field
to the address of the playfield 1 RasInfo.
* Set up the ColorMap information
* Call MakeVPort(), MrgCop() and LoadView() to display the newly
created ViewPort.
For display purposes, each of the two BitMaps is assigned to a separate
ViewPort. To draw separately into the BitMaps, you must also assign these
BitMaps to two separate RastPorts. The section called
"Initializing a RastPort Structure" shows you how to use a RastPort data
structure to control your drawing routines.
27 / Advanced Topics / Creating a Double-Buffered Display
To produce smooth animation or similar effects, it is occasionally
necessary to double-buffer your display. To prevent the user from seeing
your graphics rendering while it is in progress, you will want to draw
into one memory area while actually displaying a different area.
There are two methods of creating and displaying a double-buffered
display. The simplest method is to create two complete Views and switch
back and forth between them with LoadView() and WaitTOF().
The second method consists of creating two separate display areas and two
sets of pointers to those areas for a single View. This is more
complicated but takes less memory.
* Allocate one ViewPort structure and one View structure.
* Allocate two BitMap structures and one RasInfo structure. Initialize
each BitMap structure to describe one drawing area and allocate
memory for the bitplanes themselves. Initialize the RasInfo
structure, setting the RasInfo.BitMap field to the address of one of
the two BitMaps you created.
* Call MakeVPort(), MrgCop() and LoadView(). When you call MrgCop(),
the system uses the information you have provided to create a Copper
instruction list for the Copper to execute. The system allocates
memory for a long-frame (LOF) Copper list and, if this is an
interlaced display, a short-frame (SHF) Copper list as well. The
system places a pointer to the long-frame Copper list in
View.LOFCprList and a pointer to a short-frame Copper list (if this
is an interlaced display) in View.SHFCprList. The Copper instruction
stream referenced by these pointers applies to the first BitMap.
* Save the values in View.LOFCprList and View.SHFCprlist and reset
these fields to zero. Place a pointer to the second BitMap structure
in the RasInfo.BitMap field. Next call MakeVPort() and MrgCop().
* When you perform MrgCop() with the Copper instruction list fields of
the View set to zero, the system automatically allocates and fills in
a new list of instructions for the Copper. Now you have created two
sets of instruction streams for the Copper, one that works with data
in the first BitMap and the other that works with data in the second
BitMap.
* You can save pointers to the second list of Copper instructions as
well. Then, to perform the double-buffering, alternate between the
two Copper lists. The code for the double-buffering loop would be as
follows: call WaitTOF(), change the Copper instruction list pointers
in the View, call LoadView() to show one of the BitMaps while drawing
into the other BitMap, and repeat.
Remember that you will have to call FreeCprList() on both sets of Copper
lists when you have finished.
27 / Advanced Topics / Extra-Half-Brite Mode
In the Extra-Half-Brite mode you can create a single-playfield,
low-resolution display with up to 64 colors, double the normal maximum of
32. This requires your ViewPort to be defined with six bitplanes. Under
1.3, you specify EHB mode by setting the EXTRA_HALFBRITE bit in the
ViewPort.Modes field. Under Release 2, you specify EHB by selecting any
ModeID which includes EXTRAHALFBRITE in its name as defined in the include
file <graphics/displainfo.h>.
When setting up the color palette for an EHB display, you only specify
values for registers 0 to 31. If you draw using color numbers 0 through
31, the pixel you draw will be the color specified in that particular
system color register. If you draw using a color number from 32 to 63,
then the color displayed will be half the intensity value of the
corresponding color register from 0 to 31. For example, if color register
0 is set to 0xFFF (white), then color number 32 would be half this value
or 0x777 (grey).
EHB mode uses all six bitplanes. The color register (0 through 31) is
obtained from the bit combinations from planes 5 to 1, in that order of
significance. Plane 6 is used to determine whether the full intensity
(bit value 0) color or half-intensity (bit value 1) color is to be
displayed.
27 / Advanced Topics / Hold-And-Modify Mode
In hold-and-modify mode you can create a single-playfield, low-resolution
display in which 4,096 different colors can be displayed simultaneously.
This requires your ViewPort to be defined with six bitplanes. Under 1.3,
you specify HAM mode by setting the HAM flag in the ViewPort.Modes field.
Under Release 2, you specify HAM by selecting any ModeID which includes
HAM in its name as defined in <graphics/displayinfo.h>.
When you draw into the BitMap associated with this ViewPort, you can
choose colors in one of four different ways. If you draw using color
numbers 0 to 15, the pixel you draw will appear in the color specified in
that particular system color register. If you draw with any other color
value (16 to 63) the color displayed depends on the color of the pixel
that is to the immediate left of this pixel on the screen. To see how
this works, consider how the bitplanes are used in HAM.
Hold-and-modify mode requires six bitplanes. Planes 5 and 6 are used to
modify the way bits from planes 1 through 4 are treated, as follows:
* If the bit combination from planes 6 and 5 for any given pixel is 00,
normal color selection procedure is followed. Thus, the bit
combinations from planes 4 to 1, in that order of significance, are
used to choose one of 16 color registers (registers 0 through 15).
* If the bit combination in planes 6 and 5 is 01, the color of the
pixel immediately to the left of this pixel is duplicated and then
modified. The bit combinations from planes 4 through 1 are used to
replace the four bits representing the blue value of the preceding
pixel color. (No color registers are changed.)
* If the bit combination in planes 6 and 5 is 10, then the color of the
pixel immediately to the left of this pixel is duplicated and
modified. The bit combinations from planes 4 through 1 are used to
replace the four bits representing the red value of the preceding
pixel color.
* If the bit combination in planes 6 and 5 is 11, then the color of the
pixel immediately to the left of this pixel is duplicated and
modified. The bit combinations from planes 4 through 1 are used to
replace the four bits representing the green value of the preceding
pixel color.
You can use just five bitplanes in HAM mode. In that case, the data for
the sixth plane is automatically assumed to be 0. Note that for the first
pixel in each line, hold-and-modify begins with the background color. The
color choice does not carry over from the preceding line.
Note:
-----
Since a typical hold-and-modify pixel only changes one of the three
RGB color values at a time, color selection is limited. HAM mode
does allow for the display of 4,096 colors simultaneously, but there
are only 64 color options for any given pixel (not 4,096). The color
of a pixel depends on the color of the preceding pixel.
27 Graphics Primitives / Drawing Routines
Most of the graphics drawing routines require information about how the
drawing is to take place. For this reason, most graphics drawing routines
use a data structure called a RastPort, that contains pointers to the
drawing area and drawing variables such as the current pen color and font
to use. In general, you pass a pointer to your RastPort structure as an
argument whenever you call a drawing function.
The RastPort Structure
Using the Graphics Drawing Routines
Performing Data Move Operations
27 / Drawing Routines / The RastPort Structure
The RastPort data structure can be found in the include files
<graphics/rastport.h> and <graphics/rastport.i>. It contains the following
information:
struct RastPort
{
struct Layer *Layer;
struct BitMap *BitMap;
UWORD *AreaPtrn; /* Ptr to areafill pattern */
struct TmpRas *TmpRas;
struct AreaInfo *AreaInfo;
struct GelsInfo *GelsInfo;
UBYTE Mask; /* Write mask for this raster */
BYTE FgPen; /* Foreground pen for this raster */
BYTE BgPen; /* Background pen */
BYTE AOlPen; /* Areafill outline pen */
BYTE DrawMode; /* Drawing mode for fill, lines, and text */
BYTE AreaPtSz; /* 2^n words for areafill pattern */
BYTE linpatcnt; /* Current line drawing pattern preshift */
BYTE dummy;
UWORD Flags; /* Miscellaneous control bits */
UWORD LinePtrn; /* 16 bits for textured lines */
WORD cp_x, cp_y; /* Current pen position */
UBYTE minterms[8];
WORD PenWidth;
WORD PenHeight;
struct TextFont *Font; /* Current font address */
UBYTE AlgoStyle; /* The algorithmically generated style */
UBYTE TxFlags; /* Text specific flags */
UWORD TxHeight; /* Text height */
UWORD TxWidth; /* Text nominal width */
UWORD TxBaseline; /* Text baseline */
WORD TxSpacing; /* Text spacing (per character) */
APTR *RP_User;
ULONG longreserved[2];
#ifndef GFX_RASTPORT_1_2
UWORD wordreserved[7]; /* Used to be a node */
UBYTE reserved[8]; /* For future use */
#endif
};
The sections that follow explain each of the items in the
RastPort structure is used.
Initializing a BitMap Structure
Initializing a RastPort Structure
RastPort Area-fill Information
RastPort Graphics Element Pointer
RastPort Write Mask
RastPort Drawing Pens
RastPort Drawing Modes
RastPort Line and Area Drawing Patterns
RastPort Pen Position and Size
Text Attributes
27 / / The RastPort Structure / Initializing a BitMap Structure
Associated with the RastPort is another data structure called a BitMap
which contains a description of the organization of the data in the
drawing area. This tells the graphics library where in memory the drawing
area is located and how it is arranged. Before you can set up a RastPort
for drawing you must first declare and initialize a BitMap structure,
defining the characteristics of the drawing area, as shown in the
following example. This was already shown in the "Forming a Basic Display"
section, but it is repeated here because it relates to drawing as well as
to display routines. (You need not necessarily use the same BitMap for
both the drawing and the display, e.g., double-buffered displays.)
#define DEPTH 2 /* Two planes deep. */
#define WIDTH 320 /* Width in pixels. */
#define HEIGHT 200 /* Height in scanlines. */
struct BitMap bitMap;
/* Initialize the BitMap. */
InitBitMap(&bitMap, DEPTH, WIDTH, HEIGHT);
27 / / The RastPort Structure / Initializing a RastPort Structure
Once you have a BitMap set up, you can declare and initialize the RastPort
and then link the BitMap into it. Here is a sample initialization
sequence:
struct BitMap bitMap = {0};
struct RastPort rastPort = {0};
/* Initialize the RastPort and link the BitMap to it. */
InitRastPort(&rastPort);
rastPort.BitMap = &bitMap;
Initialize, Then Link.
----------------------
You cannot link the bitmap in until after the RastPort has been
initialized.
27 / / The RastPort Structure / RastPort Area-fill Information
Two structures in the RastPort -- AreaInfo and TmpRas -- define certain
information for area filling operations. The AreaInfo pointer is
initialized by a call to the routine InitArea().
#define AREA_SIZE 200
register USHORT i;
WORD areaBuffer[AREA_SIZE];
struct AreaInfo areaInfo = {0};
/* Clear areaBuffer before calling InitArea(). */
for (i=0; iAreaMove(), AreaDraw(), and AreaEnd().
Typically, you prepare the RastPort for area-filling by following the
steps in the code fragment above and then linking your AreaInfo into the
RastPort like so:
rastPort->AreaInfo = &areaInfo;
In addition to the AreaInfo structure in the RastPort, you must also
provide the system with some work space to build the object whose vertices
you are going to define. This requires that you initialize a TmpRas
structure, then point to that structure for your RastPort to use. First
the TmpRas structure is initialized (via InitTmpRas()) then it is linked
into the RastPort structure.
Allocate Enough Space.
----------------------
The area to which TmpRas.RasPtr points must be at least as large
as the area (width times height) of the largest rectangular region
you plan to fill. Typically, you allocate a space as large as a
single bitplane (usually 320 by 200 bits for Lores mode, 640 by 200
for Hires, and 1280 by 200 for SuperHires).
When you use functions that dynamically allocate memory from the system,
you must remember to return these memory blocks to the system before your
program exits. See the description of FreeRaster() in the Amiga ROM
Kernel Reference Manual: Includes and Autodocs.
27 / / The RastPort Structure / RastPort Graphics Element Pointer
The graphics element pointer in the RastPort structure is called GelsInfo.
If you are doing graphics animation using the GELS system, this pointer
must refer to a properly initialized GelsInfo structure. See the chapter
on "Graphics Sprites, Bobs and Animation" for more information.
27 / / The RastPort Structure / RastPort Write Mask
The write mask is a RastPort variable that determines which of the
bitplanes are currently writable. For most applications, this variable is
set to all bits on. This means that all bitplanes defined in the BitMap
are affected by a graphics writing operation. You can selectively disable
one or more bitplanes by simply specifying a 0 bit in that specific
position in the control byte. For example:
#include
SetWrMsk(&rastPort, 0xFB); /* disable bitplane 2 */
A useful application for the Mask field is to set or clear plane 6 while
in the Extra-Half-Brite display mode to create shadow effects. For
example:
SetWrMsk(&rastPort, 0xE0); /* Disable planes 1 through 5. */
SetAPen(&rastPort, 0); /* Clear the Extra-Half-Brite bit */
RectFill(&rastPort, 20, 20, 40, 30); /* in the old rectangle. */
SetAPen(&rastPort, 32); /* Set the Extra-Half-Brite bit */
RectFill(&rastPort, 30, 25, 50, 35); /* in the new rectangle. */
SetWrMsk(&rastPort, -1); /* Re-enable all planes. */
27 / / The RastPort Structure / RastPort Drawing Pens
The Amiga has three different drawing "pens" associated with the graphics
drawing routines. These are:
* FgPen--the foreground or primary drawing pen. For historical
reasons, it is also called the A-Pen.
* BgPen--the background or secondary drawing pen. For historical
reasons, it is also called the B-Pen.
* AOlPen--the area outline pen. For historical reasons, it is also
called the O-Pen.
A drawing pen variable in the RastPort contains the current value (range
0-255) for a particular color choice. This value represents a color
register number whose contents are to be used in rendering a particular
type of image. The effect of the pen value is dependent upon the drawing
mode and can be influenced by the pattern variables and the write mask as
described below. Always use the system calls (e.g. SetAPen()) to set the
different pens, never store values directly into the pen fields of the
RastPort.
Colors Repeat Beyond 31.
------------------------
The Amiga 500/2000/3000 (with original chips or ECS) contains only
32 color registers. Any range beyond that repeats the colors in
0-31. For example, pen numbers 32-63 refer to the colors in registers
0-31 (except when you are using Extra-Half-Brite mode).
The graphics library drawing routines support BitMaps up to eight planes
deep allowing for future expansion of the Amiga hardware.
The color in FgPen is used as the primary drawing color for rendering
lines and areas. This pen is used when the drawing mode is JAM1 (see the
next section for drawing modes). JAM1 specifies that only one color is to
be "jammed" into the drawing area.
You establish the color for FgPen using the statement:
SetAPen(&rastPort, newcolor);
The color in BgPen is used as the secondary drawing color for rendering
lines and areas. If you specify that the drawing mode is JAM2 (jamming
two colors) and a pattern is being drawn, the primary drawing color
(FgPen) is used where there are 1s in the pattern. The secondary drawing
color (BgPen) is used where there are 0s in the pattern.
You establish the drawing color for BgPen using the statement:
SetBPen(&rastPort, newcolor);
The area outline pen AOlPen is used in two applications: area fill and
flood fill. (See "Area Fill Operations" below.) In area fill, you can
specify that an area, once filled, can be outlined in this AOlPen color.
In flood fill (in one of its operating modes) you can fill until the
flood-filler hits a pixel of the color specified in this pen variable.
You establish the drawing color for AOlPen using the statement:
SetOPen(&rastPort, newcolor);
27 / / The RastPort Structure / RastPort Drawing Modes
Four drawing modes may be specified in the RastPort.DrawMode field:
JAM1
Whenever you execute a graphics drawing command, one color is jammed
into the target drawing area. You use only the primary drawing pen
color, and for each pixel drawn, you replace the color at that
location with the FgPen color.
JAM2
Whenever you execute a graphics drawing command, two colors are
jammed into the target drawing area. This mode tells the system that
the pattern variables (both line pattern and area pattern--see
the next section) are to be used for the drawing. Wherever there is a
1 bit in the pattern variable, the FgPen color replaces the color of
the pixel at the drawing position. Wherever there is a 0 bit in the
pattern variable, the BgPen color is used.
COMPLEMENT
For each 1 bit in the pattern, the corresponding bit in the target
area is complemented--that is, its state is reversed. As with all
other drawing modes, the write mask can be used to protect specific
bitplanes from being modified. Complement mode is often used for
drawing and then erasing lines.
INVERSVID
This is the drawing mode used primarily for text. If the drawing mode
is (JAM1 | INVERSVID), the text appears as a transparent letter
surrounded by the FgPen color. If the drawing mode is
(JAM2|INVERSVID), the text appears as in (JAM1|INVERSVID) except that
the BgPen color is used to draw the text character itself. In this
mode, the roles of FgPen and BgPen are effectively reversed.
You set the drawing modes using the statement:
SetDrMd(&rastPort, newmode);
Set the newmode argument to one of the four drawing modes listed above.
27 / / RastPort Structure / RastPort Line and Area Drawing Patterns
The RastPort data structure provides two different pattern variables that
it uses during the various drawing functions: a line pattern and an area
pattern. The line pattern is 16 bits wide and is applied to all lines.
When you initialize a RastPort, this line pattern value is set to all 1s
(hex FFFF), so that solid lines are drawn. You can also set this pattern
to other values to draw dotted lines if you wish. For example, you can
establish a dotted line pattern with the graphics macro SetDrPt():
SetDrPt(&rastPort, 0xCCCC);
The second argument is a bit-pattern, 1100110011001100, to be applied to
all lines drawn. If you draw multiple, connected lines, the pattern
cleanly connects all the points.
The area pattern is also 16 bits wide and its height is some power of two.
This means that you can define patterns in heights of 1, 2, 4, 8, 16, and
so on. To tell the system how large a pattern you are providing, use the
graphics macro SetAfPt():
SetAfPt(&rastPort, &areaPattern, power_of_two);
The &areaPattern argument is the address of the first word of the area
pattern and power_of_two specifies how many words are in the pattern. For
example:
USHORT ditherData[] =
{
0x5555, 0xAAAA
};
SetAfPt(&rastPort, ditherData, 1);
This example produces a small cross-hatch pattern, useful for shading.
Because power_of_two is set to 1, the pattern height is 2 to the 1st, or 2
rows high.
To clear the area fill pattern, use:
SetAfPt(&rastPort, NULL, 0);
Pattern Positioning.
--------------------
The pattern is always positioned with respect to the upper left
corner of the RastPort drawing area (the 0,0 coordinate). If you
draw two rectangles whose edges are adjacent, the pattern will be
continuous across the rectangle boundaries.
The last example given produces a two-color pattern with one color where
there are 1s and the other color where there are 0s in the pattern. A
special mode allows you to develop a pattern having up to 256 colors. To
create this effect, specify power_of_two as a negative value instead of a
positive value. For instance, the following initialization establishes an
8-color checkerboard pattern where each square in the checkerboard has a
different color.
USHORT areaPattern[3][8] =
{
/* plane 0 pattern */
{
0x0000, 0x0000,
0xffff, 0xffff,
0x0000, 0x0000,
0xffff, 0xffff
},
/* plane 1 pattern */
{
0x0000, 0x0000,
0x0000, 0x0000,
0xffff, 0xffff,
0xffff, 0xffff
},
/* plane 2 pattern */
{
0xff00, 0xff00,
0xff00, 0xff00,
0xff00, 0xff00,
0xff00, 0xff00
}
};
SetAfPt(&rastPort, &areaPattern, -3);
/* when doing this, it is best to set */
/* three other parameters as follows: */
SetAPen(&rastPort, -1);
SetBPen(&rastPort, 0);
SetDrMd(&rastPort, JAM2);
If you use this multicolored pattern mode, you must provide as many planes
of pattern data as there are planes in your BitMap.
27 / / The RastPort Structure / RastPort Pen Position and Size
The graphics drawing routines keep the current position of the drawing pen
in the RastPort fields cp_x and cp_y, for the horizontal and vertical
positions, respectively. The coordinate location 0,0 is in the upper left
corner of the drawing area. The x value increases proceeding to the
right; the y value increases proceeding toward the bottom of the drawing
area.
The variables RastPort.PenWidth and RastPort.PenHeight are not currently
implemented. These fields should not be read or written by applications.
27 / / The RastPort Structure / Text Attributes
Text attributes and font information are stored in the RastPort fields
Font, AlgoStyle, TxFlags, TxHeight, TxWidth, TxBaseline and TxSpacing.
These are normally set by calls to the graphics font routines which are
covered separately in the chapter on "
27 / Drawing Routines / Using the Graphics Drawing Routines
This section shows you how to use the Amiga drawing routines. All of these
routines work either on their own or along with the windowing system and
layers library. For details about using the layers and windows, see the
chapters on "Layers Library" and "Intuition Windows".
Use WaitBlit().
---------------
The graphics library rendering and data movement routines generally
wait to get access to the blitter, start their blit, and then exit.
Therefore, you must WaitBlit() after a graphics rendering or data
movement call if you intend to immediately deallocate, examine, or
perform order-dependent processor operations on the memory used in
the call.
As you read this section, keep in mind that to use the drawing routines,
you need to pass them a pointer to a RastPort. You can define the
RastPort directly, as shown in the sample program segments in preceding
sections, or you can get a RastPort from your Window structure using code
like the following:
struct Window *window;
struct RastPort *rastPort;
window = OpenWindow(&newWindow); /* You could use OpenWindowTags() */
if (window)
rastPort = window->RPort;
You can also get the RastPort from the Layer structure, if you are not
using Intuition.
Drawing Individual Pixels
Reading Individual Pixels
Drawing Ellipses and Circles
Drawing Lines
Drawing Patterned Lines
Drawing Multiple Lines with a Single Command
Area-fill Operations
Ellipse and Circle-fill Operations
Flood-fill Operations
Rectangle-fill Operations
27 / / Using the Graphics Drawing Routines / Drawing Individual Pixels
You can set a specific pixel to a desired color by using a statement like
this:
SHORT x, y;
LONG result;
result = WritePixel(&rastPort, x, y);
WritePixel() uses the primary drawing pen and changes the pixel at that
x,y position to the desired color if the x,y coordinate falls within the
boundaries of the RastPort. A value of 0 is returned if the write was
successful; a value of -1 is returned if x,y was outside the range of the
RastPort.
27 / / Using the Graphics Drawing Routines / Reading Individual Pixels
You can determine the color of a specific pixel with a statement like this:
SHORT x, y;
LONG result;
result = ReadPixel(&rastPort, x, y);
ReadPixel() returns the value of the pixel color selector at the specified
x,y location. If the coordinates you specify are outside the range of your
RastPort, this function returns a value of -1.
27 / / Using Graphics Drawing Routines / Drawing Ellipses and Circles
Two functions are associated with drawing ellipses: DrawCircle() and
DrawEllipse(). DrawCircle(), a macro that calls DrawEllipse(), will draw a
circle from the specified center point using the specified radius. This
function is executed by the statement:
DrawCircle(&rastPort, center_x, center_y, radius);
Similarly, DrawEllipse() draws an ellipse with the specified radii from
the specified center point:
DrawEllipse(&rastPort, center_x, center_y, horiz_r, vert_r);
Neither function performs clipping on a non-layered RastPort.
27 / / Using the Graphics Drawing Routines / Drawing Lines
Two functions are associated with line drawing: Move() and Draw(). Move()
simply moves the cursor to a new position. It is like picking up a
drawing pen and placing it at a new location. This function is executed by
the statement:
Move(&rastPort, x, y);
Draw() draws a line from the current x,y position to a new x,y position
specified in the statement itself. The drawing pen is left at the new
position. This is done by the statement:
Draw(&rastPort, x, y);
Draw() uses the pen color specified for FgPen. Here is a sample sequence
that draws a line from location (0,0) to (100,50).
SetAPen(&rastPort, COLOR1); /* Set A pen color. */
Move(&rastPort, 0, 0); /* Move to this location. */
Draw(&rastPort, 100,50); /* Draw to a this location. */
Caution:
--------
If you attempt to draw a line outside the bounds of the BitMap,
using the basic initialized RastPort, you may crash the system.
You must either do your own software clipping to assure that the line
is in range, or use the layers library. Software clipping means that
you need to determine if the line will fall outside your BitMap
before you draw it, and render only the part which falls inside
the BitMap.
27 / / Using the Graphics Drawing Routines / Drawing Patterned Lines
To turn the example above into a patterned line draw, simply set a drawing
pattern, such as:
SetDrPt(&rastPort, 0xAAAA);
Now all lines drawn appear as dotted lines (0xAAAA = 1010101010101010 in
binary). To resume drawing solid lines, execute the statement:
SetDrPt(&rastPort, ~0);
Because ~0 is defined as all bits on (11...11) in binary.
27 / / / Drawing Multiple Lines with a Single Command
You can use multiple Draw() statements to draw connected line figures. If
the shapes are all definable as interconnected, continuous lines, you can
use a simpler function, called PolyDraw(). PolyDraw() takes a set of line
endpoints and draws a shape using these points. You call PolyDraw() with
the statement:
PolyDraw(&rastPort, count, arraypointer);
PolyDraw() reads the array of points and draws a line from the first pair
of coordinates to the second, then a connecting line to each succeeding
pair in the array until count points have been connected. This function
uses the current drawing mode, pens, line pattern, and write mask
specified in the target RastPort; for example, this fragment draws a
rectangle, using the five defined pairs of x,y coordinates.
SHORT linearray[] =
{
3, 3,
15, 3,
15,15,
3,15,
3, 3
};
PolyDraw(&rastPort, 5, linearray);
27 / / Using the Graphics Drawing Routines / Area-fill Operations
Assuming that you have properly initialized your RastPort structure to
include a properly initialized AreaInfo, you can perform area fill by
using the functions described in this section.
AreaMove() tells the system to begin a new polygon, closing off any other
polygon that may already be in process by connecting the end-point of the
previous polygon to its starting point. AreaMove() is executed with the
statement:
LONG result;
result = AreaMove(&rastPort, x, y);
AreaMove() returns 0 if successful, -1 if there was no more space left in
the vector list. AreaDraw() tells the system to add a new vertex to a list
that it is building. No drawing takes place until AreaEnd() is executed.
AreaDraw is executed with the statement:
LONG result;
result = AreaDraw(&rastPort, x, y);
AreaDraw() returns 0 if successful, -1 if there was no more space left in
the vector list. AreaEnd() tells the system to draw all of the defined
shapes and fill them. When this function is executed, it obeys the
drawing mode and uses the line pattern and area pattern specified in your
RastPort to render the objects you have defined.
To fill an area, you do not have to AreaDraw() back to the first point
before calling AreaEnd(). AreaEnd() automatically closes the polygon.
AreaEnd() is executed with the following statement:
LONG result;
result = AreaEnd(&rastPort);
AreaEnd() returns 0 if successful, -1 if there was an error. To turn off
the outline function, you have to set the RastPort Flags variable back to
0 with BNDRYOFF():
#include "graphics/gfxmacros.h"
BNDRYOFF(&rastPort);
Otherwise, every subsequent area-fill or rectangle-fill operation will
outline their rendering with the outline pen (AOlPen).
27 / / Using Drawing Routines / Ellipse and Circle-fill Operations
Two functions are associated with drawing filled ellipses: AreaCircle()
and AreaEllipse(). AreaCircle() (a macro that calls AreaEllipse()) will
draw a circle from the specified center point using the specified radius.
This function is executed by the statement:
AreaCircle(&rastPort, center_x, center_y, radius);
Similarly, AreaEllipse() draws a filled ellipse with the specified radii
from the specified center point:
AreaEllipse(&rastPort, center_x, center_y, horiz_r, vert_r);
Outlining with SetOPen() is not currently supported by the AreaCircle()
and AreaEllipse() routines.
Caution:
--------
If you attempt to fill an area outside the bounds of the BitMap,
using the basic initialized RastPort, it may crash the system. You
must either do your own software clipping to assure that the area is
in range, or use the layers library.
27 / / Using the Graphics Drawing Routines / Flood-fill Operations
Flood fill is a technique for filling an arbitrary shape with a color.
The Amiga flood-fill routines can use a plain color or do the fill using a
combination of the drawing mode, FgPen, BgPen and the area pattern.
Flood-fill requires a TmpRas structure at least as large as the RastPort
in which the flood-fill will be done. This is to ensure that even if the
flood-filling operation "leaks", it will not flow outside the TmpRas and
corrupt another task's memory.
You use the Flood() routine for flood fill. The syntax for this routine is
as follows:
Flood(&rastPort, mode, x, y);
The rastPort argument specifies the RastPort you want to draw into. The x
and y arguments specify the starting coordinate within the BitMap. The
mode argument tells how to do the fill. There are two different modes for
flood fill:
Outline Mode
In outline mode, you specify an x,y coordinate, and from that point
the system searches outward in all directions for a pixel whose color
is the same as that specified in the area outline pen (AOlPen). All
horizontally or vertically adjacent pixels not of that color are
filled with a colored pattern or plain color. The fill stops at the
outline color. Outline mode is selected when the mode argument to
Flood() is set to a 0.
Color Mode
In color mode, you specify an x,y coordinate, and whatever pixel
color is found at that position defines the area to be filled. The
system searches for all horizontally or vertically adjacent pixels
whose color is the same as this one and replaces them with the
colored pattern or plain color. Color mode is selected when the mode
argument ot Flood() is set to a one.
The following sample program fragment creates and then flood-fills a
triangular region. The overall effect is exactly the same as shown in the
preceding area-fill example above, except that flood-fill is slightly
slower than area-fill. Mode 0 (fill to a pixel that has the color of the
outline pen) is used in the example.
BYTE oldAPen;
UWORD oldDrPt;
struct RastPort *rastPort = Window->RPort;
/* Save the old values of the foreground pen and draw pattern. */
oldAPen = rastPort->FgPen;
oldDrPt = rastPort->LinePtrn;
/* Use AreaOutline pen color for foreground pen. */
SetAPen(rastPort, rastPort->AOlPen);
SetDrPt(rastPort, ~0); /* Insure a solid draw pattern. */
Move(rastPort, 0, 0); /* Using mode 0 to create a triangular shape */
Draw(rastPort, 0, 100);
Draw(rastPort, 100, 100);
Draw(rastPort, 0, 0); /* close it */
SetAPen(rastPort, oldAPen); /* Restore original foreground pen. */
Flood(rastPort, 0, 10, 50); /* Start Flood() inside triangle. */
SetDrPt(rastPort, oldDrPt); /* Restore original draw mode. */
This example saves the current FgPen value and draws the shape in the same
color as AOlPen. Then FgPen is restored to its original color so that
FgPen, BgPen, DrawMode, and AreaPtrn can be used to define the fill within
the outline.
27 / / Using the Graphics Drawing Routines / Rectangle-fill Operations
The final fill function, RectFill(), is for filling rectangular areas.
The form of this function follows:
RectFill(&rastPort, xmin, ymin, xmax, ymax);
As usual, the rastPort argument specifies the RastPort you want to draw
into. The xmin and ymin arguments specify the upper left corner of the
rectangle to be filled. The xmax and ymax arguments specify the lower
right corner of the rectangle to be filled. Note that the variable xmax
must be equal to or greater than xmin, and ymax must be equal to or
greater than ymin.
Rectangle-fill uses FgPen, BgPen, AOlPen, DrawMode, AreaPtrn and Mask to
fill the area you specify. Remember that the fill can be multicolored as
well as single- or two-colored. When the DrawMode is COMPLEMENT, it
complements all bit planes, rather than only those planes in which the
foreground is non-zero.
27 / Drawing Routines / Performing Data Move Operations
The graphics library includes several routines that use the hardware
blitter to handle the rectangularly organized data that you work with when
doing raster-based graphics. These blitter routines do the following:
* Clear an entire segment of memory
* Set a raster to a specific color
* Scroll a subrectangle of a raster
* Draw a pattern "through a stencil"
* Extract a pattern from a bit-packed array and draw it into a
raster
* Copy rectangular regions from one bitmap to another
* Control and utilize the hardware-based data mover, the blitter
The following sections cover these routines in detail.
WARNING:
--------
The graphics library rendering and data movement routines generally
wait to get access to the blitter, start their blit, and then exit
without waiting for the blit to finish. Therefore, you must
WaitBlit() after a graphics rendering or data movement call if you
intend to immediately deallocate, examine, or perform order-dependent
processor operations on the memory used in the call.
Clearing a Memory Area
Setting a Whole Raster to a Color
Scrolling a Sub-rectangle of a Raster
Drawing through a Stencil
Extracting from a Bit-packed Array
Copying Rectangular Areas
Scaling Rectangular Areas
When to Wait for the Blitter
Accessing the Blitter Directly
27 / / Performing Data Move Operations / Clearing a Memory Area
For memory that is accessible to the blitter (that is, internal Chip
memory), the most efficient way to clear a range of memory is to use the
blitter. You use the blitter to clear a block of memory with the statement:
BltClear(memblock, bytecount, flags);
The memblock argument is a pointer to the location of the first byte to be
cleared and bytecount is the number of bytes to set to zero. In general
the flags variable should be set to one to wait for the blitter operation
to complete. Refer to the Amiga ROM Kernel Manual: Includes and Autodocs
for other details about the flag argument.
27 / / Data Move Operations / Setting a Whole Raster to a Color
You can preset a whole raster to a single color by using the function
SetRast(). A call to this function takes the following form:
SetRast(&rastPort, pen);
As always, the &rastPort is a pointer to the RastPort you wish to use.
Set the pen argument to the color register you want to fill the RastPort
with.
27 / / Data Move Operations / Scrolling a Sub-rectangle of a Raster
You can scroll a sub-rectangle of a raster in any direction--up, down,
left, right, or diagonally. To perform a scroll, you use the
ScrollRaster() routine and specify a dx and dy (delta-x, delta-y) by which
the rectangle image should be moved relative to the (0,0) location.
As a result of this operation, the data within the rectangle will become
physically smaller by the size of delta-x and delta-y, and the area
vacated by the data when it has been cropped and moved is filled with the
background color (color in BgPen). ScrollRaster() is affected by the Mask
setting.
Here is the syntax of the ScrollRaster() function:
ScrollRaster(&rastPort, dx, dy, xmin, ymin, xmax, ymax);
The &rastPort argument is a pointer to a RastPort. The dx and dy
arguments are the distances (positive, 0, or negative) to move the
rectangle. The outer bounds of the sub-rectangle are defined by the xmin,
xmax, ymin and ymax arguments.
Here are some examples that scroll a sub-rectangle:
/* scroll up 2 */
ScrollRaster(&rastPort, 0, 2, 10, 10, 50, 50);
/* scroll right 1 */
ScrollRaster(&rastPort, -1, 0, 10, 10, 50, 50);
When scrolling a Simple Refresh window (or other layered RastPort),
ScrollRaster() scrolls the appropriate existing damage region. Refer to
the "Intuition Windows" chapter for an explanation of Simple Refresh
windows and damage regions.
When scrolling a SuperBitMap window ScrollRaster() requires a properly
initialized TmpRas. The TmpRas must be initialized to the size of one
bitplane with a width and height the same as the SuperBitMap, using the
technique described in the "Area-Fill Information" section above.
If you are using a SuperBitMap Layer, it is possible that the information
in the BitMap is not fully reflected in the layer and vice-versa. Two
graphics calls, CopySBitMap() and SyncSBitMap(), remedy these situations.
Again, refer to the "Intuition Windows" chapter for more on this.
27 / / Performing Data Move Operations / Drawing through a Stencil
The routine BltPattern() allows you to change only a very selective
portion of a drawing area. Basically, this routine lets you define a
rectangular region to be affected by a drawing operation and a mask of the
same size that further defines which pixels within the rectangle will be
affected.
The figure below shows an example of what you can do with BltPattern().
· = 0 bits o & # = 1 bits
Mask contains Drawing area contains:
· · o · o · · · · · · · · ·
· · o · o · · · # # # # # ·
· · o · o · · # · · · · · ·
· · o · o · · · # # # # # ·
· · o · o · · · · · · · · #
· · o · o · · · # # # # # ·
· · o · o · · · · · · · · ·
\ /
\ /
\ /
· · o · o · ·
· # o # o # ·
# · o · o · ·
· # o # o # ·
· · o · o · #
· # o # o # ·
· · o · o · ·
Result of BitPattern():
Figure 27-17: Example of Drawing Through a Stencil
In the resulting drawing, the lighter squares show where the target
drawing area has been affected. Exactly what goes into the drawing area
when the mask has 1's is determined by your RastPort's FgPen, BgPen,
DrawMode and AreaPtrn fields.
You call BltPattern() with:
BltPattern(&rastport, mask, xl, yl, maxx, maxy, bytecnt)
The &rastport argument specifies the RastPort to use. The operation will
be confined to a rectangular area within the RastPort specified by xl and
yl (upper right corner of the rectangle) and maxx and maxy (lower right
corner of the rectangle).
The mask is a pointer to the mask to use. This can be NULL, in which case
a simple rectangular region is modified. Or it can be set to the address
of a byte pattern which allows any arbitrary shape within the rectangle to
be defined. The bytecount is the number of bytes per row for the mask (it
must be an even number of bytes).
The mask parameter is a rectangularly organized, contiguously stored
pattern. This means that the pattern is stored in sequential memory
locations stored as (maxy - yl + 1) rows of bytecnt bytes per row. These
patterns must obey the same rules as BitMaps. This means that they must
consist of an even number of bytes per row and must be stored in memory
beginning at a legal word address. (The mask for BltPattern() does not
have to be in Chip RAM, though.)
27 / / Data Move Operations / Extracting from a Bit-packed Array
You use the routine BltTemplate() to extract a rectangular area from a
source area and place it into a destination area. The following figure
shows an example.
Array Start -->· · · · · · · · · · * * * · · ·<-- Line 1 end
Line 1 end + 1 -->· · · · · · · · · · · * · · · ·
· · · · · · · · · · · * · · · ·
· · · · · · · · · · · * · · · ·
· · · · · · · · · · · * · · · ·
· · · · · · · · · · · * · · · ·
· · · · · · · · · · * * * · · ·
------------------->
Character starts 10-bits
in from starting point on
the left edge of the array.
Figure 27-18: Example of Extracting from a Bit-Packed Array
For a rectangular bit array to be extracted from within a larger,
rectangular bit array, the system must know how the larger array is
organized. For this extraction to occur properly, you also need to tell
the system the modulo for the inner rectangle. The modulo is the value
that must be added to the address pointer so that it points to the correct
word in the next line in this rectangularly organized array.
The following figure represents a single bitplane and the smaller
rectangle to be extracted. The modulo in this instance is 4, because at
the end of each line, you must add 4 to the address pointer to make it
point to the first word in the smaller rectangle.
________________________________________________
| |
| 20 21 22 23 24 25 26 27 |<-- Larger source
| | bit-plane image
| 28 29 30 31 32 33 34 35 |
| ---------------------- |
| 36 37 | 38 39 40 41 | 42 43 |
| | |<-----------|--- Smaller rectangle
| 44 45 | 46 47 48 49 | 50 51 | to be extracted
| | | |
| 52 53 | 54 55 56 57 | 58 59 |
| ---------------------- |
| 60 61 62 63 64 65 66 67 |
|________________________________________________|
Figure 27-19: Modulo
Warning:
--------
The modulo value must be an even number of bytes.
BltTemplate() takes the following arguments:
BltTemplate(source, srcX, srcMod, &destRastPort, destX, destY,
sizeX, sizeY);
The source argument specifies the rectangular bit array to use as the
source template. Set this to the address of the nearest word (rounded
down) that contains the first line of the source rectangle. The srcX
argument gives the exact bit position (0-15) within the source address at
which the rectangular bit array begins. The srcMod argument sets the
source modulo so the next line of the rectangular bit array can be found.
The data from the source rectangle is copied into the destination RastPort
specified by destRastPort. The destX and destY arguments indicate where
the data from the source rectangle should be positioned within the
destination RastPort. The sizeX and sizeY arguments indicate the
dimensions of the data to be moved.
BltTemplate() uses FgPen, BgPen, DrawMode and Mask to place the template
into the destination area. This routine differs from BltPattern() in that
only a solid color is deposited in the destination drawing area, with or
without a second solid color as the background (as in the case of text).
Also, the template can be arbitrarily bit-aligned and sized in x.
27 / / Performing Data Move Operations / Copying Rectangular Areas
Four routines use the blitter to copy rectangular areas from one section
of a BitMap to another: BltBitMap(), BltBitMapRastPort(),
BltMaskBitMapRastPort(), and ClipBlit(). All four of these blitter
routines take a special argument called a minterm.
The minterm variable is an unsigned byte value which represents an action
to be performed during the move. Since all the blitter routines uses the
hardware blitter to move the data, they can take advantage of the
blitter's ability to logically combine or change the data as the move is
made. The most common operation is a direct copy from source area to
destination, which uses a minterm set to hex value C0.
You can determine how to set the minterm variable by using the logic
equations shown in the following tables. B represents data from the
source rectangle and C represents data in the destination area.
Table 27-7: Minterm Logic Equations
Leftmost 4 Bits Logic Term Included
of MinTermin Final Output
------------ ------------
8 BC "B AND C"
_
4 BC "B AND NOT C"
_
2 BC "NOT B AND C"
__
1 BC "NOT B AND NOT C"
You can combine values to select the logic terms. For instance a minterm
value of 0xC0 selects the first two logic terms in the table above. These
logic terms specify that in the final destination area you will have data
that occurs in source B only. Thus, C0 means a direct copy. The logic
equation for this is:
_ _
BC + BC = B(C + C) = B
Logic equations may be used to decide on a number of different ways of
moving the data. For your convenience, a few of the most common ones are
listed below.
Table 27-8: Some Common MinTerm Values to Use for Copying
MinTerm
Value Logic Operation Performed During Copy
----- -------------------------------------
30 Replace destination area with inverted source B.
50 Replace destination area with an inverted version
of itself.
60 Put B where C is not, put C where B is not (cookie cut).
80 Only put bits into destination where there is a bit in
the same position for both source and destination (sieve
operation).
C0 Plain vanilla copy from source B to destination C.
The graphics library blitter routines all accept a minterm argument as
described above. BltBitMap() is the basic blitter routine, moving data
from one BitMap to another.
BltBitMap() allows you to define a rectangle within a source BitMap and
copy it to a destination area of the same size in another (or even the
same) BitMap. This routine is used by the graphics library itself for
rendering. BltBitMap() returns the number of planes actually involved in
the blit. The syntax for the function is:
ULONG planes;
planes = BltBitMap(&srcBM, srcX, srcY, &dstBM, dstX, dstY,
sizeX, sizeY, minterm, mask, tempA);
The source bitmap is specified by the &srcBM argument. The position of
the source area within the bitmap is specified by srcX and srcY. The
destination bitmap is specified by the &dstBM argument. The position of
the destination area within the bitmap is specified by dstX and dstY.
The dimensions (in pixels) of the area to be moved is indicated by the
sizeX and sizeY arguments. With the original custom chip set, the blitter
size limits are 992 x 1024. With ECS the blitter size limits are 32,736 x
32,768. See the section on "Determining Chip Versions" earlier in this
chapter to find out how to tell if the host system has ECS installed.
The minterm argument determines what logical operation to perform on the
rectangle data as bits are moved (described above). The mask argument,
normally set to 0xff, specifies which bitplanes will be involved in the
blit operation and which will be ignored. If a bit is set in the mask
byte, the corresponding bitplane is included. The tempA argument applies
only to blits that overlap and, if non-NULL, points to Chip memory the
system will use for temporary storage during the blit.
BltBitMapRastPort() takes most of the same arguments as BltBitMap(), but
its destination is a RastPort instead of a BitMap. The syntax for the
function is:
VOID BltBitMapRastPort(&srcBM, srcX, srcY, &dstRP, dstX, dstY,
sizeX, sizeY, minterm);
The arguments here are the same as for BltBitMap() above. Note that the
BltBitMapRastPort() function will respect the RastPort.Mask field. Only
the planes specified in the Mask will be included in the operation.
A third type of blitter operation is provided by the
BltMaskBitMapRastPort() function. This works the same as
BltBitMapRastPort() except that it takes one extra argument, a pointer to
a single bitplane mask of the same height and width as the source. The
mask acts as a filter for the operation--a blit only occurs where the mask
plane is non-zero. The syntax for the function is:
VOID BltMaskBitMapRastPort(&srcBM, srcX, srcY, &dstRP, dstX, dstY,
sizeX, sizeY, minterm, bltmask);
The bltmask argument points to a word-aligned mask bitplane in Chip memory
with the same dimensions as the source bitmap. Note that this function
ignores the Mask field of the destination RastPort.
ClipBlit() takes most of the same arguments as the other blitter calls
described above but it works with source and destination RastPorts and
their layers. Before ClipBlit() moves data, it looks at the area from
which and to which the data is being copied (RastPorts, not BitMaps) and
determines if there are overlapping areas involved. If so, it splits up
the overall operation into a number of bitmaps to move the data in the way
you request. To call ClipBlit() use:
VOID ClipBlit(&srcRP, srcX, srcY, &dstRP, dstX, dstY, XSize, YSize,
minterm);
Since ClipBlit() respects the Layer of the source and destination
RastPort, it is the easiest blitter movement call to use with Intuition
windows. The following code fragments show how to save and restore an
undo buffer using ClipBlit().
/* Save work rastport to an undo rastport */
ClipBlit(&drawRP, 0, 0, &undoRP, 0, 0, areaWidth, areaHeight, 0xC0);
/* restore undo rastport to work rastport */
ClipBlit(&undoRP, 0, 0, &drawRP, 0, 0, areaWidth, areaHeight, 0xC0);
27 / / Performing Data Move Operations / Scaling Rectangular Areas
BitMapScale() will scale a single bitmap any integral size up to 16,383
times its original size. This function is available only in Release 2 and
later versions of the OS. It is called with the address of a BitScaleArgs
structure (see <graphics/scale.h>).
void BitMapScale(struct BitScaleArgs *bsa)
The bsa argument specifies the BitMaps to use, the source and destination
rectangles, as well as the scaling factor. The source and destination may
not overlap. The caller must ensure that the destination BitMap is large
enough to receive the scaled-up copy of the source rectangle. The
function ScalerDiv() is provided to help in the calculation of the
destination BitMap's size.
27 / / Performing Data Move Operations / When to Wait for the Blitter
This section explains why you might have to call WaitBlit(), a special
graphics function that suspends your task until the blitter is idle. Many
of the calls in the graphics library use the Amiga's hardware blitter to
perform their operation, most notably those which render text and images,
fill or pattern, draw lines or dots and move blocks of graphic memory.
Internally, these graphics library functions operate in a loop, doing
graphic operations with the blitter one plane at a time as follows:
OwnBlitter(); /* Gain exclusive access to the hardware blitter */
for(planes=0; planes < bitmap->depth; planes++)
{
WaitBlit(); /* Sleep until the previous blitter operation */
/* completes start a blit */
}
DisownBlitter(); /* Release exclusive access to the hardware blitter */
Graphics library functions that are implemented this way always wait for
the blitter at the start and exit right after the final blit is started.
It is important to note that when these blitter-using functions return to
your task, the final (or perhaps only) blit has just been started, but not
necessarily completed. This is efficient if you are making many such
calls in a row because the next graphics blitter call always waits for the
previous blitter operation to complete before starting its first blit.
However, if you are intermixing such graphics blitter calls with other
code that accesses the same graphics memory then you must first WaitBlit()
to make sure that the final blit of a previous graphics call is complete
before you use any of the memory. For instance, if you plan to
immediately deallocate or reuse any of the memory areas which were passed
to your most recent blitter-using function call as a source, destination,
or mask, it is imperative that you first call WaitBlit().
Warning:
--------
If you do not follow the above procedure, you could end up with a
program that works correctly most of the time but crashes sometimes.
Or you may run into problems when your program is run on faster
machines or under other circumstances where the blitter is not as
fast as the processor.
27 / / Performing Data Move Operations / Accessing Blitter Directly
To use the blitter directly, you must first be familiar with how its
registers control its operation. This topic is covered thoroughly in the
Amiga Hardware Reference Manual and is not repeated here. There are two
basic approaches you can take to perform direct programming of the
blitter: synchronous and asynchronous.
* Synchronous programming of the blitter is used when you want to do a
job with the blitter right away. For synchronous programming, you
first get exclusive access to the blitter with OwnBlitter(). Next
call WaitBlit() to ensure that any previous blitter operation that
might have been in progress is completed. Then set up your blitter
operation by programming the blitter registers. Finally, start the
blit and call DisownBlitter().
* Asynchronous programming of the blitter is used when the blitter
operation you want to perform does not have to happen immediately.
In that case, you can use the QBlit() and QBSBlit() functions in
order to queue up requests for the use of the blitter on a
non-exclusive basis. You share the blitter with system tasks.
Whichever approach you take, there is one rule you should generally keep
in mind about using the blitter directly:
Don't Tie Up The Blitter.
-------------------------
The system uses the blitter extensively for disk and display
operation. While your task is using the blitter, many other system
processes will be locked out. Therefore, use it only for brief
periods and relinquish it as quickly as possible.
To use QBlit() and QBSBlit(), you must create a data structure called a
bltnode (blitter node) that contains a pointer to the blitter code you
want to execute. The system uses this structure to link blitter usage
requests into a first-in, first-out (FIFO) queue. When your turn comes,
your own blitter routine can be repeatedly called until your routine says
it is finished using the blitter.
Two separate blitter queues are maintained. One queue is for the QBlit()
routine. You use QBlit() when you simply want something done and you do
not necessarily care when it happens. This may be the case when you are
moving data in a memory area that is not currently being displayed.
The second queue is maintained for QBSBlit(). QBS stands for
"queue-beam-synchronized". QBSBlit() requests form a beam-synchronized
FIFO queue. When the video beam gets to a predetermined position, your
blitter routine is called. Beam synchronization takes precedence over the
simple FIFO. This means that if the beam sync matches, the
beam-synchronous blit will be done before the non-synchronous blit in the
first position in the queue. You might use QBSBlit() to draw into an area
of memory that is currently being displayed to modify memory that has
already been "passed-over" by the video beam. This avoids display flicker
as an area is being updated.
The sole input to both QBlit() and QBSBlit() is a pointer to a bltnode
data structure, defined in the include file <hardware/blit.h>. Here is a
copy of the structure, followed by details about the items you must
initialize:
struct bltnode
{
struct bltnode *n;
int (*function)();
char stat;
short blitsize;
short beamsync;
int (*cleanup)();
};
struct bltnode *n;
This is a pointer to the next bltnode, which, for most applications
will be zero. You should not link bltnodes together. This is to be
performed by the system in a separate call to QBlit() or QBSBlit().
int (*function)( );
This is the address of your blitter function that the blitter queuer
will call when your turn comes up. Your function must be formed as a
subroutine, with an RTS instruction at the end. Follow Amiga
programming conventions by placing the return value in D0 (or in C,
use return(value)).
If you return a nonzero value, the system will call your routine
again next time the blitter is idle until you finally return 0. This
is done so that you can maintain control over the blitter; for
example, it allows you to handle all five bitplanes if you are
blitting an object with 32 colors. For display purposes, if you are
blitting multiple objects and then saving and restoring the
background, you must be sure that all planes of the object are
positioned before another object is overlaid. This is the reason for
the lockup in the blitter queue; it allows all work per object to be
completed before going on to the next one.
Note:
-----
Not all C compilers can handle *function() properly! The system
actually tests the processor status codes for a condition of
equal-to-zero (Z flag set) or not-equal-to-zero (Z flag clear) when
your blitter routine returns. Some C compilers do not set the
processor status code properly (i.e., according to the value
returned), thus it is not possible to use such compilers to write the
(*function)()) routine. In that case assembly language should be
used. Blitter functions are normally written in assembly language
anyway so they can take advantage of the ability of QBlit() and
QBSBlit() to pass them parameters in processor registers.
The register passing conventions for these routines are as follows.
Register A0 receives a pointer to the system hardware registers so
that all hardware registers can be referenced as an offset from that
address. Register A1 contains a pointer to the current bltnode. You
may have queued up multiple blits, each of which perhaps uses the
same blitter routine. You can access the data for this particular
operation as an offset from the value in A1. For instance, a typical
user of these routines can precalculate the blitter register values
to be placed in the blitter registers and, when the routine is
called, simply copy them in. For example, you can create a new
structure such as the following:
INCLUDE "exec/types.i"
INCLUDE "hardware/blit.i"
STRUCTURE mybltnode,0
; Make this new structure compatible with a
; bltnode by making the first element a bltnode
; structure.
STRUCT bltnode,bn_SIZEOF
UWORD bltcon1 ; Blitter control register 1.
UWORD fwmask ; First and last word masks.
UWORD lwmask
UWORD bltmda ; Modulos for sources a, b,and c.
UWORD bltmdb
UWORD bltmdc
UWORD any_more_data ; add anything else you want
LABEL mbn_SIZEOF
Other forms of data structures are certainly possible, but this
should give you the general idea.
char stat;
Tells the system whether or not to execute the clean-up routine at
the end. This byte should be set to CLEANUP (0x40) if cleanup is to
be performed. If not, then the bltnode cleanup variable can be zero.
short beamsync;
The value that should be in the VBEAM counter for use during a
beam-synchronous blit before the function() is called. The system
cooperates with you in planning when to start a blit in the routine
QBSBlit() by not calling your routine until, for example, the video
beam has already passed by the area on the screen into which you are
writing. This is especially useful during single buffering of your
displays. There may be time enough to write the object between scans
of the video display. You will not be visibly writing while the beam
is trying to scan the object. This avoids flicker (part of an old
view of an object along with part of a new view of the object).
int (*cleanup)();
The address of a routine that is to be called after your last return
from the QBlit() routine. When you finally return a zero, the queuer
will call this subroutine (ends in RTS or return()) as the clean-up.
Your first entry to the function may have dynamically allocated some
memory or may have done something that must be undone to make for a
clean exit. This routine must be specified.
27 Graphics Primitives / User Copper Lists
The Copper coprocessor allows you to produce mid-screen changes in certain
hardware registers in addition to changes that the system software already
provides. For example, it is the Copper that allows the Amiga to split
the viewing area into multiple draggable screens, each with its own
independent set of colors.
To create your own mid-screen effects on the system hardware registers,
you provide "user Copper lists" that can be merged into the system Copper
lists.
In the ViewPort data structure there is a pointer named UCopIns. If this
pointer value is non-NULL, it points to a user Copper list that you have
dynamically allocated and initialized to contain your own special
hardware-stuffing instructions.
You allocate a user Copper list by an instruction sequence such as the
following:
struct UCopList *uCopList = NULL;
/* Allocate memory for the Copper list. Make certain that the */
/* initial memory is cleared. */
uCopList = (struct UCopList *)
AllocMem(sizeof(struct UCopList), MEMF_PUBLIC|MEMF_CLEAR);
if (uCopList == NULL)
return(FALSE);
Note:
-----
User Copper lists do not have to be in Chip RAM.
Copper List Macros Copper List Example
27 / User Copper Lists / Copper List Macros
Once this pointer to a user Copper list is available, you can use it with
system macros (<graphics/gfxmacros.h>) to instruct the system what to add
to its own list of things for the Copper to do within a specific ViewPort.
The file <graphics/gfxmacros.h> provides the following five macro
functions that implement user Copper instructions.
CINIT initializes the Copper list buffer. It is used to specify how many
instructions are going to be placed in the Copper list. It is called as
follows.
CINIT(uCopList, num_entries);
The uCopList argument is a pointer tot he user Copper list and num_entries
is the number of entries in the list.
CWAIT waits for the video beam to reach a particular horizontal and
vertical position. Its format is:
CWAIT(uCopList, v, h)
Again, uCopList is the pointer to the Copper list. The v argument is the
vertical position for which to wait, specified relative to the top of the
ViewPort. The legal range of values (for both NTSC and PAL) is from 0 to
255; h is the horizontal position for which to wait. The legal range of
values (for both NTSC and PAL) is from 0 to 226.
CMOVE installs a particular value into a specified system register. Its
format is:
CMOVE(uCopList, reg, value)
Again, uCopList is the pointer to the Copper list. The reg argument is
the register to be affected, specified in this form: custom.register-name
where the register-name is one of the registers listed in the Custom
structure in <hardware/custom.h>. The value argument to CMOVE is the
value to place in the register.
CBump() increments the user Copper list pointer to the next position in
thelist. It is usually invoked for the programmer as part of the macro
definitions CWAIT or CMOVE. Its format is:
CBump(uCopList)
where uCopList is the pointer to the user Copper list.
CEND terminates the user Copper list. Its format is:
CEND(uCopList)
where uCopList is the pointer to the user Copper list.
Executing any of the user Copper list macros causes the system to
dynamically allocate special data structures called intermediate Copper
lists that are linked into your user Copper list (the list to which
uCopList points) describing the operation. When you call the function
MrgCop(&view) as shown in the section called "Forming A Basic Display,"
the system uses all of its intermediate Copper lists to sort and merge
together the real Copper lists for the system (LOFCprList and SHFCprList).
When your program exits, you must return to the system all of the memory
that you allocated or caused to be allocated. This means that you must
return the intermediate Copper lists, as well as the user Copper list data
structure. Here are two different methods for returning this memory to
the system.
/* Returning memory to the system if you have NOT
* obtained the ViewPort from Intuition. */
FreeVPortCopLists(viewPort);
/* Returning memory to the system if you HAVE
* obtained the ViewPort from Intuition. */
CloseScreen(screen); /* Intuition only */
User Copper lists may be clipped, under Release 2 and later, to ViewPort
boundaries if the appropriate tag (VTAG_USERCLIP_SET) is passed to
VideoControl(). Under earlier releases, the user Copper list would "leak"
through to lower ViewPorts.
27 Graphics Primitives / ECS and Genlocking Features
The Enhanced Chip Set (ECS) Denise chip (8373-R2a), coupled with the
Release 2 graphics library, opens up a whole new set of genlocking
possibilities. Unlike the old Denise, whose only genlocking ability
allowed keying on color register zero, the ECS Denise allows keying on any
color register. Also, the ECS Denise allows keying on any bitplane of the
ViewPort being genlocked. With the ECS Denise, the border area
surrounding the display can be made transparent (always passes video) or
opaque (overlays using color 0). All the new features are set
individually for each ViewPort. These features can be used in conjunction
with each other, making interesting scenarios possible.
Genlock Control
27 / ECS and Genlocking Features / Genlock Control
Using VideoControl(), a program can enable, disable, or obtain the state
of a ViewPort's genlocking features. It returns NULL if no error
occurred. The function uses a tag based interface:
error = BOOL VideoControl( struct ColorMap *cm, struct TagItem *ti );
The ti argument is a list of video commands stored in an array of TagItem
structures. The cm argument specifies which ColorMap and, indirectly,
which ViewPort these genlock commands will be applied to. The possible
commands are:
VTAG_BITPLANEKEY_GET, _SET, _CLR
VTAG_CHROMA_PLANE_GET, _SET
VTAG_BORDERBLANK_GET, _SET, _CLR
VTAG_BORDERNOTRANS_GET, _SET, _CLR
VTAG_CHROMAKEY_GET, _SET, _CLR
VTAG_CHROMAPEN_GET, _SET, _CLR
This section covers only the genlock VideoControl() tags. See
<graphics/videocontrol.h> for a complete list of all the available tags
you can use with VideoControl().
VTAG_BITPLANEKEY_GET is used to find out the status of the bitplane keying
mode. VTAG_BITPLANEKEY_SET and VTAG_BITPLANEKEY_CLR activate and
deactivate bitplane keying mode. If bitplane key mode is on, genlocking
will key on the bits set in a specific bitplane from the ViewPort (the
specific bitplane is set with a different tag). The data portion of these
tags is NULL.
For inquiry commands like VTAG_BITPLANEKEY_GET (tags ending in _GET),
VideoControl() changes the _GET tag ID (ti_Tag) to the corresponding _SET
or _CLR tag ID, reflecting the current state of the genlock mode. For
example, when passed the following tag array:
struct TagItem videocommands[] =
{
{VTAG_BITPLANEKEY_GET, NULL},
{VTAG_END_CM, NULL}
};
VideoControl() changes the VTAG_BITPLANEKEY_GET tag ID (ti_Tag) to
VTAG_BITPLANEKEY_SET if bitplane keying is currently on, or to
VTAG_BITPLANEKEY_CLR if bitplane keying is off. In both of these cases,
VideoControl() only uses the tag's ID, ignoring the tag's data field
(ti_Data).
The VTAG_CHROMA_PLANE_GET tag returns the number of the bitplane keyed on
when bitplane keying mode is on. VideoControl() changes the tag's data
value to the bitplane number. VTAG_CHROMA_PLANE_SET sets the bitplane
number to the tag's data value.
VTAG_BORDERBLANK_GET is used to obtain the border blank mode status. This
tag works exactly like VTAG_BITPLANEKEY_GET. VideoControl() changes the
tag's ID to reflect the current border blanking state.
VTAG_BORDERBLANK_SET and VTAG_BORDERBLANK_CLR activate and deactivate
border blanking. If border blanking is on, the Amiga will not display
anything in its display border, allowing an external video signal to show
through the border area. On the Amiga display, the border appears black.
The data portion of these tags is NULL.
The VTAG_BORDERNOTRANS_GET, _SET and _CLR tags are used, respectively, to
obtain the status of border-not-transparent mode, and to activate and to
deactivate this mode. If set, the Amiga display's border will overlay
external video with the color in register 0. Because border blanking mode
takes precedence over border-not-transparent mode, setting
border-not-transparent has no effect if border blanking is on. The data
portion of these tags is NULL.
The VTAG_CHROMAKEY_GET, _SET and _CLR tags are used, respectively, to
obtain the status of chroma keying mode, and to activate and deactivate
chroma keying mode. If set, the genlock will key on colors from specific
color registers (the specific color registers are set using a different
tag). If chroma keying is not set, the genlock will key on color register
0. The data portion of these tags is NULL.
VTAG_CHROMAPEN_GET obtains the chroma keying status of an individual color
register. The tag's ti_Data field contains the register number. Like the
other _GET tags, VideoControl() changes the tag ID (ti_Tag) to one that
reflects the current state of the mode. VTAG_CHROMAPEN_SET and
VTAG_CHROMAPEN_CLR activate and deactivate chroma keying for each
individual color register. Chroma keying can be active for more than one
register. By turning off border blanking and activating chroma keying
mode, but turning off chroma keying for each color register, a program can
overlay every part of an external video source, completely blocking it out.
After using VideoControl() to set values in the ColorMap, the
corresponding ViewPort has to be rebuilt with MakeVPort(), MrgCop() and
LoadView(), so the changes can take effect. A program that uses a
screen's ViewPort rather than its own ViewPort should use the Intuition
functions MakeScreen() and RethinkDisplay() to make the display changes
take effect.
The following code fragment shows how to access the genlock modes.
struct Screen *genscreen;
struct ViewPort *vp;
struct TagItem vtags [24];
/* The complete example opened a window, rendered some colorbars, */
/* and added gadgets to allow the user to turn the various genlock */
/* modes on and off. */
vp = &(genscreen->ViewPort);
/* Ascertain the current state of the various modes. */
/* Is borderblanking on? */
vtags[0].ti_Tag = VTAG_BORDERBLANK_GET;
vtags[0].ti_Data = NULL;
/* Is bordertransparent set? */
vtags[1].ti_Tag = VTAG_BORDERNOTRANS_GET;
vtags[1].ti_Data = NULL;
/* Key on bitplane? */
vtags[2].ti_Tag = VTAG_BITPLANEKEY_GET;
vtags[2].ti_Tag = NULL;
/* Get plane which is used to key on */
vtags[3].ti_Tag = VTAG_CHROMA_PLANE_GET;
vtags[3].ti_Data = NULL;
/* Chromakey overlay on? */
vtags[4].ti_Tag = VTAG_CHROMAKEY_GET;
vtags[4].ti_Data = NULL;
for (i = 0; i < 16; i++)
{
/* Find out which colors overlay */
vtags[i + 5].ti_Tag = VTAG_CHROMA_PEN_GET;
vtags[i + 5].ti_Data = i;
}
/* Indicate end of tag array */
vtags[21].ti_Tag = VTAG_END_CM;
vtags[21].ti_Data = NULL;
/* And send the commands. On return the Tags themselves will
* indicate the genlock settings for this ViewPort's ColorMap.
*/
error = VideoControl(vp->ColorMap, vtags);
/* The complete program sets gadgets to reflect current states. */
/* Will only send single commands from here on. */
vtags[1].ti_Tag = VTAG_END_CM;
/* At this point the complete program gets an input event and
sets/clears the genlock modes as requested using the vtag list and
VideoControl().
*/
/* send video command */
error = VideoControl(vp->ColorMap, vtags);
/* Now use MakeScreen() and RethinkDisplay() to make the VideoControl()
* changes take effect. If we were using our own ViewPort rather than
* borrowing one from a screen, we would instead do:
*
* MakeVPort(ViewAddress(),vp);
* MrgCop(ViewAddress());
* LoadView(ViewAddres());
*/
MakeScreen(genscreen);
RethinkDisplay();
/* The complete program closes and frees everything it had opened or
allocated.
*/
/* The complete example calls the CheckPAL function, which is included
below in its entirety for illustrative purposes.
*/
BOOL CheckPAL(STRPTR screenname)
{
struct Screen *screen;
ULONG modeID = LORES_KEY;
struct DisplayInfo displayinfo;
BOOL IsPAL;
if (GfxBase->LibNode.lib_Version >= 36)
{
/*
* We got at least V36, so lets use the new calls to find out what
* kind of videomode the user (hopefully) prefers.
*/
if (screen = LockPubScreen(screenname))
{
/*
* Use graphics.library/GetVPModeID() to get the ModeID of the
* specified screen. Will use the default public screen
* (Workbench most of the time) if NULL It is _very_ unlikely
* that this would be invalid, heck it's impossible.
*/
if ((modeID = GetVPModeID(&(screen->ViewPort))) != INVALID_ID)
{
/*
* If the screen is in VGA mode, we can't tell whether the
* system is PAL or NTSC. So to be foolproof we fall back
* to the displayinfo of the default monitor by inquiring
* about just the LORES_KEY displaymode if we don't know.
* The default.monitor reflects the initial video setup of
* the system, thus for either ntsc.monitor or pal.monitor.
* We only use the displaymode of the is an alias specified
* public screen if it's display mode is PAL or NTSC and
* NOT the default.
*/
if (!((modeID & MONITOR_ID_MASK) == NTSC_MONITOR_ID ||
(modeID & MONITOR_ID_MASK) == PAL_MONITOR_ID))
modeID = LORES_KEY;
}
UnlockPubScreen(NULL, screen);
} /* if fails modeID = LORES_KEY. Can't lock screen, so fall back
* on default monitor.
*/
if (GetDisplayInfoData(NULL, (UBYTE *) & displayinfo,
sizeof(struct DisplayInfo), DTAG_DISP, modeID))
{
if (displayinfo.PropertyFlags & DIPF_IS_PAL)
IsPAL = TRUE;
else
IsPAL = FALSE;
/* Currently the default monitor is always either PAL or
* NTSC.
*/
}
}
else
/* < V36. The enhancements to the videosystem in V36 (and above)
* cannot be better expressed than with the simple way to determine
* PAL in V34.
*/
IsPAL= (GfxBase->DisplayFlags & PAL) ? TRUE : FALSE;
return(IsPAL);
}
27 Graphics Primitives / Function Reference
The following are brief descriptions of the Amiga's graphics primitives.
See the Amiga ROM Kernel Reference Manual: Includes and Autodocs for
details on each function call.
Table 27-9: Graphics Primitives Functions
________________________________________________________________________
| |
| Display |
| Set-up Functions Description |
|========================================================================|
| InitView() Initializes the View structure. |
| InitBitMap() Initializes the BitMap structure. |
| RASSIZE() Calculates the size of a ViewPort's BitMap. |
| AllocRaster() Allocates the bitplanes needed for a BitMap. |
| FreeRaster() Frees the bitplanes created with AllocRaster(). |
| InitVPort() Initializes the ViewPort structure. |
| GetColorMap() Returns the ColorMap structure used by |
| ViewPorts. |
| FreeColorMap() Frees the ColorMap created by GetColorMap(). |
| LoadRGB4() Loads the color registers for a given ViewPort. |
| SetRGB4CM() Loads an individual color register for a given |
| ViewPort. |
| MakeVPort() Creates the intermediate Copper list program for |
| a ViewPort. |
| MrgCop() Merges the intermediate Copper lists. |
| LoadView() Displays a given View. |
| FreeCprList() Frees the Copper list created with MrgCop() |
| FreeVPortCopLists() Frees the intermediate Copper lists created with |
| MakeVPort(). |
| OFF_DISPLAY() Turns the video display DMA off |
| ON_DISPLAY() Turns the video display DMA back on again. |
|________________________________________________________________________|
________________________________________________________________________
| |
| Release 2 Display |
| Set-up Functions Description |
|========================================================================|
| FindDisplayInfo() Returns the display database handle for a given |
| ModeID (V36). |
| GetDisplayInfoData() Looks up a display attribute in the display |
| database (V36). |
| VideoControl() Sets, clears and gets the attributes of an |
| existing display (V36). |
| GfxNew() Creates ViewExtra or ViewPortExtra used in |
| Release 2 displays (V36). |
| GfxAssociate() Attaches a ViewExtra to a View (V36). |
| GfxFree() Frees the ViewExtra or ViewPortExtra created by |
| GfxNew() (V36). |
| OpenMonitor() Returns the MonitorSpec structure used in |
| Release 2 Views (V36). |
| CloseMonitor() Frees the MonitorSpec structure created by |
| OpenMonitor() (V36). |
| GetVPModeID() Returns the Release 2 ModeID of an existing |
| ViewPort (V36). |
| ModeNotAvailable() Determines if a display mode is available from |
| a given ModeID (V36). |
|________________________________________________________________________|
________________________________________________________________________
| |
| Drawing |
| Functions Description |
|========================================================================|
| InitRastPort() Initialize a RastPort structure. |
| InitArea() Initialize the AreaInfo structure used with a |
| RastPort. |
| SetWrMask() Set the RastPort.Mask. |
| SetAPen() Set the RastPort.FgPen foreground pen color. |
| SetBPen() Set the RastPort.BgPen background pen color. |
| SetOPen() Set the RastPort.AOlPen area fill outline pen color. |
| SetDrMode() Set the RastPort.DrawMode drawing mode. |
| SetDrPt() Set the RastPort.LinePtrn line drawing pattern. |
| SetAfPt() Set the RastPort area fill pattern and size. |
|------------------------------------------------------------------------|
| WritePixel() Draw a single pixel in the foreground color at a |
| given coordinate. |
| ReadPixel() Find the color of the pixel at a given coordinate. |
| DrawCircle() Draw a circle with a given radius and center point. |
| DrawEllipse() Draw an ellipse with the given radii and center |
| point. |
| Move() Move the RastPort drawing pen to a given coordinate. |
| Draw() Draw a line from the current pen location to a given |
| coordinate. |
|------------------------------------------------------------------------|
| PolyDraw() Draw a polygon with a given set of vertices. |
| AreaMove() Set the anchor point for a filled polygon. |
| AreaDraw() Add a new vertice to an area-fill polygon. |
| AreaEnd() Close and area-fill polygon, draw it and fill it. |
| BNDRYOFF() Turn off area-outline pen usage activated with |
| SetOPen(). |
| AreaCircle() Draw a filled circle with a given radius and center |
| point. |
| AreaEllipse() Draw a filled ellipse with the given radii and center |
| point. |
| Flood() Flood fill a region starting at a given coordinate. |
| RectFill() Flood fill a rectangular area at a given location and |
| size. |
|________________________________________________________________________|
________________________________________________________________________
| |
| Data Movement |
| Functions Description |
|========================================================================|
| BltClear() Use the hardware blitter to clear a block of |
| memory. |
| SetRast() Fill the RastPort.BitMap with a given color. |
| ScrollRaster() Move a portion of a RastPort.BitMap. |
| BltPattern() Draw a rectangular pattern of pixels into a |
| RastPort.BitMap. The x-dimension of the |
| rectangle must be word-aligned and |
| word-sized. |
| BltTemplate() Draw a rectangular pattern of pixels into a |
| RastPort.BitMap. The x-dimension of the |
| rectangle can be arbitrarily bit-aligned and |
| sized. |
| BltBitMap() Copy a rectangular area from one BitMap to a |
| given coordinate in another BitMap. |
| BltBitMapRastPort() Copy a rectangular area from a BitMap to a |
| given coordinate in a RastPort.BitMap. |
| BltMaskBitMapRastPort() Copy a rectangular area from a BitMap to a |
| RastPort.BitMap through a mask bitplane. |
| ClipBlit() Copy a rectangular area from one RastPort to |
| another with respect to their Layers. |
| BitMapScale() Scale a rectangular area within a BitMap to |
| new dimensions (V36). |
|________________________________________________________________________|
________________________________________________________________________
| |
| Hardware Programming |
| Functions Description |
|========================================================================|
| OwnBlitter() Obtain exclusive access to the Amiga's hardware |
| blitter. |
| DisownBlitter() Relinquish exclusive access to the blitter. |
| WaitBlit() Suspend until the current blitter operation has |
| completed. |
| QBlit() Place a bltnode-style asynchronous blitter request |
| in the system queue |
| QBSBlit() Place a bltnode-style asynchronous blitter request |
| in the beam synchronized queue. |
|------------------------------------------------------------------------|
| CINIT() Initialize the user Copper list buffer. |
| CWAIT() Instructs the Copper to wait for the video beam to |
| reach a given position. |
| CMOVE() Instructs the Copper to place a value into a given |
| hardware register. |
| CBump() Instructs the Copper to increment its Copper list |
| pointer. |
| CEND() Terminate the user Copper list. |
|________________________________________________________________________|
Converted on 22 Apr 2000 with RexxDoesAmigaGuide2HTML 2.1 by Michael Ranner.