Amiga® Hardware Reference Manual: 6 Blitter Hardware
This chapter covers the operation of the Amiga's blitter, the high speed
line drawing and block movement component of the system. The discussion is
divided into three parts: blitter basics, blitter area fill mode, and
blitter line draw mode.  Some example blitter operations are listed at the
end of the chapter.

For information concerning the blitter hardware in the Enhanced Chip Set,
see  Appendix C .

 What is the Blitter?           Interrupt Flag
 Memory Layout                  Zero Flag
 DMA Channels                   Pipeline Register
 Function Generator             Line Mode
 Shifts and Masks               Blitter Speed
 Descending Mode                Blitter Operations and System DMA
 Copying Arbitrary Regions      Blitter Block Diagram
 Area Fill Mode                 Blitter Key Points
 Blitter Done Flag
6 Blitter Hardware / What is the Blitter?
The blitter is one of the two coprocessors in the Amiga.  Part of the
Agnus chip, it is used to copy rectangular blocks of memory around and to
draw lines.  When copying memory, it is approximately twice as fast as the
68000, able to move almost four megabytes per second.  It can draw lines
at almost a million pixels per second.

In block move mode, the blitter can perform any logical operation on up to
three source areas, it can  shift  up to two of the source areas by one to
fifteen bits, it can  fill  outlined shapes, and it can  mask  the first
and last words of each raster row.  In  line mode , any pattern can be
imposed on a line, or the line can be drawn such that only one pixel per
horizontal line is set.

The blitter can only access Chip memory -- that portion of memory
accessible by the display hardware.  Attempting to use the blitter to read
or write Fast or other non-Chip memory may result in destruction of the
contents of Chip memory.

A "blit" is a single operation of the blitter -- perhaps the drawing of a
line or movement of a block of memory.  A blit is performed by
initializing the blitter registers with appropriate values and then
starting the blitter by writing the  BLTSIZE  register. As the blitter is
an asynchronous coprocessor, the 680x0 CPU continues to run as the blit is
executing.
6 Blitter Hardware / Memory Layout
The blitter is a word blitter, not a bit blitter.  All data fetched,
modified, and written are in full 16-bit words.  Through careful
programming, the blitter can do many "bit" type operations.

The blitter is particularly well suited to graphics operations.  As an
example, a 320 by 200 screen set up to display 16 colors is organized as
four bitplanes of 8,000 bytes each.  Each bitplane consists of 200 rows of
40 bytes or 20 16-bit words.  (From here on, a "word" will mean a 16-bit
word.)
6 Blitter Hardware / DMA Channels
The blitter has four DMA channels -- three source channels, labeled A, B,
and C, and one destination channel, called D. Each of these channels has
separate address pointer, modulo and data registers and an enable bit. Two
have shift registers , and one has a first and last word mask register .
All four share a single blit size register.
The address pointer registers are each composed of two words, named
BLTxPTH and BLTxPTL. (Here and later, in referring to a register, any "x"
in the name should be replaced by the channel label, A, B, C, or D.) The
two words of each register are adjacent in the 68000 address space, with
the high address word first, so they can both be written with one 32-bit
write from the processor. The pointer registers should be written with an
address in bytes. Because the blitter works only on words, the least
significant bit of the address is ignored. Because only Chip memory is
accessible, some of the most significant bits will be ignored as well. On
machines with 512 KB of Chip memory, the most significant 13 bits are
ignored. On machines with more Chip memory, fewer bits will are ignored.
A valid, even, Chip memory address should always be written to these
registers.
Set unused bits to zero.
------------------------
Be sure to write zeros to all unused bits in the custom chip
registers. These bits may be used by later versions of the custom
chips. Writing non-zero values to these bits may cause unexpected
results on future machines.
Each of the DMA channels can be independently enabled or disabled. The
enable bits are bits SRCA, SRCB, SRCC, and DEST in control register zero
( BLTCON0 ).
When disabled, no memory cycles will be executed for that channel and, for
a source channel, the constant value stored in the data register of that
channel will be used for each blitter cycle. For this purpose, each of
the three source channels have preloadable data registers, called BLTxDAT.
Images in memory are usually stored in a linear fashion; each word of data
on a line is located at an address that is one greater than the word on
its left. i.e. Each line is a "plus one" continuation of the previous
line.
__________________________________
| | | | | | | |
| 20 | 21 | 22 | 23 | 24 | 25 | 26 |
|____|____|____|____|____|____|____|
| | | | | | | |
| 27 | 28 | 29 | 30 | 31 | 32 | 33 |
|____|____|____|____|____|____|____|
| | | | | | | |
| 34 | 35 | 36 | 37 | 38 | 39 | 40 |
|____|____|____|____|____|____|____|
| | | | | | | |
| 41 | 42 | 43 | 44 | 45 | 46 | 47 |
|____|____|____|____|____|____|____|
| | | | | | | |
| 48 | 49 | 50 | 51 | 52 | 53 | 54 |
|____|____|____|____|____|____|____|
| | | | | | | |
| 55 | 56 | 57 | 58 | 59 | 60 | 61 |
|____|____|____|____|____|____|____|
Figure 6-1: How Images are Stored in Memory
The map in Figure 6-1 represents a single bitplane (one bit of color) of
an image at word addresses 20 through 61. Each of these addresses accesses
one word (16 pixels) of a single bitplane. If this image required sixteen
colors, four bitplanes like this would be required in memory, and four
copy (move) operations would be required to completely move the image.
The blitter is very efficient at copying such blocks because it needs to
be told only the starting address (20), the destination address, and the
size of the block (height = 6, width = 7). It will then automatically move
the data, one word at a time, whenever the data bus is available. When the
transfer is complete, the blitter will signal the processor with a flag
and an interrupt.
NOTE:
-----
This copy (move) operation operates on memory and may or may not
change the memory currently being used for display.
All data copy blits are performed as rectangles of words, with a given
width and height. All four DMA channels use a single blit size register,
called BLTSIZE, used for both the width and height. The width can take a
value of from 1 to 64 words (16 to 1024 bits). The height can run from 1
to 1024 rows. The width is stored in the least significant six bits of
the BLTSIZE register. If a value of zero is stored, a width count of 64
words is used. This is the only parameter in the blitter that is given in
words. The height is stored in the upper ten bits of the BLTSIZE
register, with zero representing a height of 1024 rows. Thus, the largest
blit possible with the current Amiga blitter is 1024 by 1024 pixels.
However, shifting and masking operations may require an extra word be
fetched for each raster scan line, making the maximum practical horizontal
width 1008 pixels.
Blitter counting.
-----------------
To emphasize the above paragraph: Blit width is in words with a
zero representing 64 words. Blit height is in lines with a zero
representing 1024 lines.
The blitter also has facilities, called modulos, for accessing images
smaller than the entire bitplane. Each of the four DMA channels has a
16-bit modulo register called BLTxMOD. As each word is fetched (or
written) for an enabled channel, the address pointer register is
incremented by two (two bytes, or one word). After each row of the blit is
completed, the signed 16-bit modulo value for that DMA channel is added to
the address pointer. (A row is defined by the width stored in BLTSIZE.)
About blitter modulos.
----------------------
The modulo values are in bytes, not words. Since the blitter can
only operate on words, the least significant bit is ignored. The
value is sign-extended to the full width of the address pointer
registers. Negative modulos can be useful in a variety of ways, such
as repeating a row by setting the modulo to the negative of the width
of the bitplane.
As an example, suppose we want to operate on a section of a full 320 by
200 pixel bitmap that started at row 13, byte 12 (where both are numbered
from zero) and the section is 10 bytes wide. We would initialize the
pointer register to the address of the bitplane plus 40 bytes per row
times 13 rows, plus 12 bytes to get to the correct horizontal position. We
would set the width to 5 words (10 bytes). At the end of each row, we
would want to skip over 30 bytes to get to the beginning of the next row,
so we would use a modulo value of 30. In general, the width (in words)
times two plus the modulo value (in bytes) should equal the full width, in
bytes, of the bitplane containing the image.
These calculations are illustrated in Figure 6-1 which shows the required
values used in the blitter registers BLTxMOD and BLTxPTR (BLTxPTH and
BLTxPTL).
About the blitter and ECS.
--------------------------
The blitter size and pointer registers have increased range under the
Enhanced Chip Set (ECS). With the original version of the Amiga's
custom chips, blits were limited to 1008 by 1024 pixels. With the
ECS version of the custom chips, up to 32K by 32K pixel blits are
possible. Refer to Appendix C for more information on ECS and the
blitter registers.
= Address (0,0)
\
\
\ BYTE (COLUMN) NUMBER
\
\ 0 10 20 30 39
\ | | | | |
+----------------------------------------+ - -
0|········································| |
1|········································|
2|········································| |
3|········································|
4|········································| |
5|········································|
6|········································| |
7|········································|
8|········································| |
9|········································|
ROW 10|········································| |
NUMBER 11|········································|
12|········································| |- - window
13|············##########··················| bitmap
14|············##########··················| |
15|· skip left ##########··· skip right ···|
16|<---------->##########<---------------->| |
17| = 12 bytes ##########··· = 18 bytes ···|
18|············##########··················| |
19|·················\······················|
20|··················\·····················| |
-|···················\····················|
-|····················\···················| |
-|·····················\··················|
-|······················\············�····| |
+-----------------------\------------\---+ - -
\ \
\ \
image to manipulate \
\
one byte
BLTxPTR = + (40*13) + 12
= + 532
BLTxMOD = 12 + 18
= 30 bytes
Figure 6-2: BLTxPTR and BLTxMOD calculations
NOTE:
-----
The blitter can be used to process linear rather than rectangular
regions by setting the horizontal or vertical count in BLTSIZE to 1.
Because each DMA channel has its own modulo register, data can be moved
among bitplanes of different widths. This is most useful when moving
small images into larger screen bitplanes.
6 Blitter Hardware / Function Generator
The blitter can combine the data from the three source  DMA channels  in
up to 256 different ways to generate the values stored by the destination
 DMA channel . These sources might be one bitplane from each of three
separate graphics images.  While each of these sources is a rectangular
region composed of many points, the same logic operation will be performed
on each point throughout the rectangular region.  Thus, for purposes of
defining the blitter logic operation it is only necessary to consider what
happens for all of the possible combinations of one bit from each of the
three sources.

There are eight possible combinations of values of the three bits, for
each of which we need to specify the corresponding destination bit as a
zero or one. This can be visualized with a standard truth table, as shown
below. We have listed the three source channels, and the possible values
for a single bit from each one.


         A       B       C       D  BLTCON0  position   Minterm
         -       -       -       - ------------------ ---------
                                                        ___
         0       0       0       ?         0            ABC
                                                        __
         0       0       1       ?         1            ABC
                                                        _ _
         0       1       0       ?         2            ABC
                                                        _
         0       1       1       ?         3            ABC
                                                         __
         1       0       0       ?         4            ABC
                                                         _
         1       0       1       ?         5            ABC
                                                          _
         1       1       0       ?         6            ABC

         1       1       1       ?         7            ABC


This information is collected in a standard format, the LF (Logic
Function) control byte in the  BLTCON0  register. This byte programs the
blitter to perform one of the 256 possible logic operations on three
sources for a given blit.

To calculate the LF control byte in  BLTCON0 , fill in the truth table
with desired values for D, and read the function value from the bottom of
the table up.

For example, if we wanted to set all bits in the destination where the
corresponding A source bit is 1 or the corresponding B source bit is 1, we
would fill in the last four entries of the truth table with 1 (because the
A bit is set) and the third, fourth, seven, and eight entries with 1
(because the B bit is set), and all others (the first and second) with 0,
because neither A nor B is set.  Then, we read the truth table from the
bottom up, reading 11111100, or $FC.

For another example, an LF control byte of $80 ( = 1000 0000 binary) turns
on bits only for those points of the D destination rectangle where the
corresponding bits of A, B, and C sources were all on (ABC = 1, bit 7 of
LF on). All other points in the rectangle, which correspond to other
combinations for A, B, and C, will be 0. This is because bits 6 through 0
of the LF control byte, which specify the D output for these situations,
are set to 0.

 Designing the LF Control Byte with Minterms
 Designing the LF Control Byte with Venn Diagrams
6 / Function Generator / Designing the LF Control Byte with Minterms
One approach to designing the LF control byte uses logic equations. Each
of the rows in the  truth table  corresponds to a "minterm", which is a
particular assignment of values to the A, B, and C bits.  For instance,
the first minterm is usually written:
     ___
     ABC

or "not A and not B and not C".  The last is written as ABC.

   Blitter logic.
   --------------
   Two terms that are adjacent are AND'ed, and two terms that are
   separated by "+" are OR'ed. AND has a higher precedence, so AB + BC
   is equal to (AB) + (BC).

Any function can be written as a sum of minterms.  If we wanted to
calculate the function where D is one when the A bit is set and the C bit
is clear, or when the B bit is set, we can write that as:
      _
     AC + B

or "A and not C or B".  Since "1 and A" is "A":
          _
     D = AC + B
             _
     D = A(1)C + (1)B(1)
                  _                  _
Since either A or A is true (1 = A + A), and similarly for B, and C; we
can expand the above equation further:
             _
     D = A(1)C + (1)B(1)
               _ _        _       _
     D = A(B + B)C + (A + A)B(C + C)
           _    __          _    _      _
     D = ABC + ABC + AB(C + C) + AB(C + C)
           _    __           _   _     _ _
     D = ABC + ABC + ABC + ABC + ABC + ABC

After eliminating duplicates, we end up with the five minterms:
      _         _    __         _     _ _
     AC + B = ABC + ABC + ABC + ABC + ABC

These correspond to  BLTCON0  bit positions of 6, 4, 7, 3, and 2,
according to our  truth table , which we would then set, and clear the
rest.

The wide range of logic operations allow some sophisticated graphics
techniques.  For instance, you can move the image of a car across some
pre-existing building images with a few blits. Producing this effect
requires predrawn images of the car, the buildings (or background), and a
car "mask" that contains bits set wherever the car image is not
transparent.  This mask can be visualized as the shadow of the car from a
light source at the same position as the viewer.

   About mask bitplanes.
   ---------------------
   The mask for the car need only be a single bitplane regardless of the
   depth of the background bitplane. This mask can be used in turn on
   each of the background bitplanes.

To animate the car, first save the background image where the car will be
placed. Next copy the car to its first location with another blit.  Your
image is now ready for display.  To create the next image, restore the old
background, save the next portion of the background where the car will be,
and redraw the car, using three separate blits. (This technique works best
with beam-synchronized blits or double buffering.)

To temporarily save the background, copy a rectangle of the background
(from the A channel, for instance) to some backup buffer (using the D
channel). In this case, the function we would use is "A", the standard
copy function.  From Table 6-1, we note that the corresponding LF code has
a value of $F0.

To draw the car, we might use the A  DMA channel  to fetch the car mask,
the B  DMA channel  to fetch the actual car data, the C DMA channel to
fetch the background, and the D DMA channel  to write out the new image.

   Warning:
   --------
   We must fetch the destination background before we write it, as only
   a portion of a destination word might need to be modified, and there
   is no way to do a write to only a portion of a word.

When blitting the car to the background we would want to use a function
that, whenever the car mask (fetched with  DMA channel  A) had a bit set,
we would pass through the car data from B, and whenever A did not have a
bit set, we would pass through the original background from C.  The
corresponding function, commonly referred to as the cookie-cut function,
      _
is AB+AC, which works out to an LF code value of $CA.

To restore the background and prepare for the next frame, we would copy
the information saved in the first step back, with the standard copy
function ($F0).

If you shift the data and the mask to a new location and repeat the above
three steps over and over, the car will appear to move across the
background (the buildings).

   NOTE:
   -----
   This may not be the most effective method of animation, depending on
   the application, but the cookie-cut function will appear often.

Table 6-1 lists some of the most common functions and their values, for
easy reference.


                Table 6-1: Table of Common Minterm Values


          Selected      BLTCON0             Selected      BLTCON0
          Equation      LF Code            Equation      LF Code
          --------      -------            --------      -------
          D = A           $F0              D =  AB         $C0
              _                                  _
          D = A           $0F              D =  AB         $30
                                                _
          D = B           $CC              D =  AB         $0C
              _                                 __
          D = B           $33              D =  AB         $03

          D = C           $AA              D =  BC         $88
              _                                  _
          D = C           $55              D =  BC         $44
                                                _
          D = AC          $A0              D =  BC         $22
               _                                __
          D = AC          $50              D =  AC         $11
              _                                     _
          D = AC          $0A              D =  A + B      $F3
              _                                 _   _
          D = AC          $05              D =  A + B      $3F
                                                    _
          D = A + B       $FC              D =  A + C      $F5
              _                                 _   _
          D = A + B       $CF              D =  A + C      $5F
                                                    _
          D = A + C       $FA              D =  B + C      $DD
              _                                 _   _
          D = A + C       $AF              D =  B + C      $77
                                                     _
          D = B + C       $EE              D =  AB + AC    $CA
              _
          D = B + C       $BB
6 / Function Generator / Designing LF Control Byte with Venn Diagrams
Another way to arrive at a particular function is through the use of Venn
diagrams:
                         ______  0 ______
                        /      \  /      \
                       /        \/        \
                      /         /\         \
                     /   A     /  \     B   \
                    |    -    |    |    -    |
                    |         |  6 |         |
                    |         |    |         |
                    |       4 |____| 2       |
                    |        /|    |\        |
                    |       / |  7 | \       |
                     \     /   \  /   \     /
                      \   /  5  \/  3  \   /
                       \ |      /\      | /
                        \|_____/  \_____|/
                         |              |
                         |       1      |
                         |              |
                         |              |
                          \            /
                           \     C    /
                            \    -   /
                             \______/

             Figure 6-3: Blitter Minterm Venn Diagram


1. To select a function D=A (that is, destination = A source only),
   select only the  minterms  that are totally enclosed by the A-circle in
   the Figure above.  This is the set of  minterms  7, 6, 5, and 4. When
   written as a set of 1s for the selected  minterms  and 0s for those not
   selected, the value becomes:

               Minterm Number      7 6 5 4 3 2 1 0
               Selected Minterms   1 1 1 1 0 0 0 0
                                  -----------------
                                        F   0       equals $F0

2. To select a function that is a combination of two sources, look for
   the  minterms  by both of the circles (their intersection).  For
   example, the combination AB (A "and" B) is represented by the area
   common to both the A and B circles, or  minterms  7 and 6.

               Minterm Numbers     7 6 5 4 3 2 1 0
               Selected Minterms   1 1 0 0 0 0 0 0
                                  -----------------
                                        C   0       equals $C0

3. To use a function that is the inverse, or "not", of one of the sources,
           _
   such as A,

   take all of the  minterms  not enclosed by
   the circle represented by A on the above Figure.  In this case, we
   have  minterms  0, 1, 2, and 3.

               Minterm Numbers     7 6 5 4 3 2 1 0
               Selected Minterms   0 0 0 0 1 1 1 1
                                  -----------------
                                        0   F       equals $0F

4. To combine  minterms , or "or" them,  "or" the values together. For
   example, the equation AB+BC becomes

               Minterm Numbers     7 6 5 4 3 2 1 0
               AB                  1 1 0 0 0 0 0 0
               BC                  1 0 0 0 1 0 0 0
              -------------------------------------
               AB+BC               1 1 0 0 1 0 0 0
                                        C   8       equals $C8
6 Blitter Hardware / Shifts and Masks
Up to now we have dealt with the blitter only in moving words of memory
around and combining them with logic operations.  This is sufficient for
 moving graphic images  around, so long as the images stay in the same
position relative to the beginning of a word.  If our car image has its
leftmost pixel on the second pixel from the left, we can easily draw it on
the screen in any position where the leftmost pixel also starts two pixels
from the beginning of some word.  But often we want to draw that car
shifted left or right by a few pixels. To this end, both the A and B
 DMA channels  have a barrel shifter that can shift an image between 0 and
15 bits.

This shifting operation is completely free; it requires no more time to
execute a blit with shifts than a blit without shifts, as opposed to
shifting with the 680x0.  The shift is normally towards the right. This
shifter allows movement of images on pixel boundaries, even though the
pixels are addressed 16 at a time by each word address of the bitplane
image.

So if the incoming data is shifted to the right, what is shifted in
from the left?  For the first word of the blit, zeros are shifted in; for
each subsequent word of the same blit, the data shifted out from the
previous word is shifted in.

The shift value for the A channel is set with bits 15 through 12 of
 BLTCON0 ; the B shift value is set with bits 15 through 12 of  BLTCON1 .
For most operations, the same value will be used for both shifts.  For
shifts of greater than fifteen bits, load the  address register pointer
of the destination with a higher address; a shift of 100 bits would
require the  destination pointer  to be advanced 100/16 or 6 words (12
bytes), and a right shift of the remaining 4 bits to be used.

As an example, let us say we are doing a blit that is three words wide,
two words high, and we are using a shift of 4 bits.  For simplicity, let
us assume we are doing a straight copy from A to D.  The first word that
will be written to D is the first word fetched from A, shifted right four
bits with zeros shifted in from the left.  The second word will be the
second word fetched from the A, shifted right, with the least significant
(rightmost) four bits of the first word shifted in. Next, we will write
the first word of the second row fetched from A, shifted four bits, with
the least significant four bits of the last word from the first row
shifted in. This would continue until the blit is finished.

On shifted blits, therefore, we only get zeros shifted in for the first
word of the first row. On all other rows the blitter will shift in the
bits that it shifted out of the previous row. For most graphics
applications, this is undesirable.  For this reason, the blitter has the
ability to mask the first and last word of each row coming through the A
 DMA channel .

Thus, it is possible to extract rectangular data from a source whose right
and left edges are between word boundaries. These two registers are called
BLTAFWM and BLTALWM, for blitter A channel first and last word masks.
When not in use, both should be initialized to all ones ($FFFF).

   A note about fonts.
   -------------------
   Text fonts on the Amiga are stored in a packed bitmap.  Individual
   characters from the font are extracted using the blitter, masking out
   unwanted bits.  The character may then be positioned to any pixel
   alignment by shifting it the appropriate amount.

These masks are "anded" with the source data, before any shifts are
applied. Only when there is a 1 bit in the first-word mask will that bit
of source A actually appear in the logic operation. The first word of each
row is anded with BLTAFWM, and the last word is "anded" with BLTALWM.  If
the width of the row is a single word, both masks are applied
simultaneously.

The masks are also useful for extracting a certain range of "columns" from
some bitplane.  Let us say we have, for example, a predrawn rectangle
containing text and graphics that is 23 pixels wide.  The leftmost edge is
the leftmost bit in its bitmap, and the bitmap is two words wide.  We wish
to render this rectangle starting at pixel position 5 into our 320 by 200
screen bitmap, without disturbing anything that lies outside of the
rectangle.

                 |<--------- two word source bitmap -------->|
                 |                                           |
                 |<--- extract a 32-bit image --->|          |
                 |                                |          |
                 |<--- 16-bit word -->|           |          |
                 |____________________|___________|__________|
                 |                                           |
    source       | 00000000  00000000     00000000  00000000 |
    DMA B        | 11111111  11111111     11111111  11111111 |
                 | 10101010  01010101     10101010  01010101 |
                 |___________________________________________|
                       |         |          |         |
                 Source is passed through mask when it is one,
                     outherwise the destination is copied.
                       |         |          |         |
                  _____v_________v____   ___v_________v______
                 |                    | |                    |
    mask on      | 11111111  11111111 | | 11111110  00000000 |
    DMA A        |  first word mask   | |  second word mask  |
                 |____________________| |____________________|
                       |         |          |  ||     |
                       |         |          |  |-     -
                  _____v_________v__________v__v_____________
    final        |                                           |
    destination  | 00000000  00000000     00000000  11111111 |
    DMA D        | 11111111  11111111     11111111  11111111 |
    (points to   | 10101010  01010101     10101010  11111111 |
    same address |___________________________________________|
    as DMA C)                                   ^   ^  ^   ^
                       -         -         -    |   |  |   | <-+
                  _____|_________|_________|____|___|__|___|_  |
    destination  |                                           | |
    before blit  | 00000000  00000000     00000000  00000000 | |
    DMA C        | 11111111  11111111     11111111  11111111 | |
    (to be       | 10101010  01010101     10101010  01010101 | |
    overwritten) |___________________________________________| |
                                                               |
                 Destination does not change where mask is 0 --+


                   Figure 6-4: Extracting a Range of Columns


To do this, we point the B  DMA channel  at the bitmap containing the
source image, and the D  DMA channel  at the screen bitmap. We use a shift
value of 5.  We also point the C  DMA channel  at the screen bitmap. We
use a blit width of 2 words. What we need is a simple copy operation,
except we wish to leave the first five bits of the first word, and the
last four bits (2 times 16, less 23, less 5) of the last word alone. The A
 DMA channel  comes to the rescue.  We preload the A  data register  with
$FFFF (all ones), and use a first word mask with the most significant five
bits set to zero ($07FF) and a last word mask with the least significant
four bits set to zero ($FFF0).  We do not enable the A  DMA channel , but
only the B, C, and D channels, since we want to use the A channel as a
simple row mask. We then wish to pass the B (source) data along wherever
the A channel is 1 (for a  minterm  of AB) and pass along the original
destination data (from the C channel) wherever A is 0
                    _
(for a  minterm  of AC),
                                               _
yielding our classic cookie-cut function of AB+AC, or $CA.

   About disabling.
   ----------------
   Even though the A channel is disabled, we use it in our logic
   function and preload the  data register .  Disabling a channel simply
   turns off the memory fetches for that channel; all other operations
   are still performed, only from a constant value stored in the
   channel's  data register .

An alternative but more subtle way of accomplishing the same thing is to
use an A shift of five, a first word mask of all ones, and a last word
mask with the rightmost nine bits set to zero.  All other registers remain
the same.

   Warning:
   --------
   Be sure to load the blitter immediate  data registers  only after
   setting the shift count in  BLTCON0/BLTCON1 , as loading the
    data registers  first will lead to unpredictable results. For instance,
   if the last person left BSHIFT to be "4", and I load BDATA with "1" and
   then change BSHIFT to "2", the resulting BDATA that is used is
   "1<<4", not "1<<2". The act of loading one of the  data registers
   "draws" the data through the machine and shifts it.
6 Blitter Hardware / Descending Mode
Our standard memory copy blit works fine if the source does not overlap
the destination.  If we want to move an image one row down (towards
increasing addresses), however, we run into a problem -- we overwrite the
second row before we get a chance to copy it!  The blitter has a special
mode of operation -- descending mode -- that solves this problem nicely.

Descending mode is turned on by setting bit one of  BLTCON1  (defined as
BLITREVERSE). If you use descending mode the address pointers will be
decremented by two (bytes) instead of incremented by two for each word
fetched.  In addition, the modulo values will be subtracted rather than
added.   Shifts  are then towards the left, rather than the right, the
first word  mask  masks the last word in a row (which is still the first
word fetched), and the last word  mask  masks the first word in a row.

Thus, for a standard memory copy, the only difference in blitter setup
(assuming no  shifting  or  masking ) is to initialize the
 address pointer registers  to point to the last word in a block, rather
than the first word.  The  modulo values ,  blit size , and all other
parameters should be set the same.

   NOTE:
   -----
   This differs from predecrement versus postincrement in the 680x0,
   where an address register would be initialized to point to the word
   after the last, rather than the last word.

Descending mode is also necessary for  area filling , which will be
covered in a later section.
6 Blitter Hardware / Copying Arbitrary Regions
One of the most common uses of the blitter is to move arbitrary rectangles
of data from one bitplane to another, or to different positions within a
bitplane. These rectangles are usually on arbitrary bit coordinates, so
 shifting  and  masking  are necessary. There are further complications.
It may take several readings and some experimentation before everything in
this section can be understood.

A source image that spans only two words may, when copied with certain
 shifts , span three words.  Our 23 pixel wide rectangle above, for
instance, when  shifted  12 bits, will span three words. Alternatively, an
image spanning three words may fit in two for certain  shifts .  Under all
such circumstances, the blit size should be set to the larger of the two
values, such that both source and destination will fit within the blit
size.  Proper  masking  should be applied to mask out unwanted data.

Some general guidelines for copying an arbitrary region are as follows.

1. Use the A  DMA channel , disabled, preloaded with all ones and the
   appropriate  mask  and  shift values , to mask the  cookie-cut  function.
   Use the B channel to fetch the source data, the C channel to fetch
   the destination data, and the D channel to write the destination
   data.  Use the  cookie-cut  function $CA.

2. If  shifting , always use ascending mode if bit shifting to the right,
   and use  descending mode  if bit shifting to the left.

   NOTE:
   -----
   These shifts are the shifts of the bit position of the leftmost edge
   within a word, rather than  absolute shifts , as explained previously.

3. If the source and destination overlap, use ascending mode if the
   destination has a lower memory address (is higher on the display) and
    descending mode  otherwise.

4. If the source spans more words than the destination, use the same
    shift  value for the A channel as for the source B channel and set the
   first and last word  masks  as if they were masking the B source data.

5. If the destination spans more words than the source, use a  shift
   value of zero for the A channel and set the first and last word  masks
   as if they were masking the destination D data.

6. If the source and destination span the same number of words, use the
   A channel to  mask  either the source, as in 4, or the destination, as
   in 5.

   Warning:
   --------
   Conditions 2 and 3 can be contradictory if, for instance, you are
   trying to move an image one pixel down and to the right.  In this
   case, we would want to use  descending mode  so our destination does
   not overwrite our source before we use the source, but we would want
   to use ascending mode for the right  shift .  In some situations, it is
   possible to get around general guideline 2 above with clever  masking .
   But occasionally just  masking  the first or last word may not be
   sufficient; it may be necessary to mask more than 16 bits on one or
   the other end. In such a case, a mask can be built in memory for a
   single raster row, and the A  DMA channel  enabled to explicitly fetch
   this mask. By setting the A modulo value to the negative of the width
   of the mask, the mask will be repeatedly fetched for each row.
6 Blitter Hardware / Area Fill Mode
In addition to copying data, the blitter can simultaneously perform a fill
operation during the copy.  The fill operation has only one restriction --
the area to fill must be defined first by drawing untextured lines with
only one bit set per horizontal row.  A special  line draw mode  is
available for this operation.  Use a standard copy blit (or any other
blit, as area fills take place after all  shifts ,  masks  and logical
combination of sources).   Descending mode  must be used. Set either the
inclusive-fill-enable bit (FILL_OR, or bit 3) or the exclusive-fill-enable
bit (FILL_XOR, or bit 4) in  BLTCON1 . The inclusive fill mode fills
between lines, leaving the lines intact. The exclusive fill mode fills
between lines, leaving the lines bordering the right edge of filled
regions but deleting the lines bordering the left edge. Exclusive fill
yields filled shapes one pixel narrower than the same pattern filled with
inclusive fill.

For instance, the pattern:

    00100100-00011000

filled with inclusive fill, yields:

    00111100-00011000

with exclusive fill, the result would be

    00011100-00001000

(Of course, fills are always done on full 16-bit words.)

There is another bit (FILL_CARRYIN or bit 3 in  BLTCON1 ) that forces the
area "outside" the lines be filled; for the above example, with inclusive
fill, the output would be

    11100111-11111111

with exclusive fill, the output would be

    11100011-11110111


             before                          after
     ______________________          ______________________
    |                      |        |                      |
    |                      |        |                      |
    |                      |        |                      |
    |   1   1      1   1   |        |   11111      11111   |
    |    1  1       1  1   |        |    1111       1111   |
    |     1 1        1 1   |        |     111        111   |
    |      11         11   |        |      11         11   |
    |     1 1        1 1   |        |     111        111   |
    |    1  1       1  1   |        |    1111       1111   |
    |   1   1      1   1   |        |   11111      11111   |
    |                      |        |                      |
    |                      |        |                      |
    |______________________|        |______________________|

           Figure 6-5: Use of the FCI Bit - Bit Is a 0


If the FCI bit is a 1 instead of a 0, the area outside the lines is filled
with 1s and the area inside the lines is left with 0s in between.


             before                          after
     ______________________          ______________________
    |                      |        |                      |
    |                      |        |                      |
    |                      |        |                      |
    |   1   1      1   1   |        | 111   1111111   11   |
    |    1  1       1  1   |        | 1111  11111111  11   |
    |     1 1        1 1   |        | 11111 111111111 11   |
    |      11         11   |        | 111111111111111111   |
    |     1 1        1 1   |        | 11111 111111111 11   |
    |    1  1       1  1   |        | 1111  11111111  11   |
    |   1   1      1   1   |        | 111   1111111   11   |
    |                      |        |                      |
    |                      |        |                      |
    |______________________|        |______________________|

           Figure 6-6: Use of the FCI Bit - Bit Is a 1


If you wish to produce very sharp, single-point vertices, exclusive-fill
enable must be used. Figure 6-7 shows how a single-point vertex is
produced using exclusive-fill enable.


             before                   after exclusive fill
     ______________________          ______________________
    |                      |        |                      |
    |                      |        |                      |
    |                      |        |                      |
    |   1   1      1   1   |        |    1111       1111   |
    |    1  1       1  1   |        |     111        111   |
    |     1 1        1 1   |        |      11         11   |
    |      11         11   |        |       1          1   |
    |     1 1        1 1   |        |      11         11   |
    |    1  1       1  1   |        |     111        111   |
    |   1   1      1   1   |        |    1111       1111   |
    |                      |        |                      |
    |                      |        |                      |
    |______________________|        |______________________|

             Figure 6-7: Single-Point Vertex Example


The blitter uses the fill carry-in bit as the starting fill state
beginning at the rightmost edge of each line.  For each "1" bit in the
source area, the blitter flips the fill state, either filling or not
filling the space with ones.  This continues for each line until the left
edge of the blit is reached, at which point the filling stops.
6 Blitter Hardware / Blitter Done Flag
When the  BLTSIZE  register is written the blit is started.  The processor
does not stop while the blitter is working, though; they can both work
concurrently, and this provides much of the speed evident in the Amiga.
This does require some amount of care when using the blitter.

A blitter done flag, also called the blitter busy flag, is provided as
DMAF_BLTDONE (bit 14) in  DMACONR .  This flag is set when a blit is in
progress.

   About the blitter done flag.
   ----------------------------
   If a blit has just been started but has been locked out of memory
   access because of, for instance, display fetches, this bit may not
   yet be set.  The processor, on the other hand, may be running
   completely uninhibited out of Fast memory or its internal cache, so
   it will continue to have memory cycles.

The solution is to read a chip memory or hardware register address with
the processor before testing the bit.  This can easily be done with the
sequence:

        btst.b  #DMAB_BLTDONE-8,DMACONR(a1)
        btst.b  #DMAB_BLTDONE-8,DMACONR(a1)

where a1 has been preloaded with the address of the hardware registers.
The first "test" of the blitter done bit may not return the correct
result, but the second will.

   NOTE:
   -----
   Starting with the Fat Agnus the blitter busy bit has been "fixed" to
   be set as soon as you write to  BLTSIZE  to start the blit, rather than
   when the blitter gets its first DMA cycle.  However, not all machines
   will use these newer chips, so it is best to rely on the above method
   of testing.

 Multitasking and the Blitter
6 / Blitter Done Flag / Multitasking and the Blitter
When a blit is in progress, none of the blitter registers should be
written.  For details on arbitration of blitter access in the system,
please refer to the ROM Kernel Manual.  In particular, read the discussion
about the OwnBlitter() and DisownBlitter() functions.  Even after the
blitter has been "owned", a blit may still be finishing up, so the blitter
 done flag  should be checked before using it even the first time.  Use of
the ROM kernel function WaitBlit() is recommended.

You should also check the blitter  done flag  before using results of a
blit.  The blit may not be finished, so the data may not be ready yet.
This can lead to difficult to find bugs, because a 68000 may be slow
enough for a blit to finish without checking the  done flag , while a
68020, perhaps running out of its cache, may be able to get at the data
before the blitter has finished writing it.

Let us say that we have a subroutine that displays a text box on top of
other imagery temporarily.  This subroutine might allocate a chunk of
memory to hold the original screen image while we are displaying our text
box, then draw the text box.  On exit, the subroutine might blit the
original imagery back and then free the allocated memory.  If the memory
is freed before the blitter  done flag  is checked, some other process
might allocate that memory and store new data into it before the blit is
finished, trashing the blitter source and, thus, the screen imagery being
restored.
6 Blitter Hardware / Interrupt Flag
The blitter also has an interrupt flag that is set whenever a blit
finishes.  This flag,  INTF_BLIT , can generate a 680x0 interrupt if
enabled. For more information on  interrupts , see Chapter 7: "System
Control Hardware."
6 Blitter Hardware / Zero Flag
A blitter zero flag is provided that can be tested to determine if the
logic operation selected has resulted in zero bits for all destination
bits, even if those destination bits are not written due to the D
 DMA channel  being disabled.  This feature is often useful for
 collision detection , by performing a logical "and" on two source images
to test for overlap. If the images do not overlap, the zero flag will stay
true.

The Zero flag is only valid after the blitter has completed its operation
and can be read from bit (13) DMAF_BLTNZERO of the  DMACONR  register.
6 Blitter Hardware / Pipeline Register
The blitter performs many operations in each cycle --  shifting  and
 masking  source words, logical combination of sources, and  area fill
and zero detect on the output.  To enable so many things to take place so
quickly, the blitter is pipelined. This means that rather than performing
all of the above operations in one blitter cycle, the operations are
spread over two blitter cycles. (Here "cycle" is used very loosely for
simplicity.) To clarify this, the blitter can be imagined as two chips
connected in series. Every cycle, a new set of source operations come in,
and the first chip performs its operations on the data.  It then passes
the half-processed data to the second chip to be finished during the next
cycle, when the first chip will be busy at work on the next set of data.
Each set of data takes two "cycles" to get through the two chips,
overlapped so a set of data can be pumped through each cycle.

What all this means is that the first two sets of sources are fetched
before the first destination is written.  This allows you to  shift  a
bitmap up to one word to the right using ascending mode, for instance,
even though normally parts of the destination would be overwritten before
they were fetched.


    USE Code
       in        Active
    BLTCON0     Channels             Cycle Sequence
   ---------    --------             --------------
       F        A B C D     A0 B0 C0 -  A1 B1 C1 D0 A2 B2 C2 D1 D2
       E        A B C       A0 B0 C0 A1 B1 C1 A2 B2 C2
       D        A B   D     A0 B0 -  A1 B1 D0 A2 B2 D1 -  D2
       C        A B         A0 B0 -  A1 B1 -  A2 B2
       B        A   C D     A0 C0 -  A1 C1 D0 A2 C2 D1 -  D2
       A        A   C       A0 C0 A1 C1 A2 C2
       9        A     D     A0 -  A1 D0 A2 D1 -  D2
       8        A           A0 -  A1 -  A2
       7          B C D     B0 C0 -  -  B1 C1 D0 -  B2 C2 D1 -  D2
       6          B C       B0 C0 -  B1 C1 -  B2 C2
       5          B   D     B0 -  -  B1 D0 -  B2 D1 -  D2
       4          B         B0 -  -  B1 -  -  B2
       3            C D     C0 -  -  C1 D0 -  C2 D1 -  D2
       2            C       C0 -  C1 -  C2
       1              D     D0 -  D1 -  D2
       0         none       -  -  -  -


       Table 6-2: Typical Blitter Cycle Sequence


Here are a few caveats to keep in mind about Table 6-2.

*  No fill.
*  No competing bus activity.
*  Three-word blit.
*  Typical operation involves fetching all sources twice before the
   first destination becomes available. This is due to internal
   pipelining. Care must be taken with overlapping source and
   destination regions.

   Warning:
   --------
   This Table is only meant to be an illustration of the typical order
   of blitter cycles on the bus. Bus cycles are dynamically allocated
   based on blitter operating mode; competing bus activity from
   processor, bitplanes, and other  DMA channels ; and other factors.
   Commodore Amiga does not guarantee the accuracy of or future
   adherence to this chart. We reserve the right to make product
   improvements or design changes in this area without notice.
6 Blitter Hardware / Line Mode
In addition to all of the functions described above, the blitter can draw
patterned lines.  The line draw mode is selected by setting bit 0
(LINEMODE) of  BLTCON1 , which changes the meaning of some other bits in
BLTCON0  and  BLTCON1 .  In line draw mode, the blitter can draw lines up
to 1024 pixels long, it can draw them in a variety of modes, with a
variety of textures, and can even draw them in a special way for simple
 area fill .

Many of the blitter registers serve other purposes in line-drawing mode.
Consult  Appendix A  for more detailed descriptions of the use of these
registers and control bits.  You should also see Appendix C for the
 new limits  on line-drawing mode in the Enhanced Chip Set (ECS).

In line mode, the blitter draws a line from one point to another, which
can be viewed as a vector.  The direction of the vector can lie in any of
the following eight octants.  (In the following diagram, the standard
Amiga convention is used, with x increasing towards the right and y
increasing down.) The number in parenthesis is the octant numbering; the
other number represents the value that should be placed in bits 4 through
2 of  BLTCON1 .

                               |
                               |
                      \   (2)  |  (1)   /
                       \       |       /
                        \   3  |  1   /
                         \     |     /
                          \    |    /
                     (3)   \   |   /   (0)
                            \  |  /
                        7    \ | /    6
                              \|/
                  -------------*-------------
                              /|\
                        5    / | \    4
                            /  |  \
                     (4)   /   |   \   (7)
                          /    |    \
                         /     |     \
                        /   2  |  0   \
                       /       |       \
                      /   (5)  |  (6)   \
                               |
                               |

              Figure 6-8: Octants for Line Drawing


Line drawing based on octants is a simplification that takes advantage of
symmetries between x and -x, y and -y. The following Table lists the
octant number and corresponding values:


      Table 6-3:  BLTCON1  Code Bits for Octant Line Drawing


                BLTCON1  Code Bits      Octant #
               -------------------       --------
                     4  3  2
                     -  -  -
                     1  1  0               0
                     0  0  1               1
                     0  1  1               2
                     1  1  1               3
                     1  0  1               4
                     0  1  0               5
                     0  0  0               6
                     1  0  0               7


We initialize  BLTCON1  bits 4 through 2 according to the above Table.
Now, we introduce the variables dx and dy and set them to the absolute
values of the difference between the x coordinates and the y coordinates
of the endpoints of the line, respectively.

dx = abs(x2 - x1) ;
dy = abs(y2 - y1) ;

Now, we rearrange them if necessary so dx is greater than dy.

if (dx < dy)
        {
        temp = dx ;
        dx = dy ;
        dy = temp ;
        }

Alternately, set dx and dy as follows:

dx = max(abs(x2 - x1), abs(y2 - y1)) ;
dy = min(abs(x2 - x1), abs(y2 - y1)) ;

These calculations have the effect of "normalizing" our line into octant
0; since we have already informed the blitter of the real octant to use,
it has no difficulty drawing the line.

We initialize the A  pointer register  to 4 * dy - 2 * dx. If this value
is negative, we set the sign bit (SIGNFLAG in  BLTCON1 ), otherwise we
clear it.  We set the A   modulo register  to 4 * (dy - dx) and the B
 modulo register  to 4 * dy.

The A  data register  should be preloaded with $8000. Both word  masks
should be set to $FFFF. The A  shift  value should be set to the x
coordinate of the first point (x1) modulo 15.

The B  data register  should be initialized with the line texture pattern,
if any, or $FFFF for a solid line. The B  shift  value should be set to
the bit number at which to start the line texture (zero means the last
significant bit.)

The C and D  pointer registers  should be initialized to the word
containing the first pixel of the line; the C and D  modulo registers
should be set to the width of the bitplane in bytes.

The SRCA, SRCC, and DEST bits of  BLTCON0  should be set to one, and the
SRCB flag should be set to zero.  The OVFLAG should be cleared. If only a
single bit per horizontal row is desired, the ONEDOT bit of  BLTCON1
should be set; otherwise it should be cleared.

The logic function remains.  The C  DMA channel  represents the original
source, the A channel the bit to set in the line, and the B channel the
pattern to draw.  Thus, to draw a line, the function
        _
   AB + A

is the most common.  To draw the line using exclusive-or mode, so it can
be easily erased by drawing it again, the function
     _   _
   ABC + AC

can be used.

We set the blit height to the length of the line, which is dx + 1. The
width must be set to two for all line drawing.  (Of course, the  BLTSIZE
register should not be written until the very end, when all other
registers have been filled.)

 Register Summary for Line Mode
6 / Line Mode / Register Summary for Line Mode
Preliminary setup:

   The line goes from (x1,y1) to (x2,y2).

   dx = max(abs(x2 - x1), abs(y2 - y1)) ;
   dy = min(abs(x2 - x1), abs(y2 - y1)) ;

Register setup:

   BLTADAT  = $8000
   BLTBDAT  = line texture pattern ($FFFF for a solid line)

   BLTAFWM  = $FFFF
   BLTALWM  = $FFFF

   BLTAMOD  = 4 * (dy - dx)
   BLTBMOD  = 4 * dy
   BLTCMOD  = width of the bitplane in bytes
   BLTDMOD  = width of the bitplane in bytes

   BLTAPT   = (4 * dy) - (2 * dx)
   BLTBPT   = unused
   BLTCPT   = word containing the first pixel of the line
   BLTDPT   = word containing the first pixel of the line

   BLTCON0  bits 15-12 = x1 modulo 15
   BLTCON0  bits SRCA, SRCC, and SRCD = 1
   BLTCON0  bit  SRCB = 0
            If exclusive-or line mode:                  _   _
                     then BLTCON0  LF control byte  = ABC + AC
                                                           _
                     else BLTCON0  LF control byte  = AB + AC

   BLTCON1  bit  LINEMODE  = 1
   BLTCON1  bit  OVFLAG  = 0
   BLTCON1  bits 4-2 =  octant number  from table
   BLTCON1  bits 15-12 = start bit for line texture (0 = last significant
            If (((4 * dy) - (2 * dx)) < 0):                bit)
                     then  BLTCON1  bit  SIGNFLAG  = 1
                     else  BLTCON1  bit  SIGNFLAG  = 0
            If one pixel/row:
                     then  BLTCON1  bit  ONEDOT  = 1
                     else  BLTCON1  bit  ONEDOT  = 0

   BLTSIZE  bits 15-6 = dx + 1
   BLTSIZE  bits  5-0 = 2

   Warning:
   --------
   You must set the  BLTSIZE  register last as it starts the blit.
6 Blitter Hardware / Blitter Speed
The speed of the blitter depends entirely on which  DMA channels  are
enabled.  You might be using a  DMA channel  as a constant, but unless it
is enabled, it does not count against you.  The minimum blitter cycle is
four ticks; the maximum is eight ticks.  Use of the A register is always
free. Use of the B register always adds two ticks to the blitter cycle.
Use of either C or D is free, but use of both adds another two ticks.
Thus, a copy cycle, using A and D, takes four clock ticks per cycle; a
copy cycle using B and D takes six ticks per cycle, and a generalized bit
copy using B, C, and D takes eight ticks per cycle. When in  line mode ,
each pixel takes eight ticks.

The system clock speed for NTSC Amigas is 7.16 megahertz (PAL Amigas 7.09
megahertz). The clock for the blitter is the system clock.  To calculate
the total time for the blit in microseconds, excluding setup and DMA
contention, you use the equation (for NTSC):

       n * H * W
   t = ---------
         7.16

For PAL:

       n * H * W
   t = ---------
         7.09

where t is the time in microseconds, n is the number of clocks per cycle,
and H and W are the height and width (in words) of the blit, respectively.

For instance, to copy one bitplane of a 320 by 200 screen to another
bitplane, we might choose to use the A and D channels.  This would require
four ticks per blitter cycle, for a total of

   4 * 200 * 20
   ------------ = 2235 microseconds.
       7.16

These timings do not take into account blitter setup time, which is the
time required to calculate and load the blitter registers and start the
blit.  They also ignore DMA contention.
6 Blitter Hardware / Blitter Operations and System DMA
The operations of the blitter affect the performance of the rest of the
system. The following sections explain how system performance is affected
by blitter direct memory access priority, DMA time slot allocation, bus
sharing between the 680x0 and the display hardware, the operations of the
blitter and Copper, and different playfield display sizes.

The blitter performs its various data-fetch, modify, and store operations
through DMA sequences, and it shares memory access with other devices in
the system. Each device that accesses memory has a priority level assigned
to it, which indicates its importance relative to other devices.

Disk DMA, audio DMA, display DMA, and sprite DMA all have the highest
priority level.  Display DMA has  priority  over sprite DMA under certain
circumstances.  Each of these four devices is allocated a group of time
slots during each horizontal scan of the video beam. If a device does not
request one of its allocated time slots, the slot is open for other uses.
These devices are given first priority because missed DMA cycles can cause
lost data, noise in the sound output, or on-screen interruptions.

The Copper has the next priority because it has to perform its operations
at the same time during each display frame to remain synchronized with the
display beam sweeping across the screen.

The lowest priorities are assigned to the blitter and the 68000, in that
order. The blitter is given the higher priority because it performs data
copying, modifying, and line drawing operations operations much faster
than the 68000.

During a horizontal scan line (about 63 microseconds), there are 227.5
"color clocks", or memory access cycles.  A memory cycle is approximately
280 ns in duration.  The total of 227.5 cycles per horizontal line
includes both display time and non-display time.  Of this total time, 226
cycles are available to be allocated to the various devices that need
memory access.

The time-slot allocation per horizontal line is:

      4 cycles for memory refresh
      3 cycles for disk DMA
      4 cycles for audio DMA (2 bytes per channel)
     16 cycles for sprite DMA (2 words per channel)
     80 cycles for bitplane DMA (even- or odd-numbered slots
          according to the display size used)

Figure 6-9 shows one complete horizontal scan line and how the clock
cycles are allocated.


 Figure 6-9: DMA Time Slot Allocation

The 68000 uses only the even-numbered memory access cycles. The 68000
spends about half of a complete processor instruction time doing internal
operations and the other half accessing memory. Therefore, the allocation
of alternate memory cycles to the 68000 makes it appear to the 68000 that
it has the memory all of the time, and it will run at full speed.

Some 68000 instructions do not match perfectly with the allocation of even
cycles and cause cycles to be missed. If cycles are missed, the 68000 must
wait until its next available memory slot before continuing. However, most
instructions do not cause cycles to be missed, so the 68000 runs at full
speed most of the time if there is no blitter DMA interference.

Figure 6-10 illustrates the normal cycle of the 68000.

   Avoid the TAS instruction.
   --------------------------
   The 68000 test-and-set instruction (TAS) should never be used in the
   Amiga; the indivisible read-modify-write cycle that is used only in
   this instruction will not fit into a DMA memory access slot.


      |                                                       |
      |<- - - - - - - - average 68000 cycle - - - - - - - - ->|
      |                                                       |
      |                                                       |
      |                           |                           |
      |<- - - - internal  - - - ->|<- - - - - memory  - - - ->|
      |         operation         |           access          |
      |         portion           |           portion         |
      |                           |                           |
      |                           |                           |
      |        odd cycle,         |         even cycle,       |
      |        assigned to        |         available to      |
      |        other devices      |         the 68000         |
      |                           |                           |
      |                           |                           |
      |                           |                           |
      |                           |                           |

                   Figure 6-10: Normal 68000 Cycle


If the display contains four or fewer low resolution bitplanes, the 68000
can be granted alternate memory cycles (if it is ready to ask for the
cycle and is the highest priority item at the time). However, if there are
more than four bitplanes, bitplane DMA will begin to steal cycles from the
68000 during the display.

During the display time for a six bitplane display (low resolution, 320
pixels wide), 160 time slots will be taken by bitplane DMA for each
horizontal line. As you can see from Figure 6-11, bitplane DMA steals 50
percent of the open slots that the processor might have used if there were
only four bitplanes displayed.


                          - timing cycle -
      T                                                     T + 7

      +               *               +               *
   _______________________________________________________________
  |       |       |       |       |       |       |       |       |
  |       |   4   |   6   |   2   |       |   3   |   5   |   1   |
  |_______|_______|_______|_______|_______|_______|_______|_______|

       Figure 6-11: Time Slots Used by a Six Bitplane Display


If you specify four high resolution bitplanes (640 pixels wide), bitplane
DMA needs all of the available memory time slots during the display time
just to fetch the 40 data words for each line of the four bitplanes
(40 * 4 = 160 time slots).  This effectively locks out the 68000 (as well
as the blitter or Copper) from any memory access during the display,
except during horizontal and  vertical blanking .


                          - timing cycle -
      T                                                     T + 7

   _______________________________________________________________
  |       |       |       |       |       |       |       |       |
  |   4   |   2   |   3   |   1   |   4   |   2   |   3   |   1   |
  |_______|_______|_______|_______|_______|_______|_______|_______|

      Figure 6-12: Time Slots Used by a High Resolution Display


Each horizontal line in a normal, full-sized display contains 320 pixels
in low resolution mode or 640 pixels in high resolution mode.  Thus,
either 20 or 40 words will be fetched during the horizontal line display
time. If you want to  scroll a playfield , one extra data word per line must
be fetched from the memory.

 Display size  is adjustable (see Chapter 3, "Playfield Hardware"), and

 Figure 6-9
larger displays may block out one or more of the highest-numbered sprites,
especially with scrolling.

As mentioned above, the blitter normally has a higher priority than the
processor for DMA cycles.  There are certain cases, however, when the
blitter and the 68000 can share memory cycles. If given the chance, the
blitter would steal every available Chip memory cycle. Display, disk, and
audio DMA take precedence over the blitter, so it cannot block them from
bus access.  Depending on the setting of the blitter DMA mode bit,
commonly referred to as the "blitter-nasty" bit, the processor may be
blocked from bus access.  This bit is called DMAF_BLITHOG (bit 10) and is
in register  DMACON .

If DMAF_BLITHOG is a 1, the blitter will keep the bus for every available
Chip memory cycle.  This could potentially be every cycle (ROM and Fast
memory are not typically Chip memory cycles).

If DMAF_BLITHOG is a 0, the DMA manager will monitor the 68000 cycle
requests.  If the 68000 is unsatisfied for three consecutive memory
cycles, the blitter will release the bus for one cycle.
6 Blitter Hardware / Blitter Block Diagram
Figure 6-13 shows the basic building blocks for a single bit of a 16-bit
wide operation of the blitter. It does not cover the line-drawing
hardware.
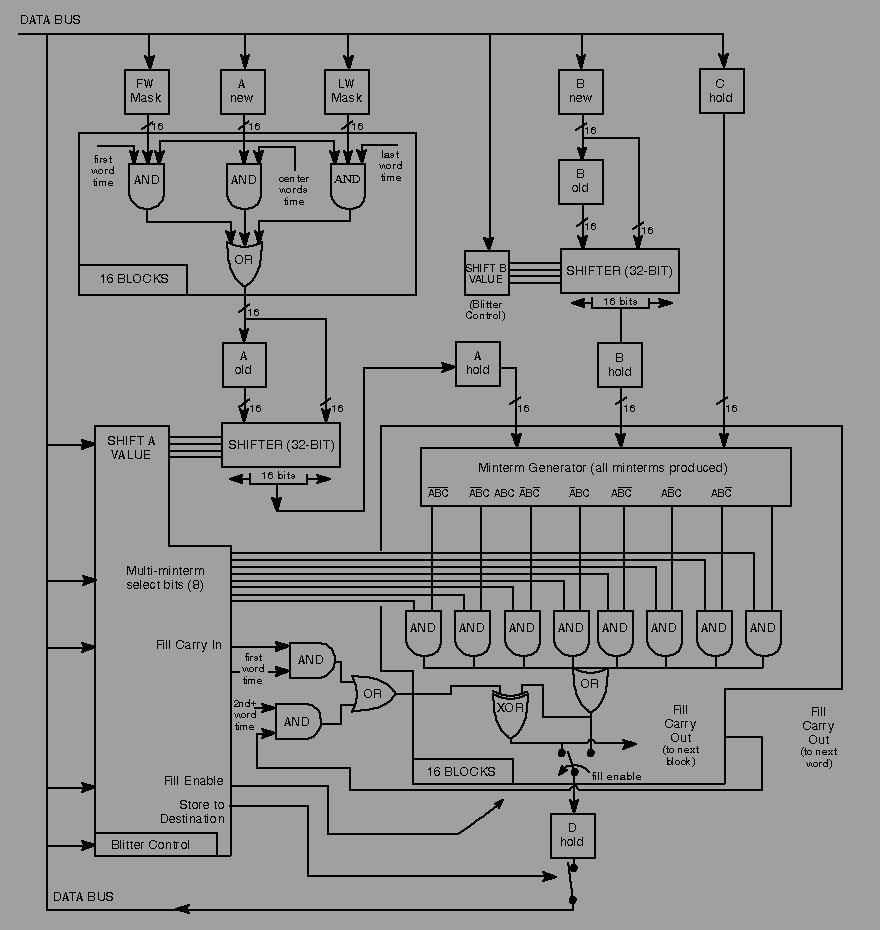
Figure 6-13: Blitter Block Diagram
* The upper left corner shows how the first-- and last-- word masks are
applied to the incoming A-source data. When the blit shrinks to one
word wide, both masks are applied.
* The shifter (upper right and center left) drawing illustrates how 16
bits of data is taken from a specified position within a 32-bit
register, based on the A shift or B shift values shown in BLTCON0
and BLTCON1 .
* The minterm generator (center right) illustrates how the minterm
select bits either allow or inhibit the use of a specific minterm .
* The drawing shows how the fill operation works on the data generated
by the minterm combinations. Fill operations can be performed
simultaneously with other complex logic operations.
* At the bottom, the drawing shows that data generated for the
destination can be prevented from being written to a destination by
using one of the blitter control bits.
* Not shown on this diagram is the logic for zero detection, which
looks at every bit generated for the destination. If there are any
1-bits generated, this logic indicates that the area of the blit
contained at least one 1-bit (zero detect is false.)
6 Blitter Hardware / Blitter Key Points
This is a list of some key points that should be remembered when
programming the blitter.

*  Write  BLTSIZE  last; writing this register starts the blit.

*  Modulos and pointers are in bytes; width is in words and height is in
   pixels.  The least significant bit of all pointers and modulos is
   ignored.

*  The order of operations in the blitter is  masking ,  shifting , logical
   combination of sources,  area fill , and  zero flag  setting.

*  In ascending mode, the blitter increments the pointers, adds the
   modulos, and  shifts  to the right.

*  In  descending mode , the blitter decrements the pointers, subtracts
   the modulos, and shifts to the left.

*   Area fill  only works correctly in  descending mode .

*  Check  BLTDONE  before writing blitter registers or using the results
   of a blit.

*   Shifts  are done on immediate data as soon as it is loaded.


    ECS blitter .
   -------------
   For information relating to the blitter hardware in the Enhanced Chip
   Set, see  Appendix C .


 Example:  Clearmem
 Example:  Simpleline
 Example:  Rotatebits
Converted on 22 Apr 2000 with RexxDoesAmigaGuide2HTML 2.1 by Michael Ranner.