Figure 1-1: Block Diagram for the Amiga Computer Family
The Amiga family of computers consists of several models, each of which
has been designed on the same premise -- to provide the user with a
low-cost computer that features high-cost performance.  The Amiga does
this through the use of custom silicon hardware that yields advanced
graphics and sound features.

There are four basic models that make up the Amiga computer family: the
A500, A1000, A2000, and A3000.  Though the models differ in price and
features, they have a common hardware nucleus that makes them software
compatible with one another.  This chapter describes the Amiga's hardware
components and gives a brief overview of its graphics and sound features.

 Components of the Amiga          Applications & Technical Support (CATS)
 About the Examples               Error Reports
 General Development Guidelines
These are the hardware components of the Amiga:

*  Motorola MC68000 16/32-bit main processor.  The Amiga also supports the
   68010, 68020, and 68030 processors as an option. The A1000, A500 and
   A2000 contain the 68000, while the A3000 utilizes the 68030 processor.

*  Custom graphics and audio chips with DMA capability.  All Amiga models
   are equipped with three custom chips named Paula, Agnus, and Denise
   which provide for superior color graphics, digital audio, and
   high-performance interrupt and I/O handling.  The custom chips can
   access up to 2MB of memory directly without using the 68000 CPU.

*  From 256K to 2 MB of RAM expandable to a total of 8 MB (over a gigabyte
   on the Amiga 3000).

*  512K of system ROM containing a real time, multitasking operating
   system with sound, graphics, and animation support routines. (V1.3 and
   earlier versions of the OS used 256K of system ROM.)

*  Built-in 3.5 inch double sided disk drive with expansion floppy disk
   ports for connecting up to three additional disk drives (either 3.5
   inch or 5.25 inch, double sided).

*  SCSI disk port for connecting additional SCSI disk drives (A3000 Only).

*  Fully programmable parallel and RS-232-C serial ports.

*  Two button opto-mechanical mouse and two reconfigurable controller
   ports (for mice, joysticks, light pens, paddles, or custom
   controllers).

*  A professional keyboard with numeric keypad, 10 function keys, and
   cursor keys.  A variety of international keyboards are also supported.

*  Ports for analog or digital RGB output (all models), monochrome video
   (A500 and A2000), composite video (A1000), and VGA-style multiscan
   video (A3000).

*  Ports for left and right stereo audio from four special purpose audio
   channels.

*  Expansion options that allow you to add RAM, additional disk drives
   (floppy or hard), peripherals, or coprocessors.


 The MC68000 and the Amiga Custom Chips
 Amiga Memory System
 Peripherals
 System Expandability and Adaptability
 VCR and Direct Camera Interface
 Amiga System Block Diagram
The Motorola MC68000 microprocessor is the CPU used in the A1000, the
A500, and the A2000.  The 68000 is a 16/32-bit microprocessor; internal
registers are 32 bits wide, while the data bus and ALU are 16 bits.  The
68000's system clock speed is 7.15909 MHz on NTSC systems (USA) or 7.09379
MHz on PAL systems (Europe).  These speeds can vary when using an external
system clock, such as from a genlock board.

The 68000 has an address space of 16 megabytes.  In the Amiga, the 68000
can address up to 9 megabytes of random access memory (RAM).

In the A3000, the Motorola MC68030 microprocessor is the CPU.  This is a
full 32-bit microprocessor with a system clock speed of 16 or 25
megahertz. The 68030 has an address space of 4 gigabytes.  In the A3000,
over a gigabyte of RAM can be addressed.

In addition to the 680x0, all Amiga models contain special purpose
hardware known as the custom chips that greatly enhance system
performance. The term custom chips refers to the three integrated circuits
which were designed specifically for the Amiga computer.  These three
custom chips, named Paula, Agnus, and Denise, each contain the logic to
handle a specific set of tasks such as video, audio, or I/O.

Because the custom chips have DMA capability, they can access memory
without using the 680x0 CPU - this frees the CPU for other types of
operations. The division of labor between the custom chips and the 680x0
gives the Amiga its power; on most other systems the CPU has to do
everything.

The memory shared between the Amiga's CPU and the custom chips is called
Chip memory.  The more Chip memory the Amiga has, the more graphics,
audio, and I/O data it can operate on without the CPU being involved. All
Amigas can access at least 512K of Chip memory.

The latest version of the custom chips, known as the Enhanced Chip Set or
ECS, can handle up to 2 MB of memory and has other advanced features.  For
more details about the Enhanced Chip Set, refer to  Appendix C
Hard_C/MAIN}.

Although there are different versions of the Amiga's custom chips, all
versions have some common features.  Among other functions, the custom
chips provide the following:

*  Bitplane generated, high resolution graphics capable of supporting both
   PAL and NTSC video standards.

      NTSC systems.
      -------------
      On NTSC systems, the Amiga typically produces a 320 by 200
      non-interlaced or 320 by 400 interlaced display in 32 colors. A
      high resolution mode provides a 640 by 200 non-interlaced or 640
      by 400 interlaced display in 16 colors.

      PAL systems.
      ------------
      On PAL systems, the Amiga typically produces a 320 by 256
      non-interlaced or 320 by 512 interlaced display in 32 colors.
      High resolution mode provides a 640 by 256 non-interlaced or 640
      by 512 interlaced display in 16 colors.

   The design of the Amiga's display system is very flexible and there are
   many other modes available.  Hold-and-modify (HAM) mode allows for the
   display of up to 4,096 colors on screen simultaneously.  Overscan mode
   allows the creation of higher resolution displays specially suited for
   video and film applications.  Displays of arbitrary size, larger than
   the visible viewing area can be created.  Amigas which contain the
   Enhanced Chip Set (ECS) support Productivity mode giving displays of
   640 by 480, non-interlaced with 4 colors from a pallette of 64.

*  A custom graphics coprocessor, called the Copper, that allows changes
   to most of the special purpose registers in synchronization with the
   position of the video beam.  This allows such special effects as
   mid-screen changes to the color palette, splitting the screen into
   multiple horizontal slices each having different video resolutions and
   color depths, beam-synchronized interrupt generation for the 680x0, and
   more. The coprocessor can trigger many times per screen, in the middle
   of lines, and at the beginning or during the blanking interval. The
   coprocessor itself can directly affect most of the registers in the
   other custom chips, freeing the 680x0 for general computing tasks.

*  32 system color registers, each of which contains a 12-bit number as
   four bits of red, four bits of green, and four bits of blue intensity
   information.  This allows a system color palette of 4,096 different
   choices of color for each register.

*  Eight reusable 16-bit wide sprites with up to 15 color choices per
   sprite pixel (when sprites are paired).  A sprite is an easily movable
   graphics object whose display is entirely independent of the background
   (called a playfield); sprites can be displayed over or under this
   background.  A sprite is 16 low resolution pixels wide and an arbitrary
   number of lines tall. After producing the last line of a sprite on the
   screen, a sprite DMA channel may be used to produce yet another sprite
   image elsewhere on screen (with at least one horizontal line between
   each reuse of a sprite processor). Thus, many small sprites can be
   produced by simply reusing the sprite processors appropriately.

*  Dynamically controllable inter-object priority, with collision
   detection. This means that the system can dynamically control the video
   priority between the sprite objects and the bitplane backgrounds
   (playfields). You can control which object or objects appear over or
   under the background at any time.  Additionally, you can use system
   hardware to detect collisions between objects and have your program
   react to such collisions.

*  Custom bit blitter used for high speed data movement, adaptable to
   bitplane animation.  The blitter has been designed to efficiently
   retrieve data from up to three sources, combine the data in one of 256
   different possible ways, and optionally store the combined data in a
   destination area. The bit blitter, in a special mode, draws patterned
   lines into rectangularly organized memory regions at a speed of about 1
   million dots per second; and it can efficiently handle area fill.

*  Audio consisting of four digital channels with independently
   programmable volume and sampling rate.  The audio channels retrieve
   their control and sample data via DMA.  Once started, each channel can
   automatically play a specified waveform without further processor
   interaction.  Two channels are directed into each of the two stereo
   audio outputs.  The audio channels may be linked together to provide
   amplitude or frequency modulation or both forms of modulation
   simultaneously.

*  DMA controlled floppy disk read and write on a full track basis.  This
   means that the built-in disk can read over 5600 bytes of data in a
   single disk revolution (11 sectors of 512 bytes each).
As mentioned previously, the custom chips have DMA access to RAM which
allows them to perform graphics, audio, and I/O chores independently of
the CPU.  This shared memory that both the custom chips and the CPU can
access directly is called Chip memory.

The custom chips and the 680x0 CPU share Chip memory on a fully
interleaved basis.  Since the 680x0 only needs to access the Chip memory
bus during each alternate clock cycle in order to run full speed, the rest
of the time the Chip memory bus is free for other activities.  The custom
chips use the memory bus during these free cycles, effectively allowing
the CPU to run at full speed most of the time.

There are some occasions though when the custom chips steal memory cycles
from the 680x0.  In the higher resolution video modes, some or all of the
cycles normally used for processor access are needed by the custom chips
for video refresh.  In that case, the Copper and the blitter in the custom
chips steal time from the 680x0 for jobs they can do better than the
680x0.  Thus, the system DMA channels are designed with maximum
performance in mind.

Even when such cycle stealing occurs, it only blocks the 680x0's access to
the internal, shared memory.  When using ROM or external memory, also
known as Fast memory, the 680x0 always runs at full speed.

The DMA capabilities of the custom chips vary depending on the version of
the chips and the Amiga model.  The original custom chip set found in the
A1000 could access the first 512K of RAM.  Most A1000s have only 512K of
RAM so some of the Chip RAM is used up for operating system overhead.

A later version of the custom chips found in early A500s and A2000s
replaced the original Agnus chip (8361) with a newer version called Fat
Agnus (8370/8371).  The Fat Agnus chip has DMA access to 512K of Chip
memory, just like the original Agnus, but also allows an additional 512K
of internal slow memory or pseudo-fast memory located at ($00C0 0000).
Since the slow memory can be used for operating system overhead, this
allows all 512K of Chip memory to be used by the custom chips.

The name slow memory comes from the fact that bus contention with the
custom chips can still occur even though only the CPU can access the
memory.  Since slow memory is arbitrated by the same gate that controls
Chip memory, the custom chips can block processor access to slow memory in
the higher resolution video modes.

The latest version of Agnus and the custom chips found in most A500s and
A2000s is known as the Enhanced Chip Set or ECS.  ECS Fat Agnus (8372A)
can access up to one megabyte of Chip memory.  It is pin compatible with
the original Fat Agnus (8370/8371) found in earlier A500 and A2000 models.
In addition, ECS Fat Agnus supports both the NTSC and PAL video standards
on a single chip.

In the A3000, the Enhanced Chip Set can access up to two megabytes of Chip
memory.

The amount of Chip memory is important since it determines how much
graphics, audio, and disk data the custom chips can operate on without the
680x0 CPU. Table 1-1 summarizes the basic memory configurations of the
Amiga.


                  Chip RAM     Maximum    Total RAM     Maximum
                (base model)   Chip RAM  (base model)  Total RAM
                ------------   --------  ------------  ---------
     Amiga 1000     256K        512K        256K          9 MB
     Amiga  500     512K        1 MB        1 MB          9 MB
     Amiga 2000     512K        1 MB        1 MB          9 MB
     Amiga 3000     1 MB        2 MB        2 MB     over 1 GB


                Table 1-1: Summary of Amiga Memory Configurations


Another primary feature of the Amiga hardware is the ability to
dynamically control which part of the Chip memory is used for the
background display, audio, and sprites.  The Amiga is not limited to a
small, specific area of RAM for a frame buffer.  Instead, the system
allows display bitplanes, sprite processor control lists, coprocessor
instruction lists, or audio channel control lists to be located anywhere
within Chip memory.

This same region of memory can be accessed by the bit blitter.  This
means, for example, that the user can store partial images at scattered
areas of Chip memory and use these images for animation effects by rapidly
replacing on screen material while saving and restoring background images.
In fact, the Amiga includes firmware support for display definition and
control as well as support for animated objects embedded within playfields.
Floppy disk storage is provided by a built-in, 3.5 inch floppy disk drive.
Disks are 80 track, double sided, and formatted as 11 sectors per track,
512 bytes per sector (over 900,000 bytes per disk).  The disk controller
can read and write 320/360K IBM PC(TM) (MS-DOS(TM)) formatted 3.5 or 5.25
inch disks, and 640/720K IBM PC (MS-DOS) formatted 3.5 inch disks.

Up to three extra 3.5 inch or 5.25 inch disk drives can be added to the
Amiga.  The A2000 and A3000 also provide room to mount floppy or hard
disks internally.  The A3000 has a built-in hard disk drive and an
on-board SCSI controller which can handle two internal drives and up to
seven external SCSI devices.

The Amiga has a full complement of dedicated I/O connectors.  The
circuitry for some of these peripherals resides on the Paula custom chip
while the Amiga's two 8520 CIA chips handle other I/O chores not
specifically assigned to any of the custom chips.  These include modem
control, disk status sensing, disk motor and stepping control, ROM enable,
parallel input/output interface, and keyboard interface.

The Amiga includes a standard RS-232-C serial port for external serial
input/output devices such as a modem, MIDI interface, or printer. A
programmable, Centronics-compatible parallel port supports parallel
printers, audio digitizers, and other peripherals.

The Amiga also includes a two-button, opto-mechanical mouse plus a
keyboard with numeric keypad, cursor controls, and 10 function keys in the
base system. A variety of international keyboards are supported.  Many
other input options are available.  Other types of controllers can be
attached through the two controller ports on the base unit including
joysticks, keypads, trackballs, light pens, and graphics tablets.
New peripheral devices may be easily added to all Amiga models. These
devices are automatically recognized and used by system software through a
well defined, well documented linking procedure called AUTOCONFIG(TM).
AUTOCONFIG is short for automatic configuration and is the process which
allows memory or I/O space for an expansion board to be dynamically
allocated by the system at boot time.  Unlike some other systems, there is
no need to set DIP switches to select an address space from a fixed range
reserved for expansion devices.

On the A500 and A1000 models, peripheral devices can be added using the
Amiga's 86-pin expansion connector.  Peripherals that can be added include
hard disk controllers and drives, or additional external RAM.  Extra
floppy disk units may be added from a connector at the rear of the unit.

The A2000 and A3000 models provide the user with the same features as the
A500 or A1000, but with the added convenience of simple and extensive
expandability through the Amiga's 100-pin Zorro expansion bus.

The A2000 contains 7 internal slots and the A3000 contains 4 internal
slots plus a SCSI disk controller that allow many types of expansion
devices to be quickly and easily added inside the machine. Available
options include RAM boards, coprocessors, hard disk controllers, video
cards, and I/O ports.

The A2000 and A3000 also support the special Bridgeboard(TM) coprocessor
card.  This provides a complete IBM PC(TM) on a card and allows the Amiga
to run MS-DOS(TM) compatible software, while simultaneously running native
Amiga software.  In addition, both machines have expansion slots capable
of supporting standard, IBM PC(TM) style boards.
In addition to the connectors for monochrome composite, and analog or
digital RGB monitors, the Amiga can be expanded to include a VCR or camera
interface. The system is capable of synchronizing with an external video
source and replacing the system background color with the external image.
This allows development of fully integrated video images with computer
generated graphics. Laser disk input is accepted in the same manner.

The A2000 and A3000 models also provide a special internal slot designed
for video applications.  This allows the Amiga to use low-cost video
expansion boards such as genlocks and frame-grabbers.
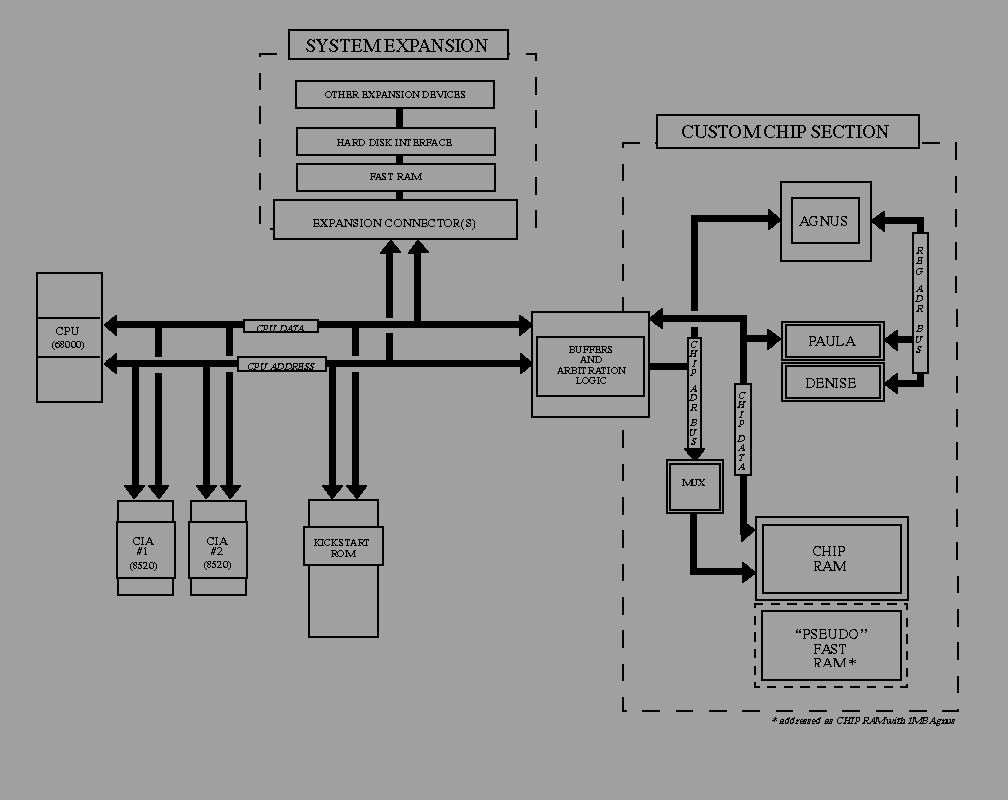
The diagram below highlights the major hardware components of the Amiga's
architecture.  Notice that there are two separate buses, one that only the
CPU can access (Fast memory) and another one that the custom chips share
with the CPU (Chip memory).


 Figure 1-1: Block Diagram for the Amiga Computer Family
The examples in this book all demonstrate direct manipulation of the Amiga
hardware.  However, as a general rule, it is not permissible to directly
access the hardware in the Amiga unless your software either has full
control of the system, or has arbitrated via the OS for exclusive access
to the particular parts of the hardware you wish to control.

Almost all of the hardware discussed in this manual, most notably the
Blitter, Copper, playfield, sprite, CIA, trackdisk, and system control
hardware, are in either exclusive or arbitrated use by portions of the
Amiga OS in any running Amiga system.  Additional hardware, such as the
audio, parallel, and serial hardware, may be in use by applications which
have allocated their use through the system software.

Before attempting to directly manipulate any part of the hardware in the
Amiga's multitasking environment, your application must first be granted
exclusive access to that hardware by the operating system library, device,
or resource which arbitrates its ownership.  The operating system
functions for requesting and receiving control of parts of the Amiga
hardware are varied and are not within the scope of this manual.
Generally such functions, when available, will be found in the library,
device, or resource which manages that portion of the Amiga hardware in
the multitasking environment.  The following list will help you to find
the appropriate operating system functions or mechanisms which may exist
for arbitrated access to the hardware discussed in this manual.


   Hardware component            Amiga system module that controls it
   ------------------            ------------------------------------
   Copper, Playfield, Sprite, Blitter................graphics.library
   Audio.................................................audio.device
   Trackdisk..........................trackdisk.device, disk.resource
   Serial................................serial.device, misc.resource
   Parallel..............parallel.device, cia.resource, misc.resource
   Gameport.............input.device, gameport.device, potgo.resource
   Keyboard.............................input.device, keyboard.device
   System Control.........graphics.library, exec.library (interrupts)


Most of the examples in this book use the hw_examples.i file (see
 Appendix I ) to define the chip register names.  Hw_examples.i
uses the system include file hardware/custom.i to define the chip
structures and relative addresses. The values defined in hardware/custom.i
and hw_examples.i are offsets from the base of the chip register address
space. In general, this base value is defined as _custom and is resolved
during linking with the linker library amiga.lib.  (_ciaa and _ciab are
also resolved in this way.)

Normally, the base address is loaded into an address register and the
offsets given by hardware/custom.i and hw_examples.i are then used to
access the correct register.  (One exception to this rule is the Copper
which uses only the offset access the registers.)

For example, in assembler:


        INCLUDE "exec/types.i"
        INCLUDE "hardware/custom.i"

        XREF    _custom                 ; External reference...

Start:  lea     _custom,a0              ; Use a0 as base register and
        move.w  #$7FFF,intena(a0)       ; use the name intena as an offset
                                        ; to disable all interrupts


In C, you would use the structure definitions in hardware/custom.h For
example:


  #include        "exec/types.h"
  #include        "hardware/custom.h"

  extern  struct  Custom  custom;

  /* You may need to define the above external as
  **  extern struct Custom far custom;
  **  Check you compiler manual.
  */

  main()
  {
      custom.intena = 0x7FFF;         /* Disable all interrupts */
  }


The Amiga hardware include files are generally supplied with your compiler
or assembler.  Listings of the hardware include files may also be found in
the Amiga ROM Kernel Manual: Includes and Autodocs. Generally, the include
file label names are very similar to the equivalent hardware register list
names with the following typical differences.

*  Address registers which have low word and high word components are
   generally listed as two word sized registers in the hardware register
   list, with each register name containing either a suffix or embedded
   "L" or "H" for low and high.  The include file label for the same
   register will generally treat the whole register as a longword (32 bit)
   register, and therefore will not contain the "L" or "H" distinction.

*  Related sequential registers which are given individual names with
   number suffixes in the hardware register list, are generally referenced
   from a single base register definition in the include files.  For
   example, the color registers in the hardware list (COLOR00, COLOR01,
   etc.) would be referenced from the "color" label defined in
   hardware/custom.i (color+0, color+2, etc.).

*  Examples of how to define the correct register offset can be found in
   the hw_examples.i file listed in  Appendix I .

Except as noted, 68000 assembly language examples have been assembled
under the Innovatronics CAPE assembler V2.x, the HiSoft Devpac assembler
V1.2, and the Lake Forest Logic ADAPT assembler 1.0.  No substantial
changes should be required to switch between assemblers.
The Amiga is available in a variety of models and configurations, and is
further diversified by a wealth of add-on expansion peripherals and
processor replacements.  In addition, even standard Amiga hardware such as
the keyboard and floppy disks, are supplied by a number of different
manufacturers and may vary subtly in both their timing and in their
ability to perform outside of their specified capabilities.

The Amiga operating system is designed to operate the Amiga hardware
within spec, adapt to different hardware and RAM configurations, and
generally provide upward compatibility with any future hardware upgrades
or "add ons" envisioned by the designers. For maximum upward
compatibility, it is strongly suggested that programmers deal with the
hardware through the commands and functions provided by the Amiga
operating system.

If you find it necessary to program the hardware directly, then it is your
responsibility to write code which will work properly on various models and
configurations.  Be sure to properly request and gain control of the
hardware you are manipulating, and be especially careful in the following
areas:

*  The environment of the Amiga computer is quite different than that of
   many other systems.  The Amiga is a multitasking platform, which
   means multiple programs can run on a single machine simultaneously.
   However, for multitasking to work correctly, care must be taken to
   ensure that programs do not interfere with one another.  It also
   means that certain guidelines must be followed during programming.

*  Remember that memory, peripheral configurations, and ROMs differ
   between models and between individual systems.  Do not make
   assumptions about memory address ranges, storage device names, or the
   locations of system structures or code.  Never call ROM routines
   directly.  Beware of any example code you find that calls routines at
   addresses in the $F0 0000 - $FF FFFF range.  These are ROM routines
   and they will move with every OS release.  The only supported
   interface to system ROM code is through the library, device, and
   resource calls.

*  Never assume library bases or structures will exist at any particular
   memory location.  The only absolute address in the system is $0000
   0004, which contains a pointer to the exec.library base. Do not modify
   or depend on the format of private system structures. This includes the
   poking of copper lists, memory lists, and library bases.

*  Never assume that programs can access hardware resources directly. Most
   hardware is controlled by system software that will not respond well to
   interference from other programs.  Shared hardware requires programs to
   use the proper sharing protocols.  Use the defined interface; it is the
   best way to ensure that your software will continue to operate on
   future models of the Amiga.

*  Never access shared data structures directly without the proper mutual
   exclusion (locking).  Remember that other tasks may be accessing the
   same structures.

*  All data for the custom chips must reside in Chip memory (type
   MEMF_CHIP).  This includes bitplanes, sound samples, trackdisk buffers,
   and images for sprites, bobs, pointers, and gadgets.  The AllocMem()
   call takes a flag for specifying the type of memory. A program that
   specifies the wrong type of memory may appear to run correctly because
   many Amigas have only Chip memory.  (On all models of the Amiga, the
   first 512K of memory is Chip memory and in some later models, Chip
   memory may occupy the first one or two megabytes).

   However, once expansion memory has been added to an Amiga (type
   MEMF_FAST), any memory allocations will be made in the expansion memory
   area by default.  Hence, a program can run correctly on an unexpanded
   Amiga which has only Chip memory while crashing on an Amiga which has
   expanded memory.  A developer with only Chip memory may fail to notice
   that memory was incorrectly specified.

   Most compilers have options to mark specific data structures or object
   modules so that they will load into Chip RAM.  Some older compilers
   provide the Atom utility for marking object modules.  If this method is
   unacceptable, use the AllocMem() call to dynamically allocate Chip
   memory, and copy your data there.

   When making allocations that do not require Chip memory, do not
   explicitly ask for Fast memory.  Instead ask for memory type
   MEMF_PUBLIC or 0L as appropriate.  If Fast memory is available, you
   will get it.

*  Never use software delay loops!  Under the multitasking operating
   system, the time spent in a loop can be better used by other tasks.
   Even ignoring the effect it has on multitasking, timing loops are
   inaccurate and will wait different amounts of time depending on the
   specific model of Amiga computer.  The timer.device provides
   precision timing for use under the multitasking system and it works
   the same on all models of the Amiga.  The AmigaDOS Delay() function
   or the graphics.library/WaitTOF() function provide a simple interface
   for longer delays.  The 8520 I/O chips provide timers for developers
   who are bypassing the operating system (see the Amiga Hardware
   Reference Manual for more information).


 68010/020/030/040 Compatibility
 Hardware Programming Guidelines
 Additional Assembler Guidelines
Special care must be taken to be compatible with the entire family of 68000 processors: * Do not use the upper 8 bits of a pointer for storing unrelated information. The 68020, 68030, and 68040 use all 32 bits for addressing. * Do not use signed variables or signed math for addresses. * Do not use software delay loops, and do not make assumptions about the order in which asynchronous tasks will finish. * The stack frame used for exceptions is different on each member of the 68000 family. The type identification in the frame must be checked! In addition, the interrupt autovectors may reside in a different location on processors with a VBR register. * Do not use the MOVE SR,instruction! This 68000 instruction acts differently on other members of the 68000 family. If you want to get a copy of the processor condition codes, use the exec.library/GetCC() function. * Do not use the CLR instruction on a hardware register which is triggered by Write access. The 68020 CLR instruction does a single Write access. The 68000 CLR instruction does a Read access first, then a Write access. This can cause a hardware register to be triggered twice. Use MOVE.x #0, instead. * Self-modifying code is strongly discouraged. All 68000 family processors have a pre-fetch feature. This means the CPU loads instructions ahead of the current program counter. Hence, if your code modifies or decrypts itself just ahead of the program counter, the pre-fetched instructions may not match the modified instructions. The more advanced processors prefetch more words. If self-modifying code must be used, flushing the cache is the safest way to prevent troubles. * The 68020, 68030, and 68040 processors all have instruction caches. These caches store recently used instructions, but do not monitor writes. After modifying or directly loading instructions, the cache must be flushed. See the exec.library/CacheClearU() Autodoc for more details. If your code takes over the machine, flushing the cache will be trickier. You can account for the current processors, and hope the same techniques will work in the future: CACRF_ClearI EQU $0008 ;Bit for clear instruction cache ; ;Supervisor mode only. Use only if you have taken ;over the machine. Read and store the ExecBase ;processor AttnFlags flags at boot time, call this ;code only if the "68020 or better" bit was set. ; ClearICache: dc.w $4E7A,$0002 ;MOVEC CACR,D0 tst.w d0 ;movec does not affect CC's bmi.s cic_040 ;A 68040 with enabled cache! ori.w #CACRF_ClearI,d0 dc.w $4E7B,$0002 ;MOVEC D0,CACR bra.s cic_exit cic_040: dc.w $f4b8 ;CPUSHA (IC) cic_exit:
*  If you find it necessary to program the hardware directly, then it is
   your responsibility to write code that will work correctly on the
   various models and configurations of the Amiga.  Be sure to properly
   request and gain control of the hardware resources you are
   manipulating, and be especially careful in the following areas:

*  Kickstart 2.0 uses the 8520 Complex Interface Adaptor (CIA) chips
   differently than 1.3 did.  To ensure compatibility, you must always
   ask for CIA access using the cia.resource/AddICRVector() and
   RemICRVector() functions.  Do not make assumptions about what the
   system might be using the CIA chips for.  If you write directly to
   the CIA chip registers, do not expect system services such as the
   trackdisk.device to function.  If you are leaving the system up, do
   not read or write to the CIA Interrupt Control Registers directly;
   use the cia.resource/AbleICR(), and SetICR() functions.  Even if you
   are taking over the machine, do not assume the initial contents of
   any of the CIA registers or the state of any enabled interrupts.

*  All custom chip registers are Read-only or Write-only.  Do not read
   Write-only registers, and do not write to Read-only registers.

*  Never write data to, or interpret data from the unused bits or
   addresses in the custom chip space.  To be software-compatible with
   future chip revisions, all undefined bits must be set to zeros on
   writes, and must be masked out on reads before interpreting the
   contents of the register.

*  Never write past the current end of custom chip space.  Custom chips
   may be extended or enhanced to provide additional registers, or to
   use bits that are currently undefined in existing registers.

*  Never read, write, or use any currently undefined address ranges or
   registers.  The current and future usage of such areas is reserved by
   Commodore and is subject to change.

*  Never assume that a hardware register will be initialized to any
   particular value.  Different versions of the OS may leave registers set
   to different values.  Check the Amiga Hardware Reference Manual to
   ensure that you are setting up all the registers that affect your code.
If you are writing in assembly language there are some extra rules to keep
in mind in addition to those listed above.

*  Never use the TAS instruction on the Amiga.  System DMA can conflict
   with this instruction's special indivisible read-modify-write cycle.

*  System functions must be called with register A6 containing the library
   or device base.  Libraries and devices assume A6 is valid at the time
   of any function call.  Even if a particular function does not currently
   require its base register, you must provide it for compatibility with
   future system software releases.

*  Except as noted, system library functions use registers D0, D1, A0, and
   A1 as scratch registers and you must consider their former contents to
   be lost after a system library call.  The contents of all other
   registers will be preserved.  System functions that provide a result
   will return the result in D0.

*  Never depend on processor condition codes after a system call. The
   caller must test the returned value before acting on a condition code.
   This is usually done with a TST or MOVE instruction.

*  If you are programming at the hardware level, you must follow hardware
   interfacing specifications.  All hardware is not the same.  Do not
   assume that low level hacks for speed or copy protection will work on
   all drives, or all keyboards, or all systems, or future systems.  Test
   your software on many different systems, with different processors, OS,
   hardware, and RAM configurations.
Commodore maintains a technical support group dedicated to helping
developers achieve their goals with the Amiga.  Currently, technical
support programs are available to meet the needs of both smaller,
independent software developers and larger corporations. Subscriptions to
Commodore's technical support publication, Amiga Mail, is available to
anyone with an interest in the latest news, Commodore software and
hardware changes, and tips for developers.

To request an application for Commodore's developer support program, or a
list of CATS technical publications send a self-addressed, stamped, 9" x
12" envelope to:


          CATS-Information
          1200 West Wilson Drive
          West Chester, PA  19380-4231
In a complex technical manual, errors are often found after publication.
When errors in this manual are found, they will be corrected in a
subsequent printing.  Updates will be published in Amiga Mail, Commodore's
technical support publication.

Bug reports can be sent to Commodore electronically or by mail.  Submitted
reports must be clear, complete, and concise.  Reports must include a
telephone number and enough information so that the bug can be quickly
verified from your report (i.e., please describe the bug and the steps
that produced it).


          Amiga Software Engineering Group
          ATTN: BUG REPORTS
          Commodore Business Machines
          1200 Wilson Drive
          West Chester, PA  19380-4231
          USA


          BIX: amiga.com/bug.reports      (Commercial developers)
               amiga.cert/bug.reports     (Certified developers)
               amiga.dev/bugs             (Others)


               USENET: bugs@commodore.COM  or  uunet!cbmvax!bugs